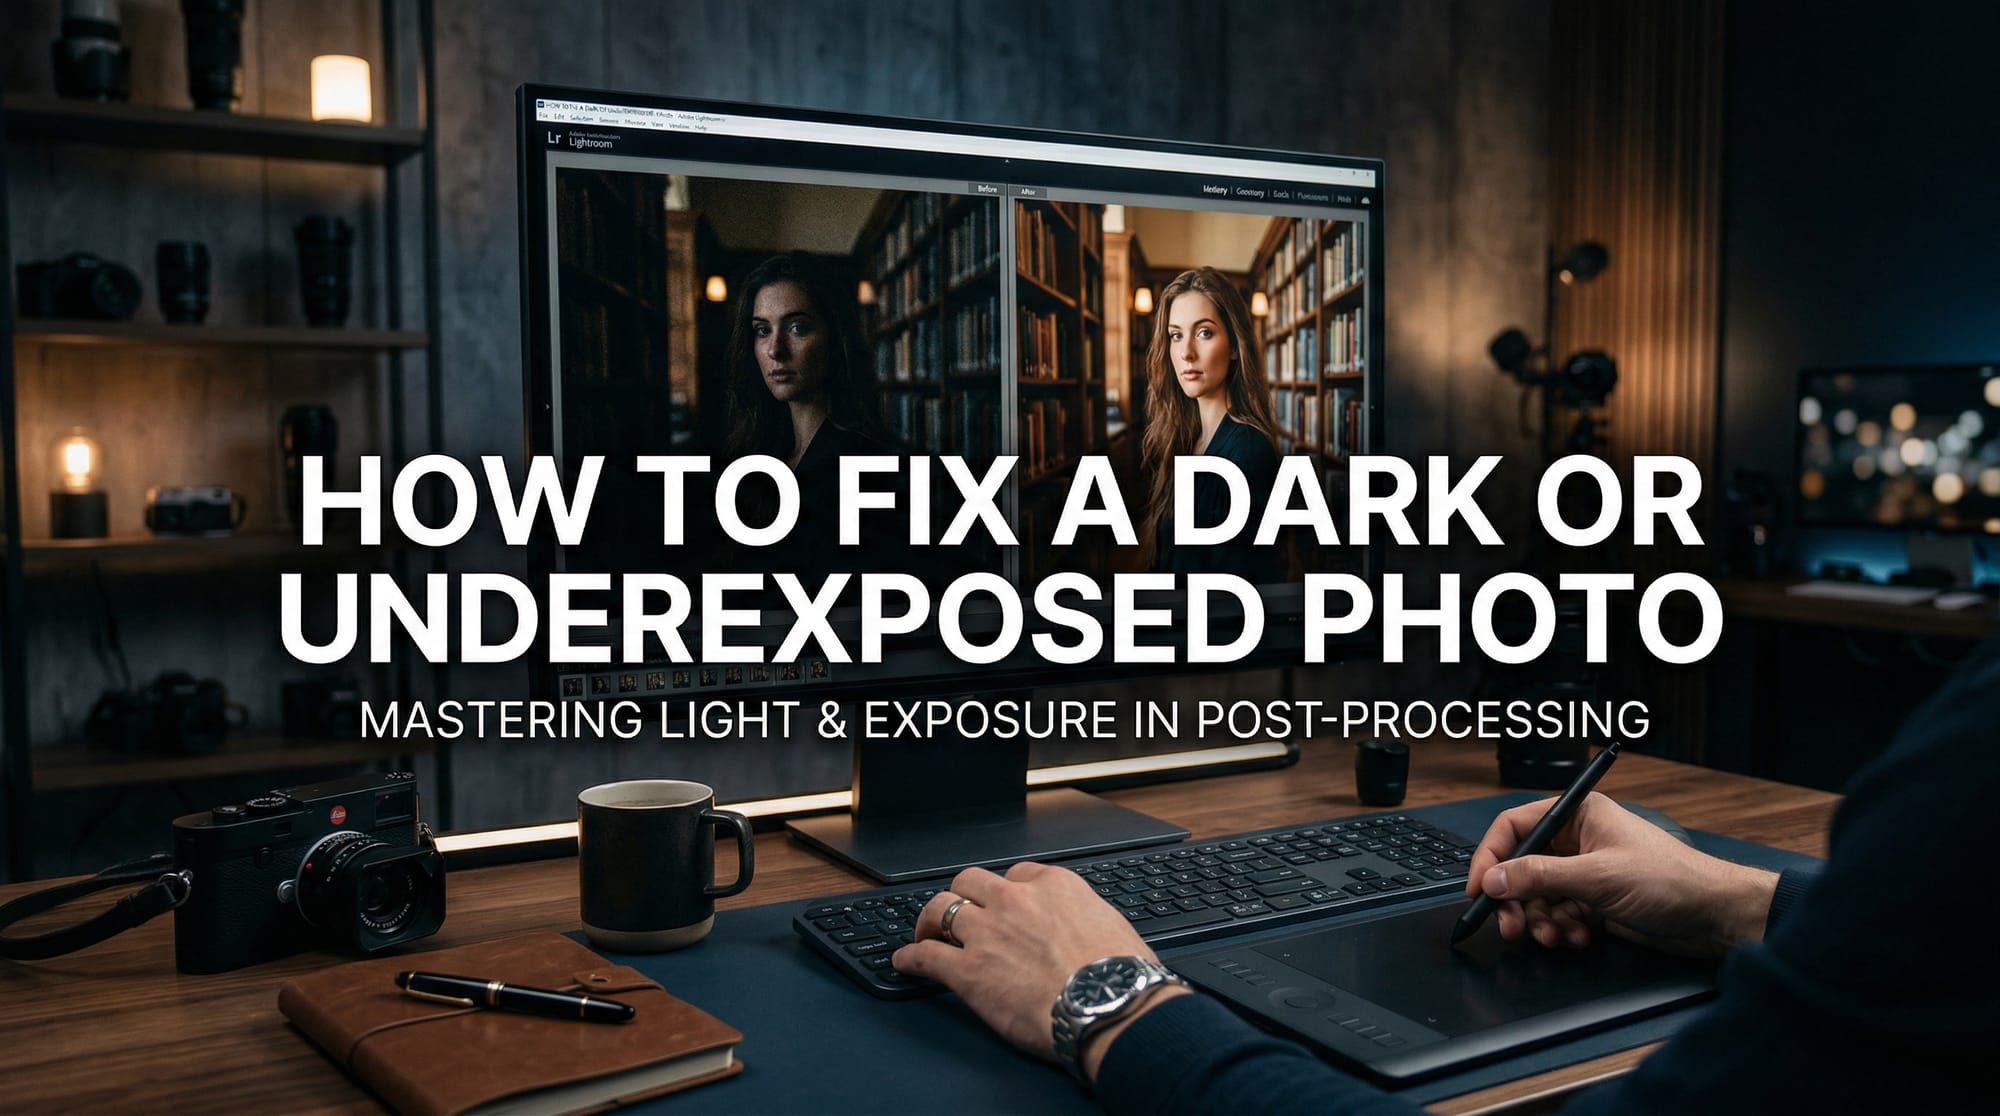
How to Fix a Dark or Underexposed Photo
Shot a wedding last November in a venue that refused to add more lights. By the end of the night I had 340 frames, and about a third of them were 1.5 to 2 stops underexposed. Every single one needed fixing. Here's exactly how I did it — and how to fix a dark or underexposed photo regardless of what software you're using.
Quick answer: to fix a dark photo in Lightroom, raise Shadows first (+60 to +80), then add Exposure (+0.5 to +1.0), then pull Highlights down (-20 to -40) to rebalance. Run AI Denoise after — brightening shadows always introduces noise. The order matters, and most guides get it backwards.
First: figure out where the darkness actually is
Before touching a slider, zoom in and check where the problem lives. This takes ten seconds and determines which tools you reach for.
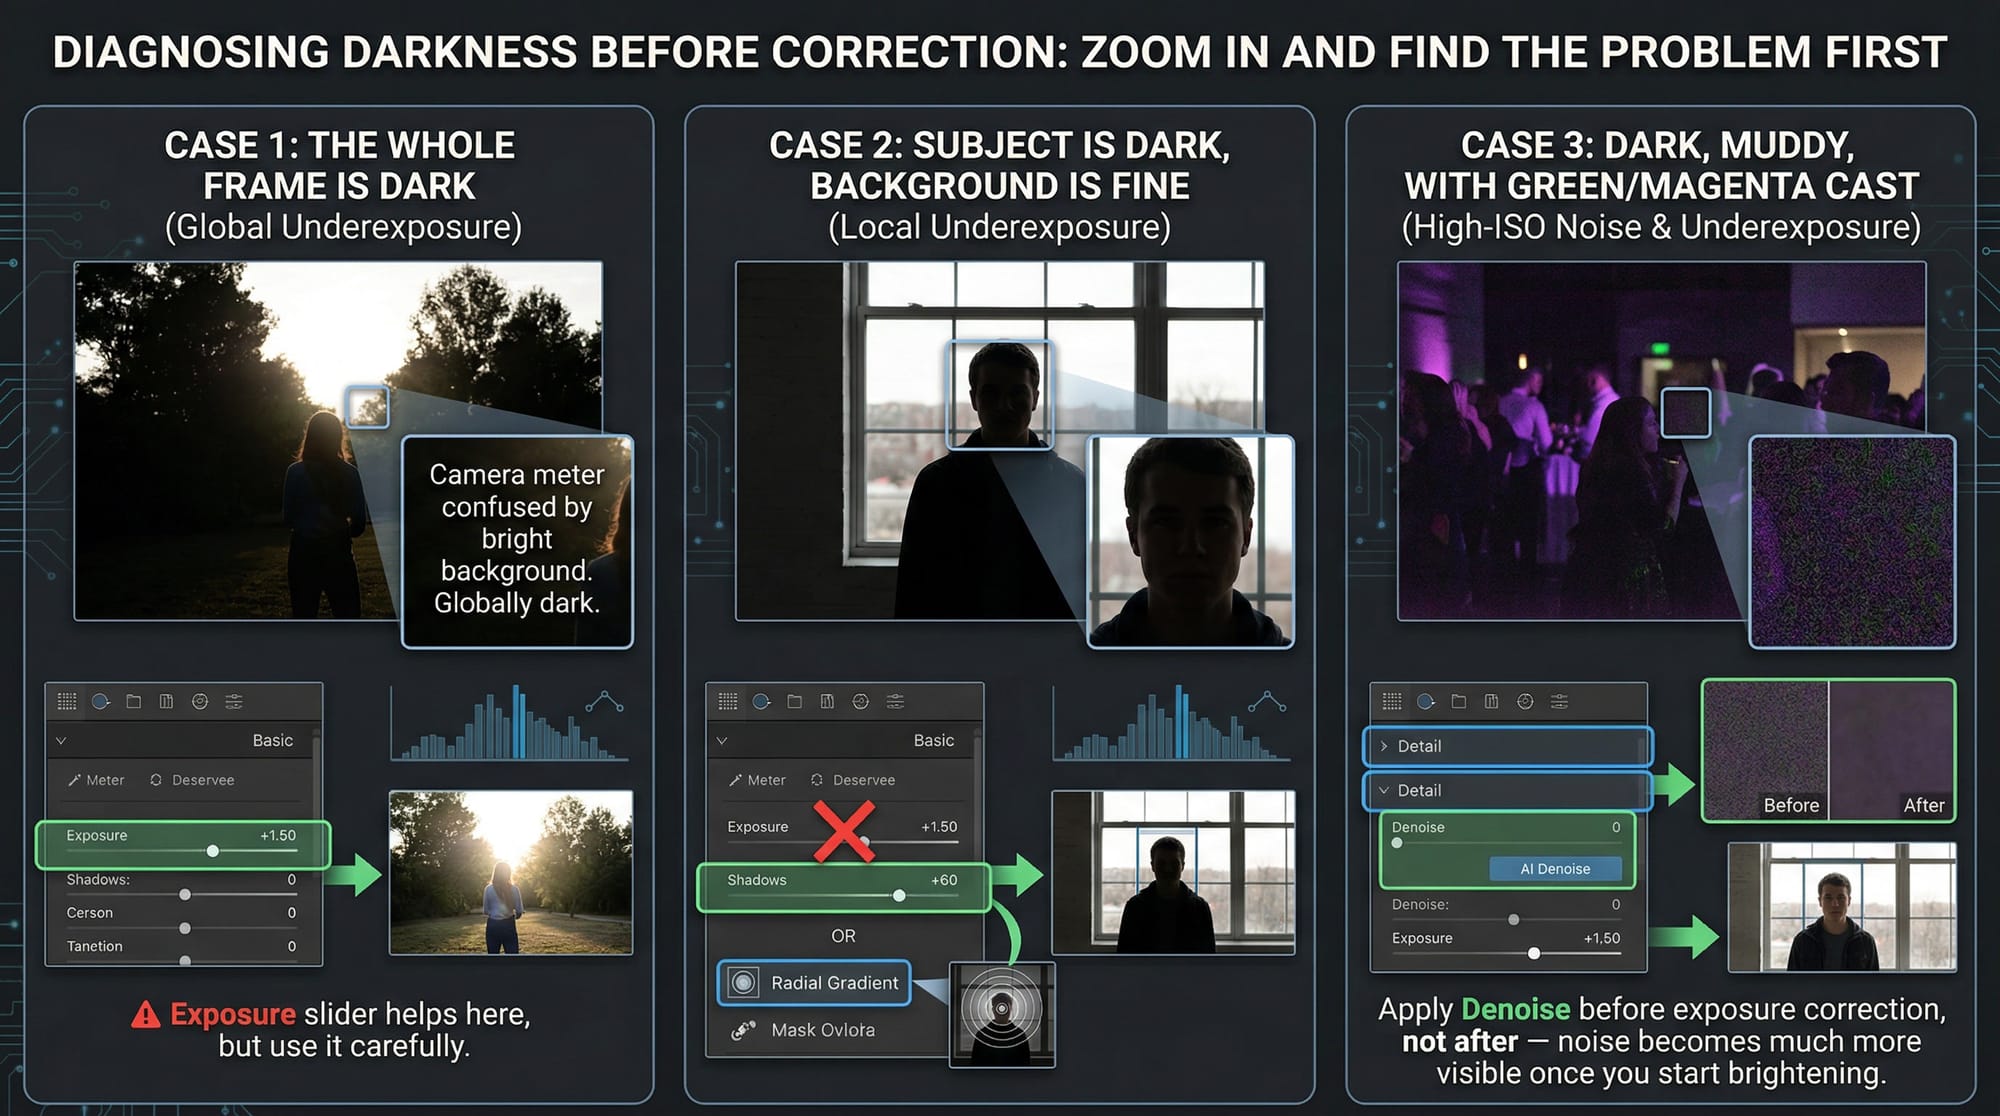
The whole frame is dark: the camera underexposed globally. Usually backlight, a bright background, or a venue that confused the meter. The Exposure slider helps here, but use it carefully.
The subject is dark but the background is fine: don't touch global Exposure. Use Shadows or a local mask. Raising Exposure here blows out the background that's already correct.
Dark, muddy, with a green or magenta cast: high-ISO noise mixed with underexposure. This needs Denoise before the exposure correction, not after — noise becomes much more visible once you start brightening.
How to fix a dark photo in Lightroom
Lightroom handles most underexposed photos well, especially RAW files. JPEG is workable but gives you less room — brightening JPEG shadows more than +60 usually turns them grey and soft. Open the Develop module and work in this order.
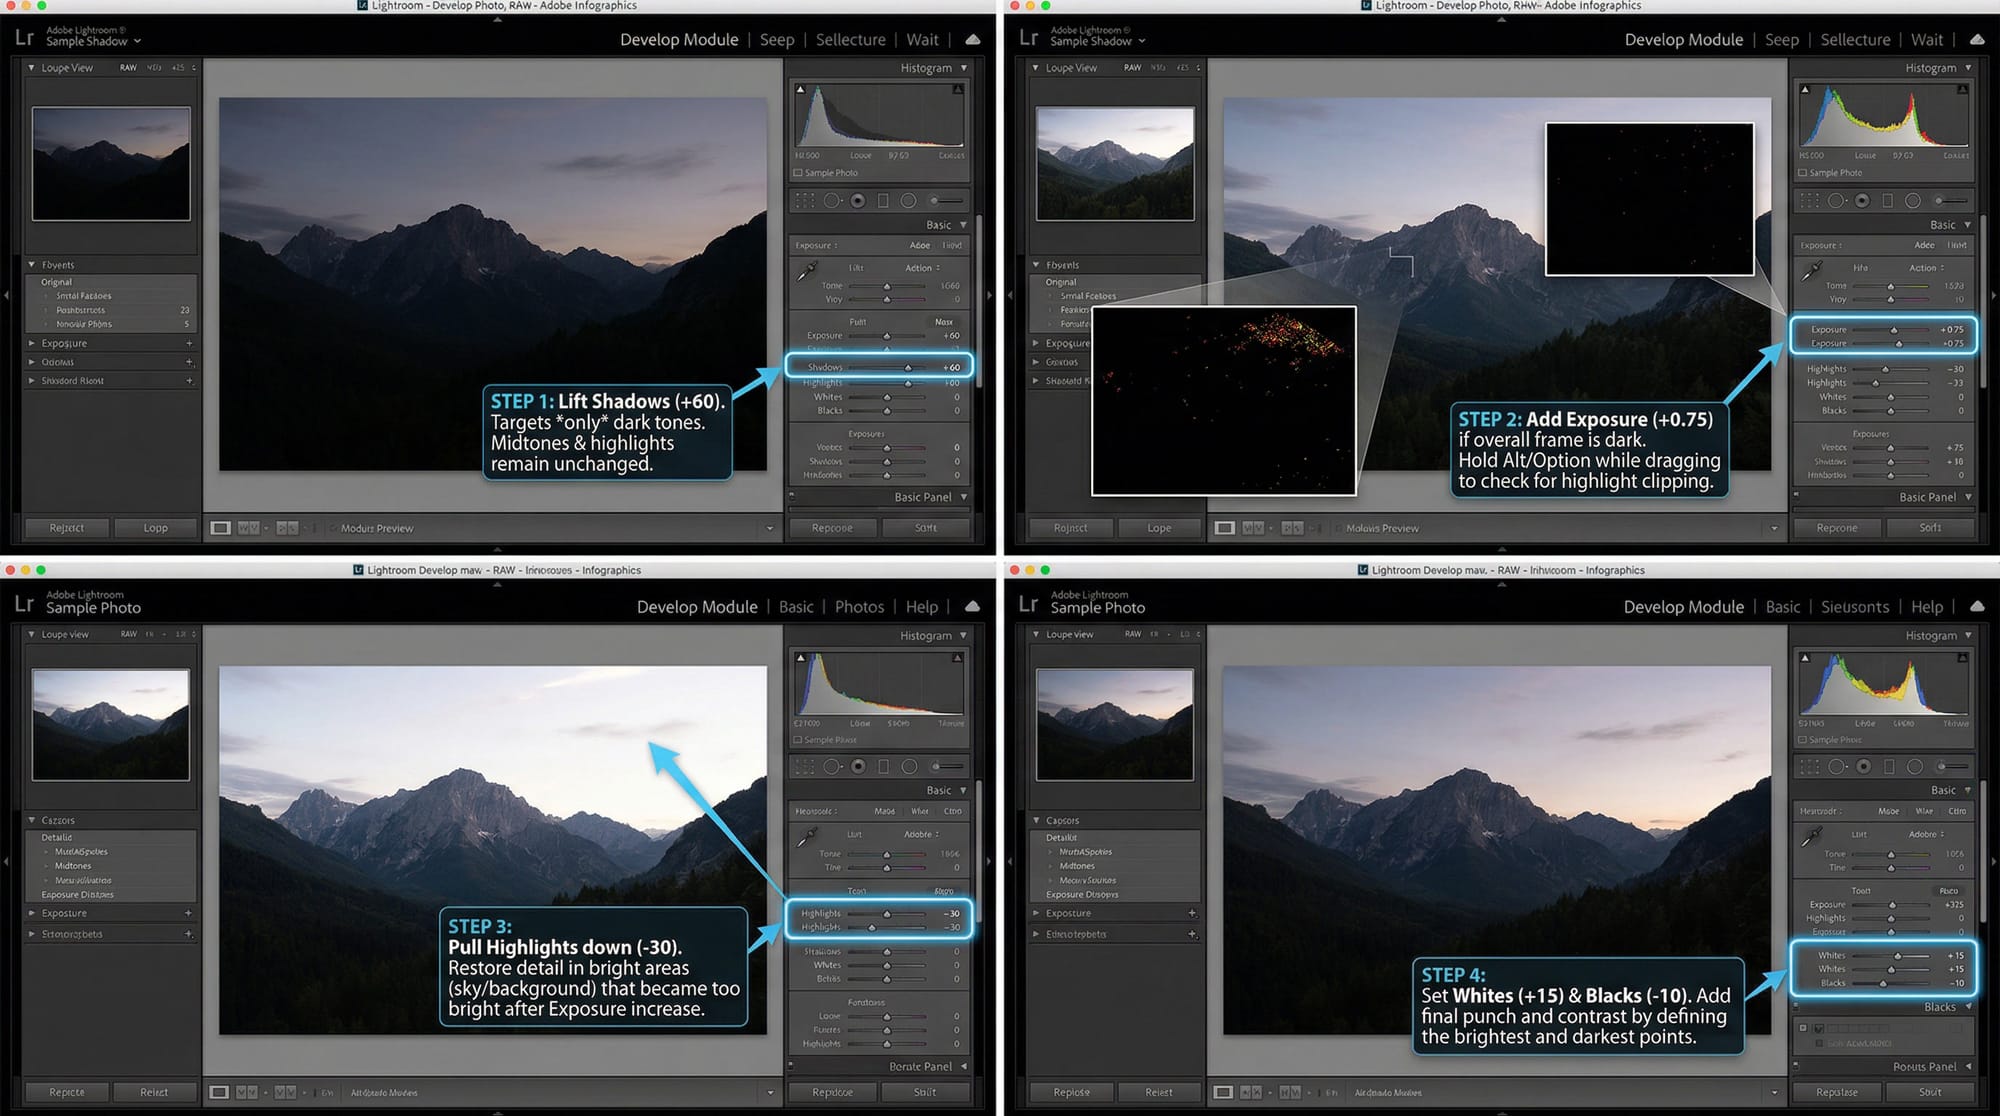
Step 1 — Shadows slider first. Drag it right to +60 as a starting point. The Shadows slider lifts only the dark tones — midtones and highlights stay where they are. This is why it's better than going straight to Exposure: you're targeting the problem areas, not the whole image. Check the bright parts of the frame; they should look unchanged.
Step 2 — Add Exposure if needed. If the overall frame is still too dark after lifting shadows, add Exposure. Start at +0.5 and go up to +1.0 maximum before the highlights start to blow. Hold Alt/Option while dragging — the preview turns black and white so you can see clipping clearly. Stop before anything turns white.
Step 3 — Pull Highlights down. After raising Exposure, the sky or any bright background has gotten too bright. Drop Highlights to -20 or -30 to bring it back. This stops the image from looking washed out after the exposure correction.
Step 4 — Blacks and Whites. Add a small amount of Whites (+10 to +20) to restore snap to the bright areas. Pull Blacks down slightly (-10) to stop the shadows going flat grey. These are finishing adjustments, not fixes.
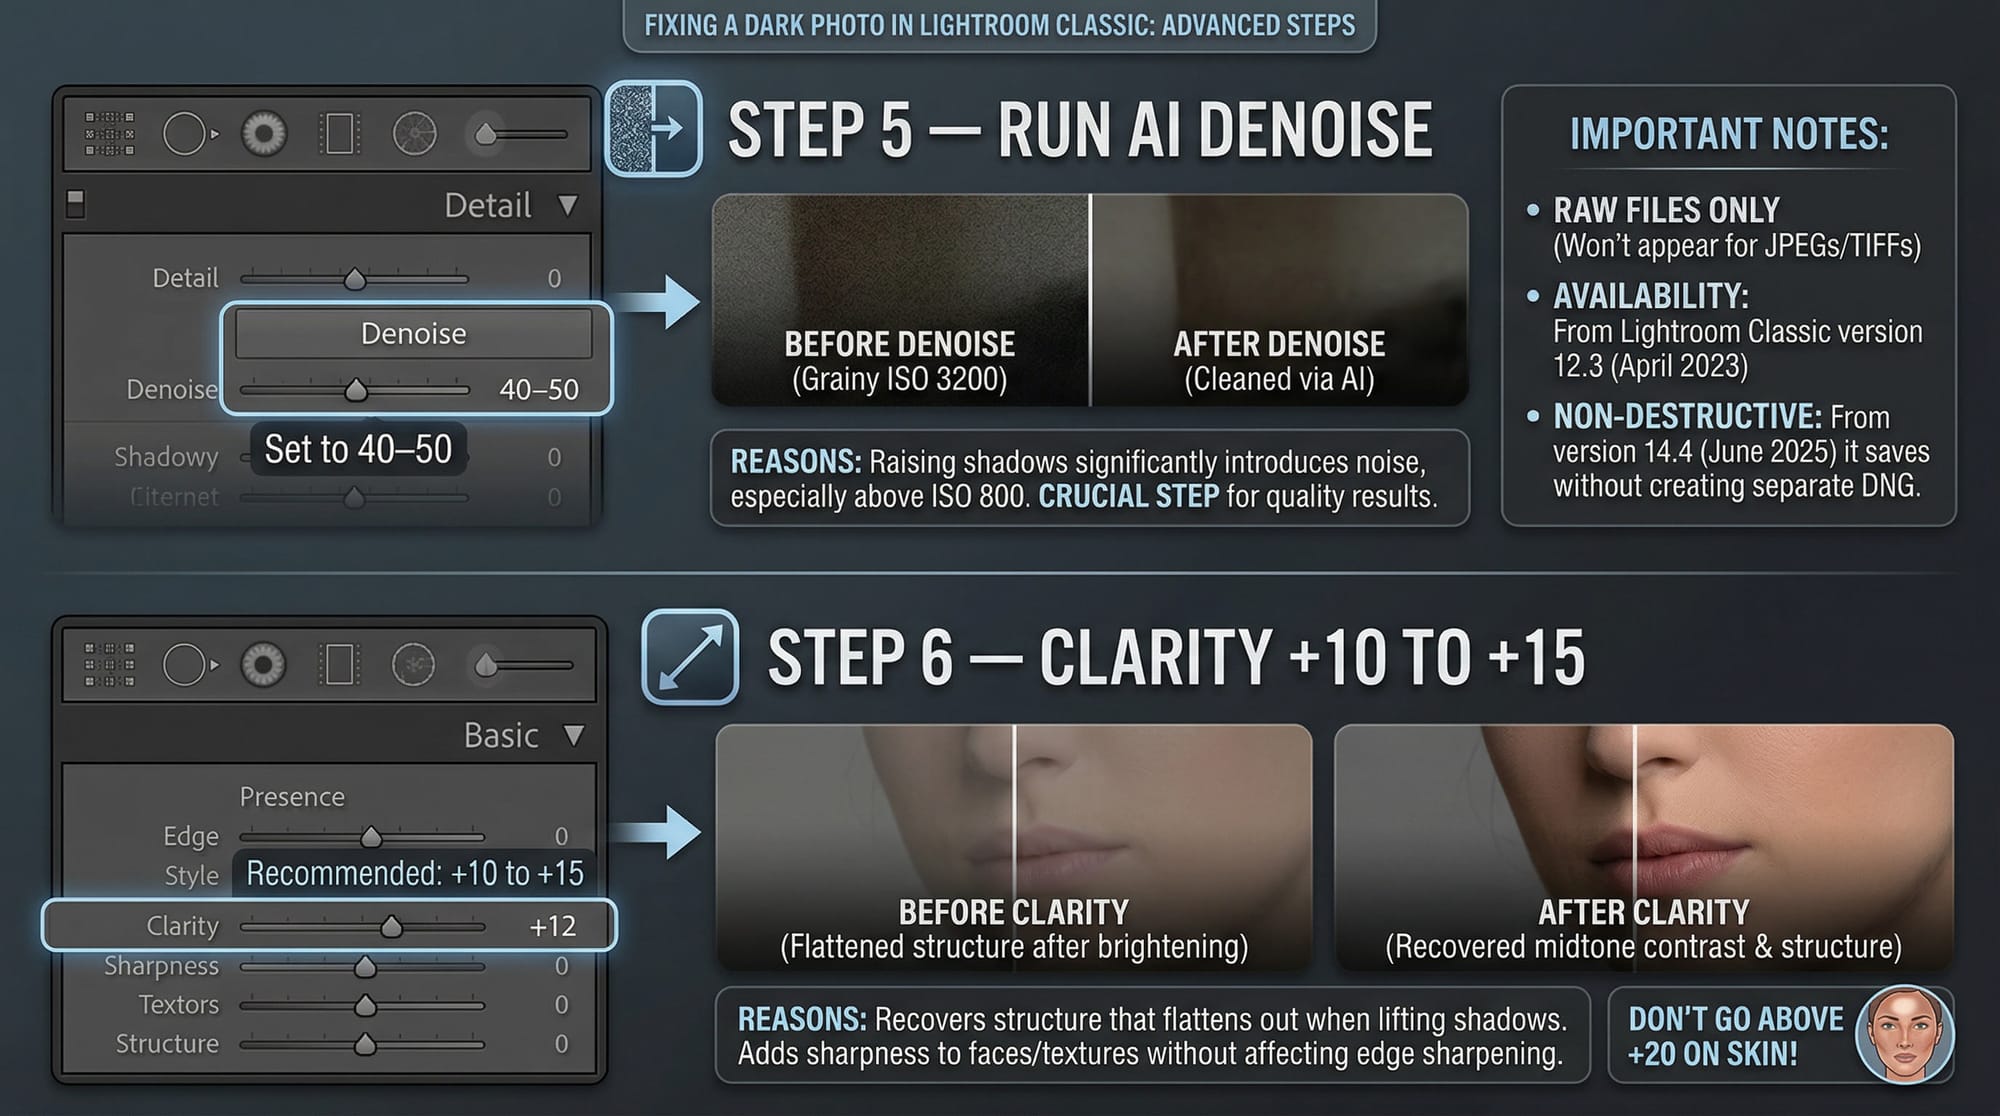
Step 5 — Run AI Denoise. In the Develop module, go to the Detail panel and click Denoise. Set it to 40–50. Every time you raise shadows significantly, noise comes with it — especially on shots above ISO 800. Skipping this step is the most common reason a fixed dark photo still looks bad.
A few things worth knowing about Denoise: it works with RAW files only — it won't appear as an option for JPEGs or TIFFs. It's been available since Lightroom Classic version 12.3 (April 2023). From version 14.4 (June 2025) it saves non-destructively without creating a separate DNG file.
Step 6 — Clarity +10 to +15. This adds midtone contrast and makes faces and textures look sharper without touching edge sharpening. In dark photos that have been brightened, a small Clarity boost recovers the structure that flattens out when you lift shadows. Don't go above +20 on skin.
For photos where only part of the frame is dark — a face in shadow, a dark foreground against a bright sky — skip global Exposure entirely. Use a Radial Mask or the Brush tool. Select the dark area, paint the mask, then raise Exposure and Shadows within the mask only. This is how you brighten a face by 1.5 stops without blowing out the window behind it.
How to fix a dark photo in Photoshop
Photoshop gives more control for severely underexposed images or when you need different corrections on different parts of the frame. Work non-destructively — everything on adjustment layers, never directly on the pixel layer.
Curves Adjustment Layer for targeted shadow lifting:
- Add a Curves adjustment layer (Layer → New Adjustment Layer → Curves).
- Click on the bottom-left quarter of the curve — the shadow zone — and drag upward. Watch the dark areas lift without the highlights moving much.
- If the highlights start moving too, add a second anchor point in the upper-right area of the curve and pin it in place before dragging the shadows point.
- Set the layer blend mode to Luminosity instead of Normal. This applies the brightness change without shifting colour — it prevents the orange cast that often appears when you lift shadows in Normal mode.
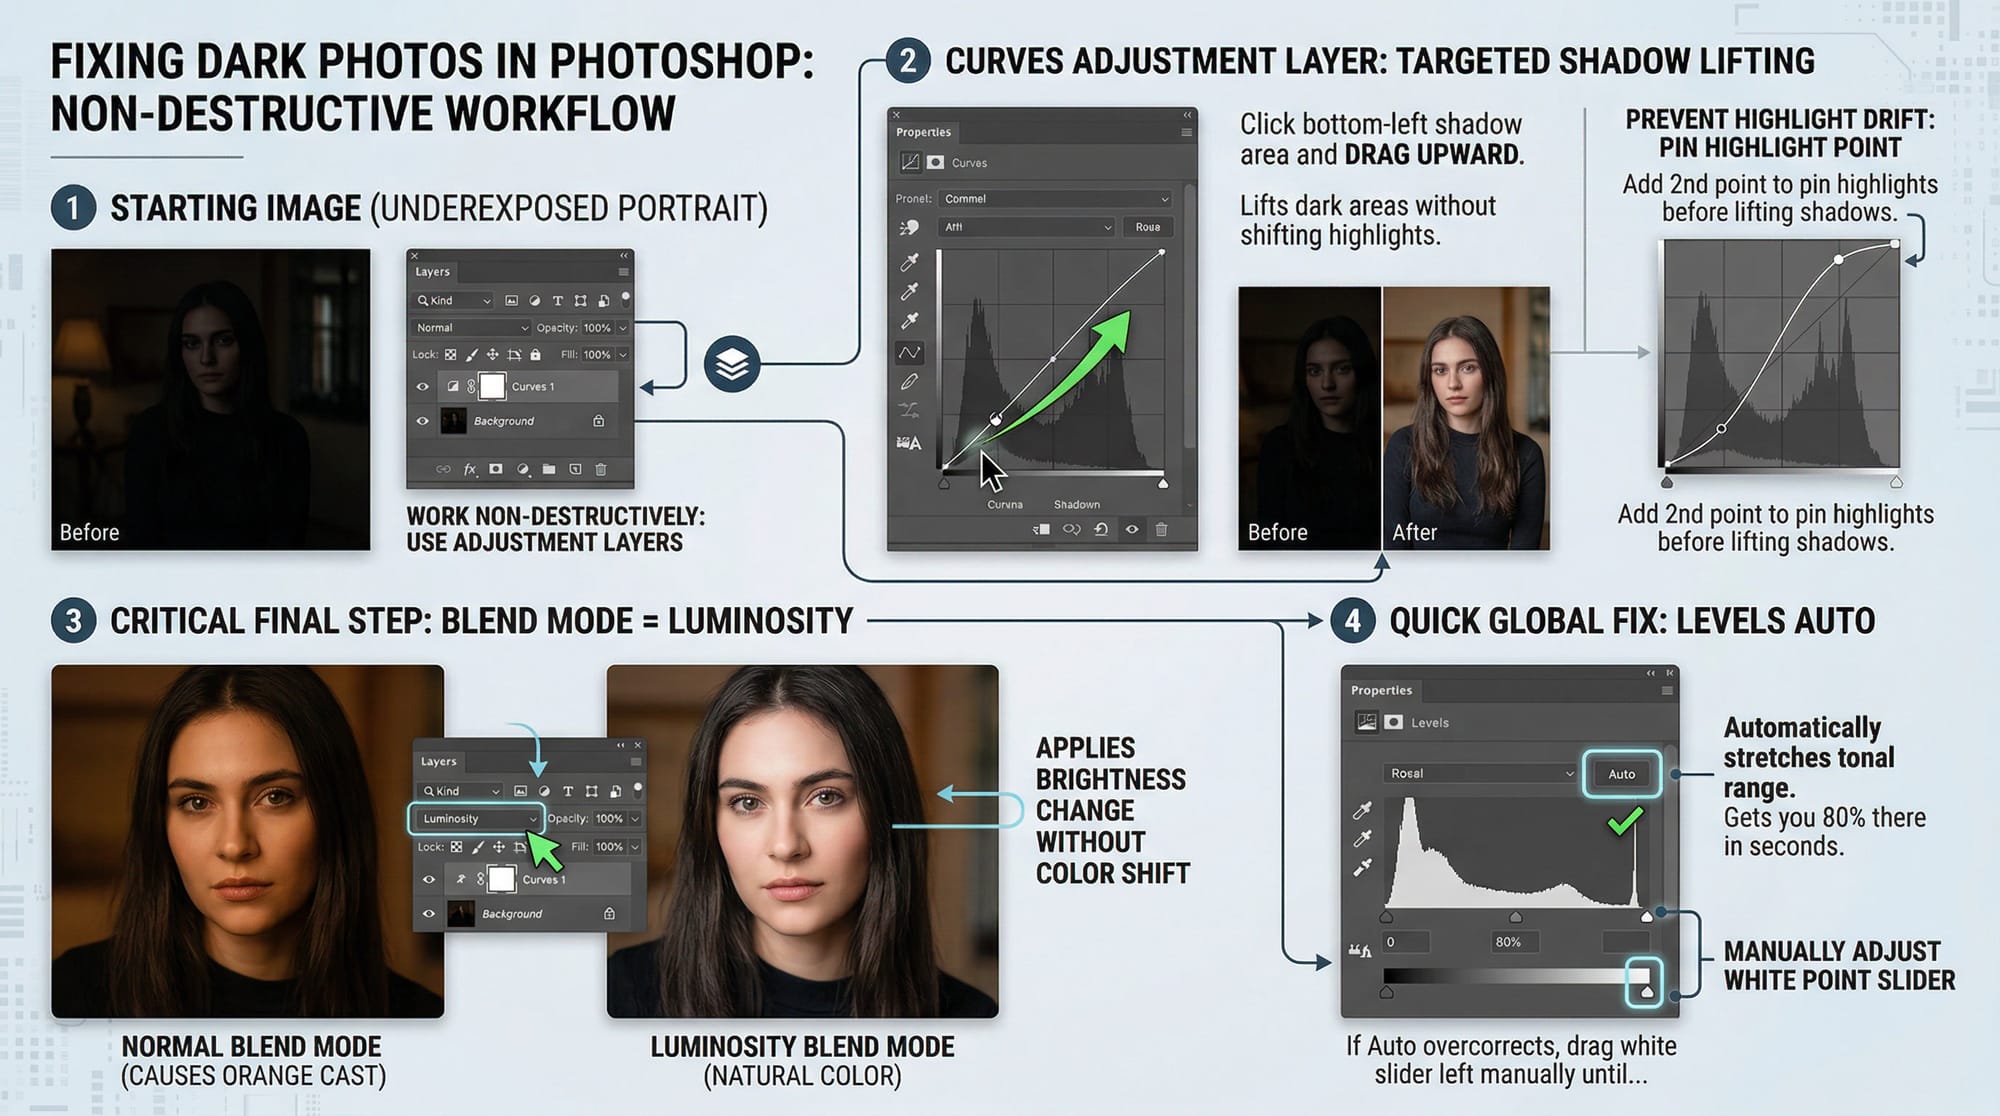
Levels for a quick global fix:
- Add a Levels adjustment layer.
- Click Auto — Photoshop stretches the tonal range based on what's in the image. On many underexposed shots this alone gets you 80% of the way there in a few seconds.
- If Auto overcorrects, drag the white point slider (right side of the histogram) left manually until the bright areas look correct, then bring the midpoint slider left to lift overall brightness.
Dodge Tool for selective brightening: for a dark face in an otherwise correctly exposed shot, the Dodge tool (O on keyboard) set to Midtones at 10–15% Exposure lets you paint brightness onto exactly the areas you need. Work at 200% zoom on faces. Takes longer than a mask but gives more control on complex areas like hair against a dark background.
Photoshop's Camera Raw filter (Filter → Camera Raw Filter) gives you the same Shadows, Exposure, and Highlights sliders as Lightroom, applied non-destructively as a Smart Filter. If you're more comfortable with Lightroom's workflow, this is a direct port of it inside Photoshop.
How to fix a dark photo on iPhone
Mobile tools are more limited than desktop — you're starting with a compressed JPEG and the algorithms have less data to work with. That said, I've saved enough shots on my phone at events to know it's worth trying before deleting a frame.

iPhone (built-in Photos app):
- Open the photo, tap Edit.
- Tap the dial icon (Adjust).
- Find Brilliance and push it to +50 first. This is iOS's combined shadow-lift tool — it brightens dark areas while toning down highlights at the same time. Better starting point than raw Exposure for underexposed shots.
- If you need more, add Shadows (+30 to +50).
- Keep Exposure as a last resort — on iPhone JPEGs, raising Exposure above +30 gets noisy fast.
Android (Google Photos): Edit → Adjust → Shadows slider. More direct than the iPhone approach. Samsung Gallery's Remaster button applies one-click AI enhancement that works reasonably well on dark portraits.
Lightroom Mobile (free, iOS and Android): the same Shadows, Exposure, and Highlights sliders as desktop Lightroom. The free tier includes full manual control. AI Denoise and Super Resolution are behind the paid subscription, but for basic dark photo recovery the free tools cover most situations.
When the photo is too dark to fix
Some dark photos aren't recoverable. It's worth knowing the signs before spending an hour trying.
If the shadow areas in the histogram are completely clipped — the graph presses against the left wall with a vertical spike — the data isn't there. You can brighten the image, but you're lifting solid black into grey. No detail comes back because none was captured.
A quick test: in Lightroom, hold Alt/Option while dragging the Shadows slider to the right. The preview shows where clipping is happening. If large areas of the frame turn white at +20 or +30, the underexposure was too severe. You might still get a usable image depending on the subject, but you're not recovering detail.
JPEG files hit this limit earlier than RAW. A RAW file at 2 stops underexposed is often fully recoverable. A JPEG at 2 stops under often isn't — JPEG throws away shadow data during compression, so there's less information to work with from the start. If you shoot anything that might need exposure correction in post, RAW gives you roughly 2 extra stops of recovery range compared to JPEG.
Quick comparison: which tool for which situation
| Situation | Best tool | Realistic result |
|---|---|---|
| Whole frame 1–2 stops under (RAW) | Lightroom Shadows + Exposure + Denoise | ✓✓ Excellent |
| Whole frame 1–2 stops under (JPEG) | Lightroom Shadows + Exposure | ✓ Good — watch for noise above +60 |
| Dark face, correct background | Lightroom Radial Mask or Photoshop Dodge | ✓✓ Excellent |
| Dark indoor shot, high ISO noise | Lightroom Denoise first, then exposure | ✓ Good with care |
| Severely underexposed (3+ stops) | Photoshop Curves + masking | ~ Partial — depends on RAW data |
| Clipped shadows (JPEG, 2+ stops) | Nothing reliably recovers clipped data | ✗ Minimal |
| Quick fix, no software | iPhone Brilliance slider or Lightroom Mobile free | ✓ Good for mild underexposure |
Frequently asked questions
What is the best slider to fix a dark photo in Lightroom?
Start with the Shadows slider, not Exposure. Shadows targets only the dark areas of the frame — midtones and highlights stay where they are. Exposure raises everything, which blows out any areas that were already correctly lit. For most dark photos, Shadows +60 to +80 does the majority of the work. Add Exposure after, carefully, if you still need overall brightness.
Why does my photo look grainy after I brighten it?
Lifting shadow areas always reveals noise that was hidden in the dark tones. The noise was there in the original file — it just wasn't visible. The fix is Lightroom's AI Denoise (Detail panel → Denoise), set to 40–50. Run it after your exposure corrections. Note that Denoise works only with RAW files, not JPEGs. On high-ISO files — anything shot above ISO 1600 — expect to need it every time you brighten shadows significantly.
How do I fix a dark photo on iPhone?
Open the photo in the built-in Photos app, tap Edit, then the dial icon. Use the Brilliance slider first — push it to around +50. Brilliance is smarter than the Exposure slider for dark shots because it lifts shadows while holding highlights. Add Shadows (+30 to +50) if you need more. Keep the Exposure slider low — iPhone JPEGs get noisy fast above +30. For better results, install Lightroom Mobile (free) which has the same Detail panel as desktop Lightroom.
Can you fix a dark photo shot in JPEG?
Yes, but with less room than RAW. JPEG compresses and discards shadow data during capture, so there's less to recover. A JPEG that's 1 stop underexposed is usually fixable. At 2 stops under, you'll get noise and flat grey shadows rather than real recovered detail. If you shoot anything that might need exposure correction, RAW gives you roughly 2 extra stops of recovery range compared to JPEG.
How do I fix a dark photo without Photoshop or Lightroom?
Topaz Labs' free web tool handles AI-based brightness correction without any software installation. Adobe Lightroom on the web (lightroom.adobe.com) is free with an Adobe account and includes the same Shadows and Exposure sliders as the desktop version. On iPhone, the built-in Photos app Brilliance slider handles mild underexposure well without any extra software.
Why does my dark photo look worse after editing?
Three common causes: raising Exposure too aggressively on JPEG files, skipping Denoise after lifting shadows, or working in the wrong order. Start with Shadows, not Exposure. Run Denoise after brightening. Pull Highlights down after raising Exposure to stop bright areas from blowing out. If the edited image looks flat or grey, add Clarity +10 to +15 and pull Blacks down slightly — this restores contrast that flattens out when you lift shadows heavily.