How to Fix Dark Photos in Photoshop
A wedding reception shot from last year — dark venue, available light only, ISO pushed to 3200. The images came back two stops underexposed across the board. I fixed all 60 in Photoshop using Camera Raw Filter with a saved preset, but the method I reach for on a single important photo is different from the fastest batch fix. Here's how to fix dark photos in Photoshop, and when each method makes sense.
Quick answer: to fix or brighten a dark photo in Photoshop, use a Curves adjustment layer — click the lower-left shadow area of the curve and drag it up, then set the blend mode to Luminosity to prevent colour shifts. For photos where only the shadows are dark (highlights are fine), use Shadows/Highlights as a Smart Filter on a Smart Object. For RAW files or quick batch fixes, use Camera Raw Filter.
Method 1: Curves adjustment layer (most control)
Curves is the most precise tool for fixing a dark photo in Adobe Photoshop. It lets you brighten specific tonal ranges — shadows, midtones, or highlights — independently rather than lifting the whole image uniformly.
In the Layers panel, click the Adjustments icon (the half-circle) → Curves. A diagonal line appears on a graph. The lower-left corner is shadows; upper-right is highlights; centre is midtones.
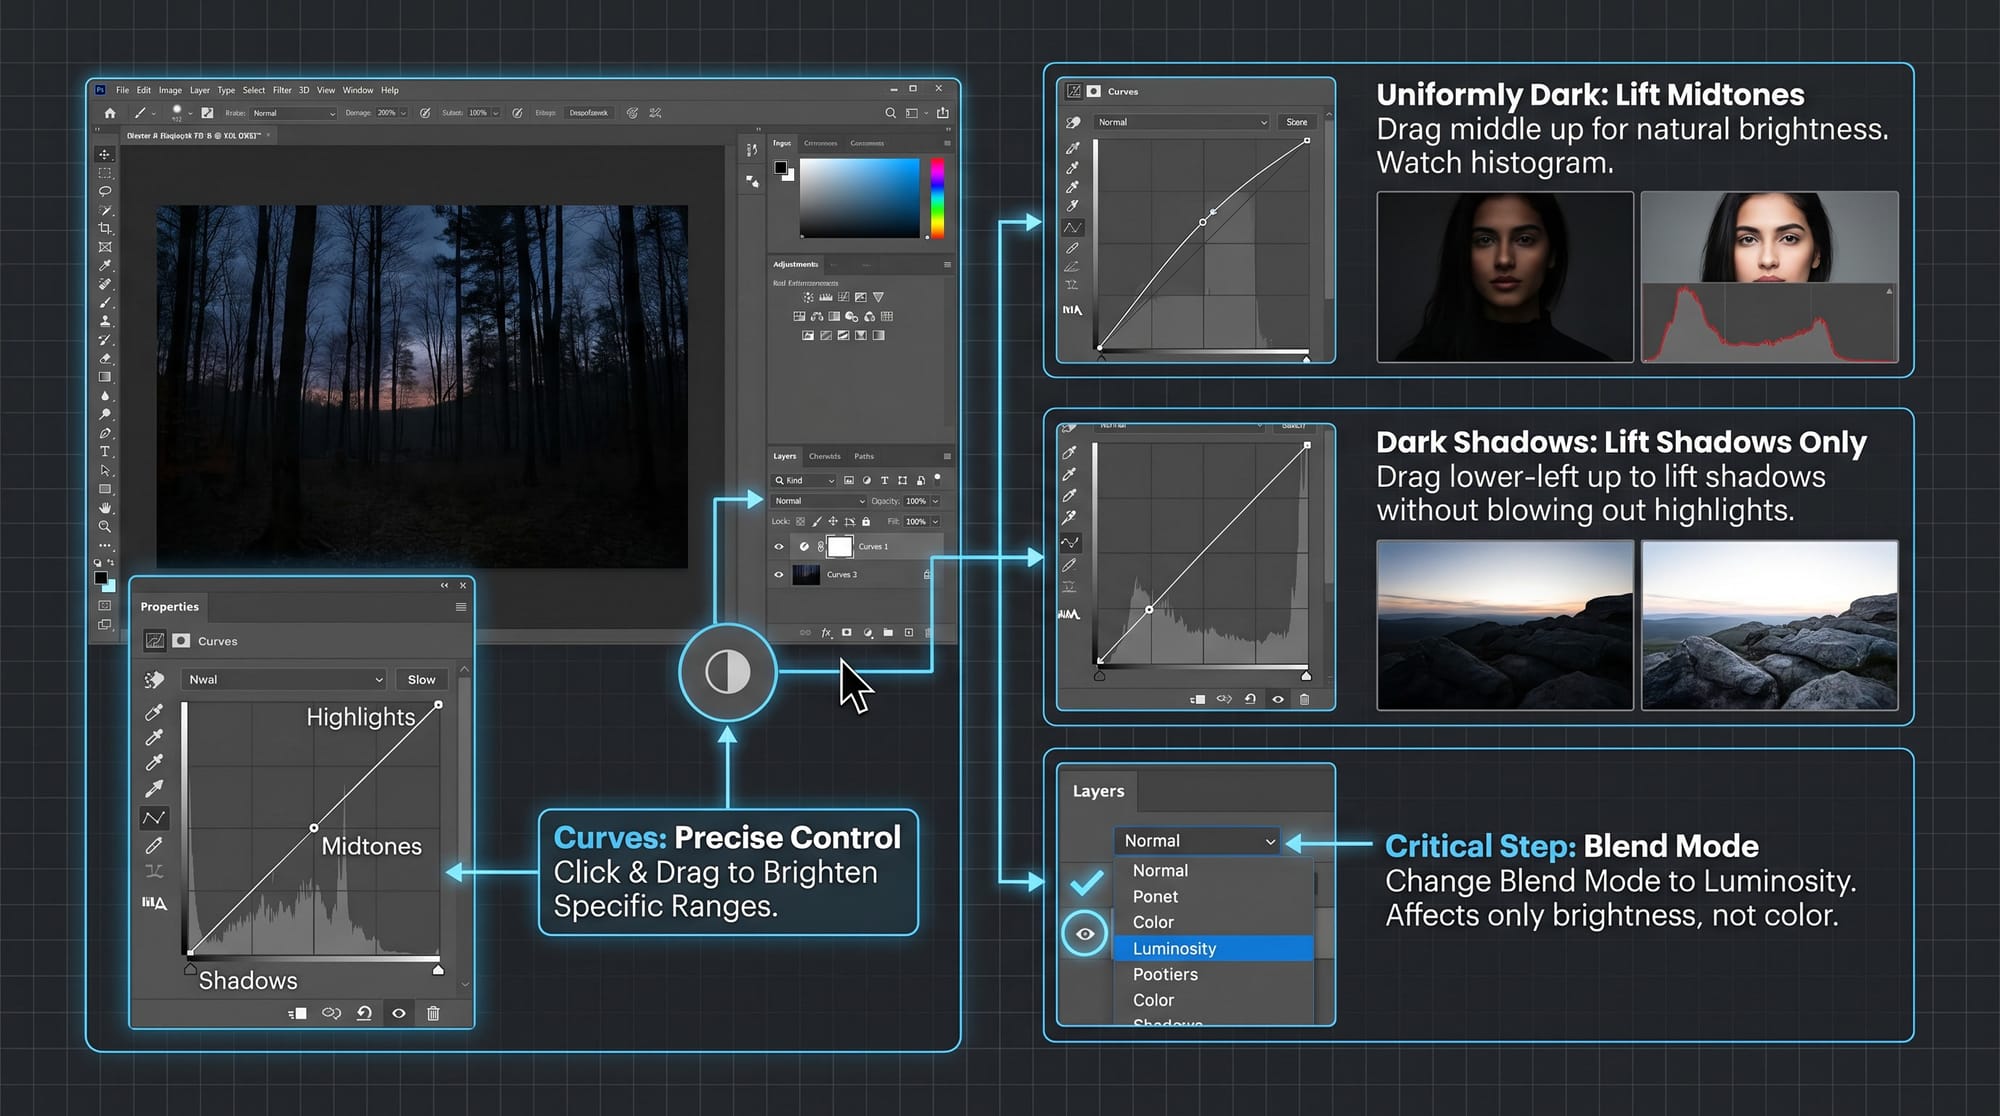
For a uniformly dark photo: click in the middle of the line and drag upward until the image reaches natural brightness. Watch the histogram — you want the bulk of the data to sit in the middle range, not pushed hard against either wall.
For a photo that's dark mainly in the shadows with acceptable highlights: click in the lower-left third of the line (around the 25% point) and drag upward. This lifts the shadows without blowing out the highlights that were already acceptable.
Critical step: change the blend mode of the Curves layer to Luminosity. Find the blend mode dropdown at the top of the Layers panel (it says "Normal" by default). Change it to Luminosity. This makes Curves affect only the brightness of the image, not the colour. Without this, brightening a dark photo through Curves shifts colours — typically adding a warm cast or oversaturating reds. Luminosity mode is the single most useful thing most guides skip entirely.
Because Curves is an adjustment layer, it's fully non-destructive. Double-click the layer thumbnail at any time to re-adjust.
Method 2: Shadows/Highlights (best for backlit or selectively dark photos)
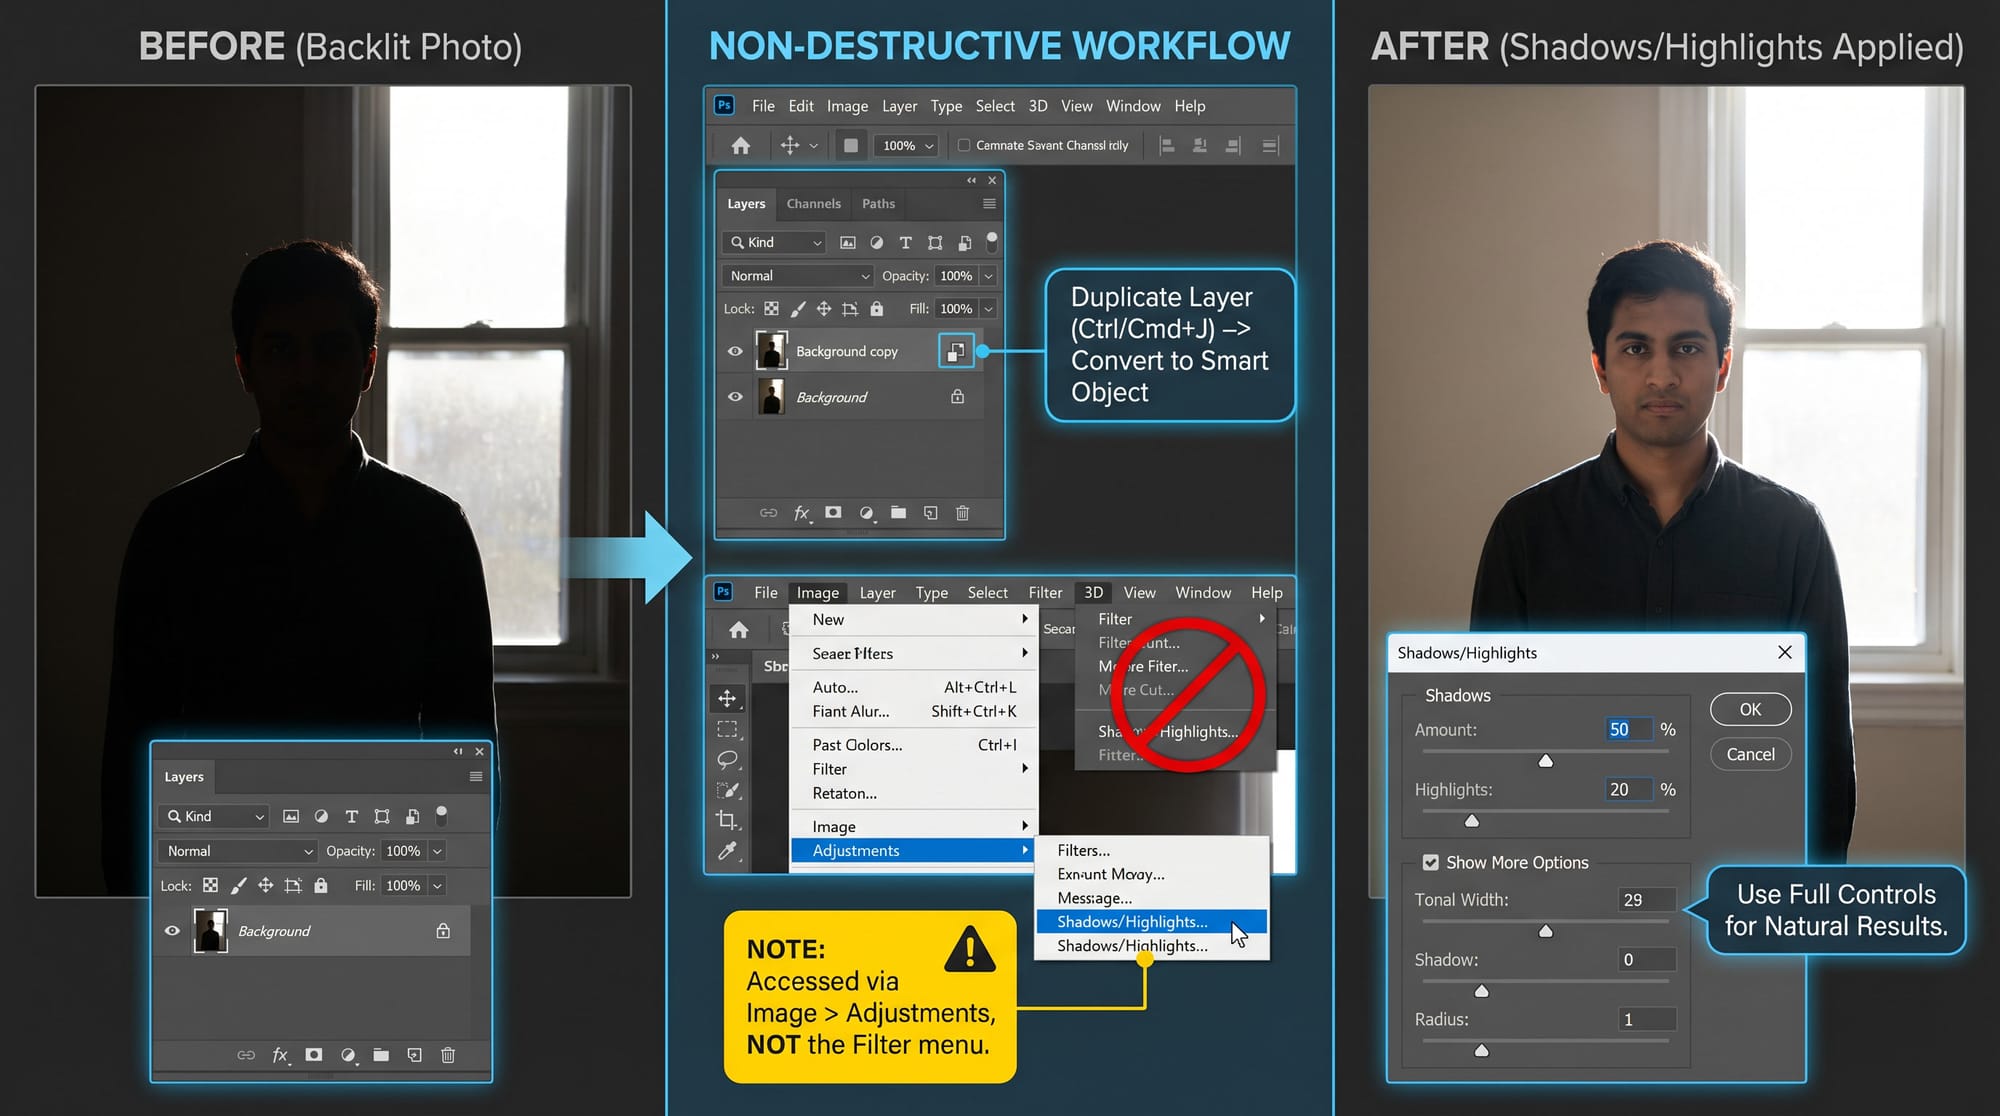
Shadows/Highlights is specifically designed for photos where shadows are too dark but highlights are acceptable — backlit subjects, indoor shots against bright windows, subjects where the background is correctly exposed but the face is in shadow. It brightens dark areas by analysing surrounding pixels, which produces more natural-looking results than lifting the whole tonal range with Curves.
To use it non-destructively: duplicate the background layer (Ctrl/Cmd+J), right-click the duplicate → Convert to Smart Object. Then go to Image → Adjustments → Shadows/Highlights. Note: Shadows/Highlights is one of only two image adjustments in Photoshop (along with HDR Toning) that can be applied as a Smart Filter via the Image menu rather than the Filter menu. If you look for it under Filter, you won't find it — it's always accessed through Image → Adjustments.
The dialog opens with two default sliders. Check "Show More Options" to access the full controls.
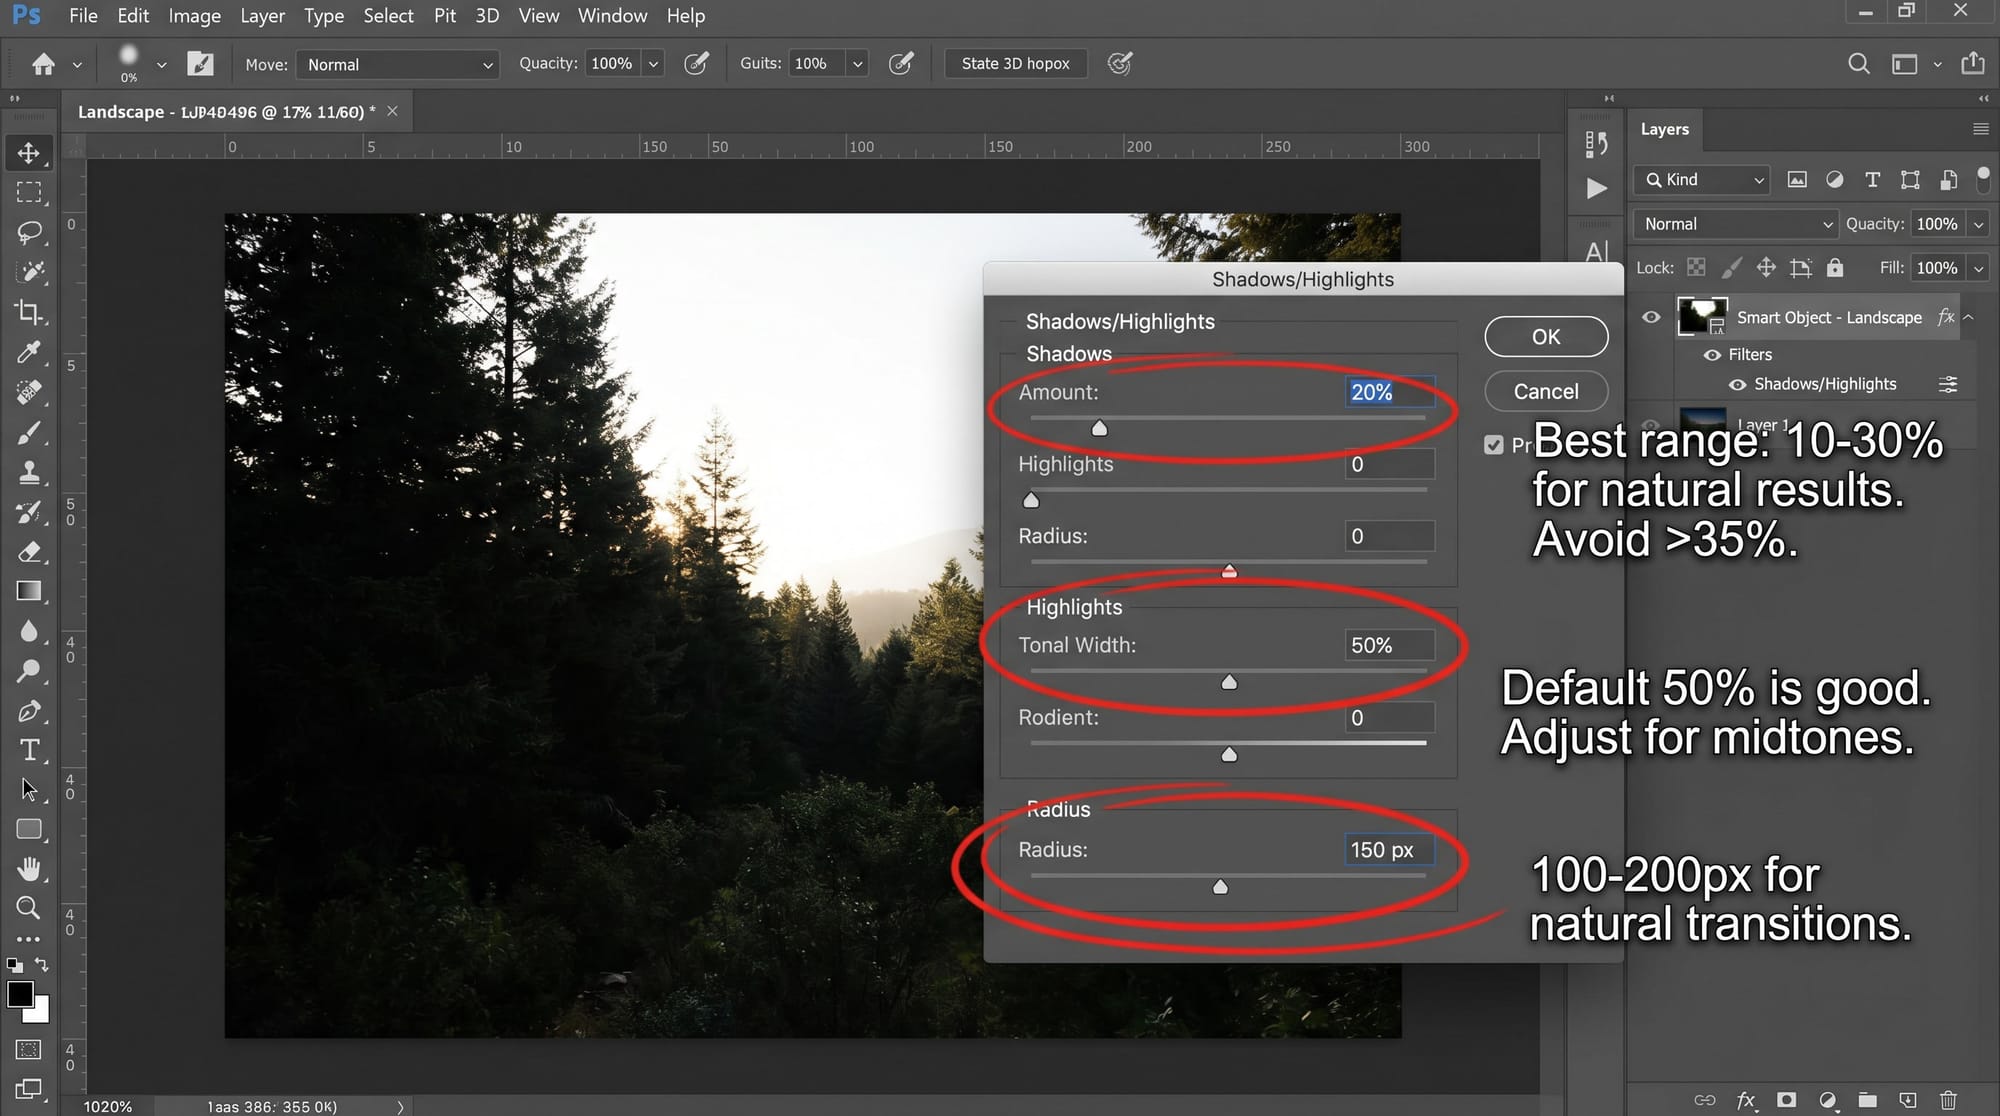
Shadows Amount: how much to brighten dark areas. Keep this between 10–30% for natural results. Above 35%, the brightened shadows start to look artificially lifted — flat, grey, and slightly unreal. If you need more than 35%, it's usually better to use Curves on the shadow region instead.
Tonal Width: how far into the midtones the shadow correction extends. Default 50% is a good starting point. Lower it if the midtones are changing too much; raise it if the correction feels like it stops too abruptly.
Radius: the area of surrounding pixels Photoshop analyses to determine what counts as "shadow." For most photos 100–200px produces natural transitions. Too low and the brightened areas have hard edges; too high and the whole image gets lifted uniformly.
Highlights Amount defaults to 0. Leave it there unless highlights are also blown — in which case raise it to 10–20% to pull them back slightly.
Because you converted to Smart Object first, the adjustment stays editable. Double-click "Shadows/Highlights" in the Layers panel to re-open the dialog.
Method 3: Screen blend mode (fastest way to brighten a mildly dark photo)
The Screen blend mode trick is the fastest approach for a photo that needs modest brightening with minimal effort. It works by duplicating the image data and combining it with itself in a way that lightens the overall result.
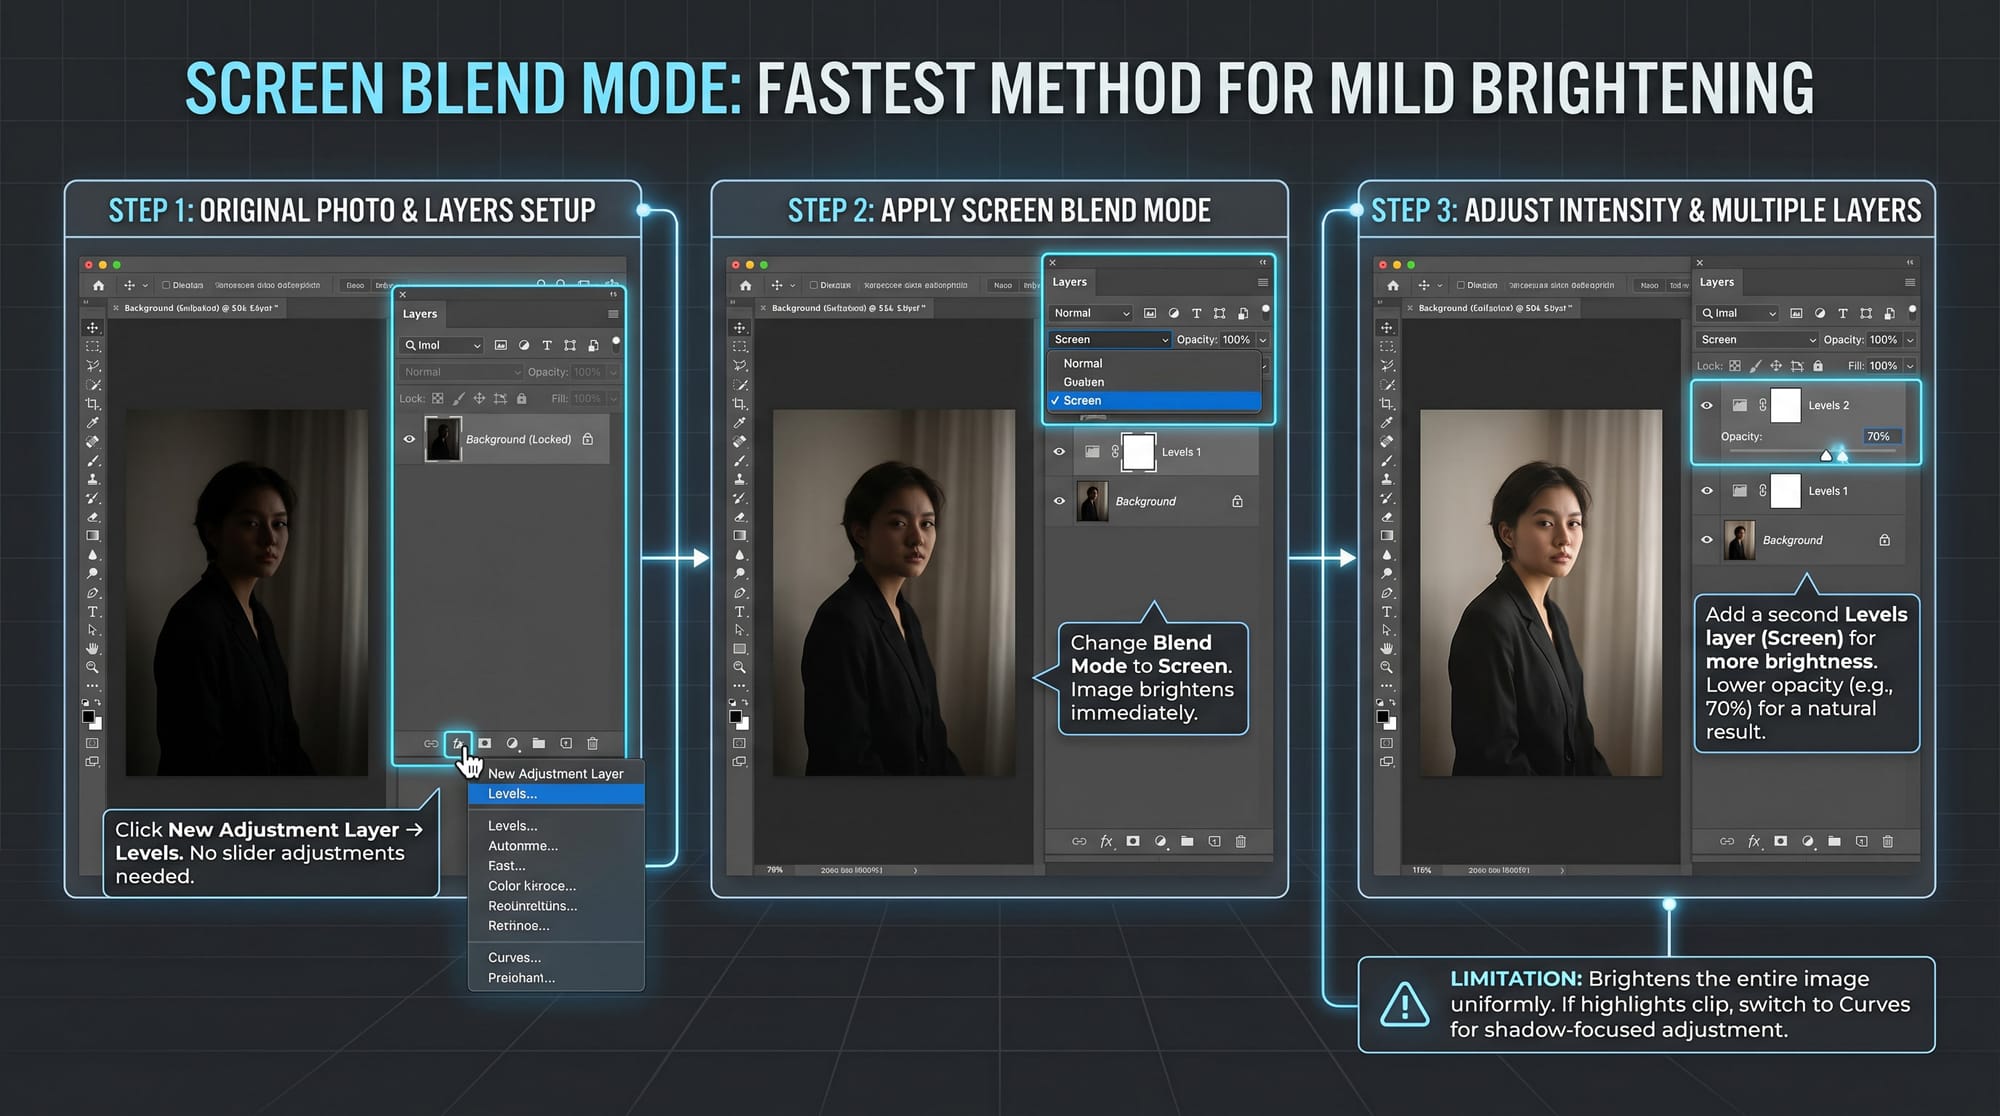
In the Layers panel, click the New Adjustment Layer icon → Levels. Don't adjust any sliders. Instead, change the blend mode of this Levels layer from Normal to Screen. The image immediately brightens. If it's not enough, add a second Levels adjustment layer also set to Screen. If it's too bright after two layers, lower the opacity of the top layer — 70% often gives a natural result.
This method is quick and works well for minor underexposure. The limitation: it brightens the entire image uniformly, including any highlights that were already acceptable. If highlights clip after applying Screen, switch to Curves with a shadow-focused adjustment instead.
Method 4: Camera Raw Filter (best for RAW files and batch work)
Camera Raw Filter gives you the same controls as Lightroom — Exposure, Shadows, Highlights, Blacks, Whites, Clarity — but inside Photoshop. It's the best choice for RAW files opened in Photoshop, and for batch work where you want to apply the same correction to multiple images via an Action.
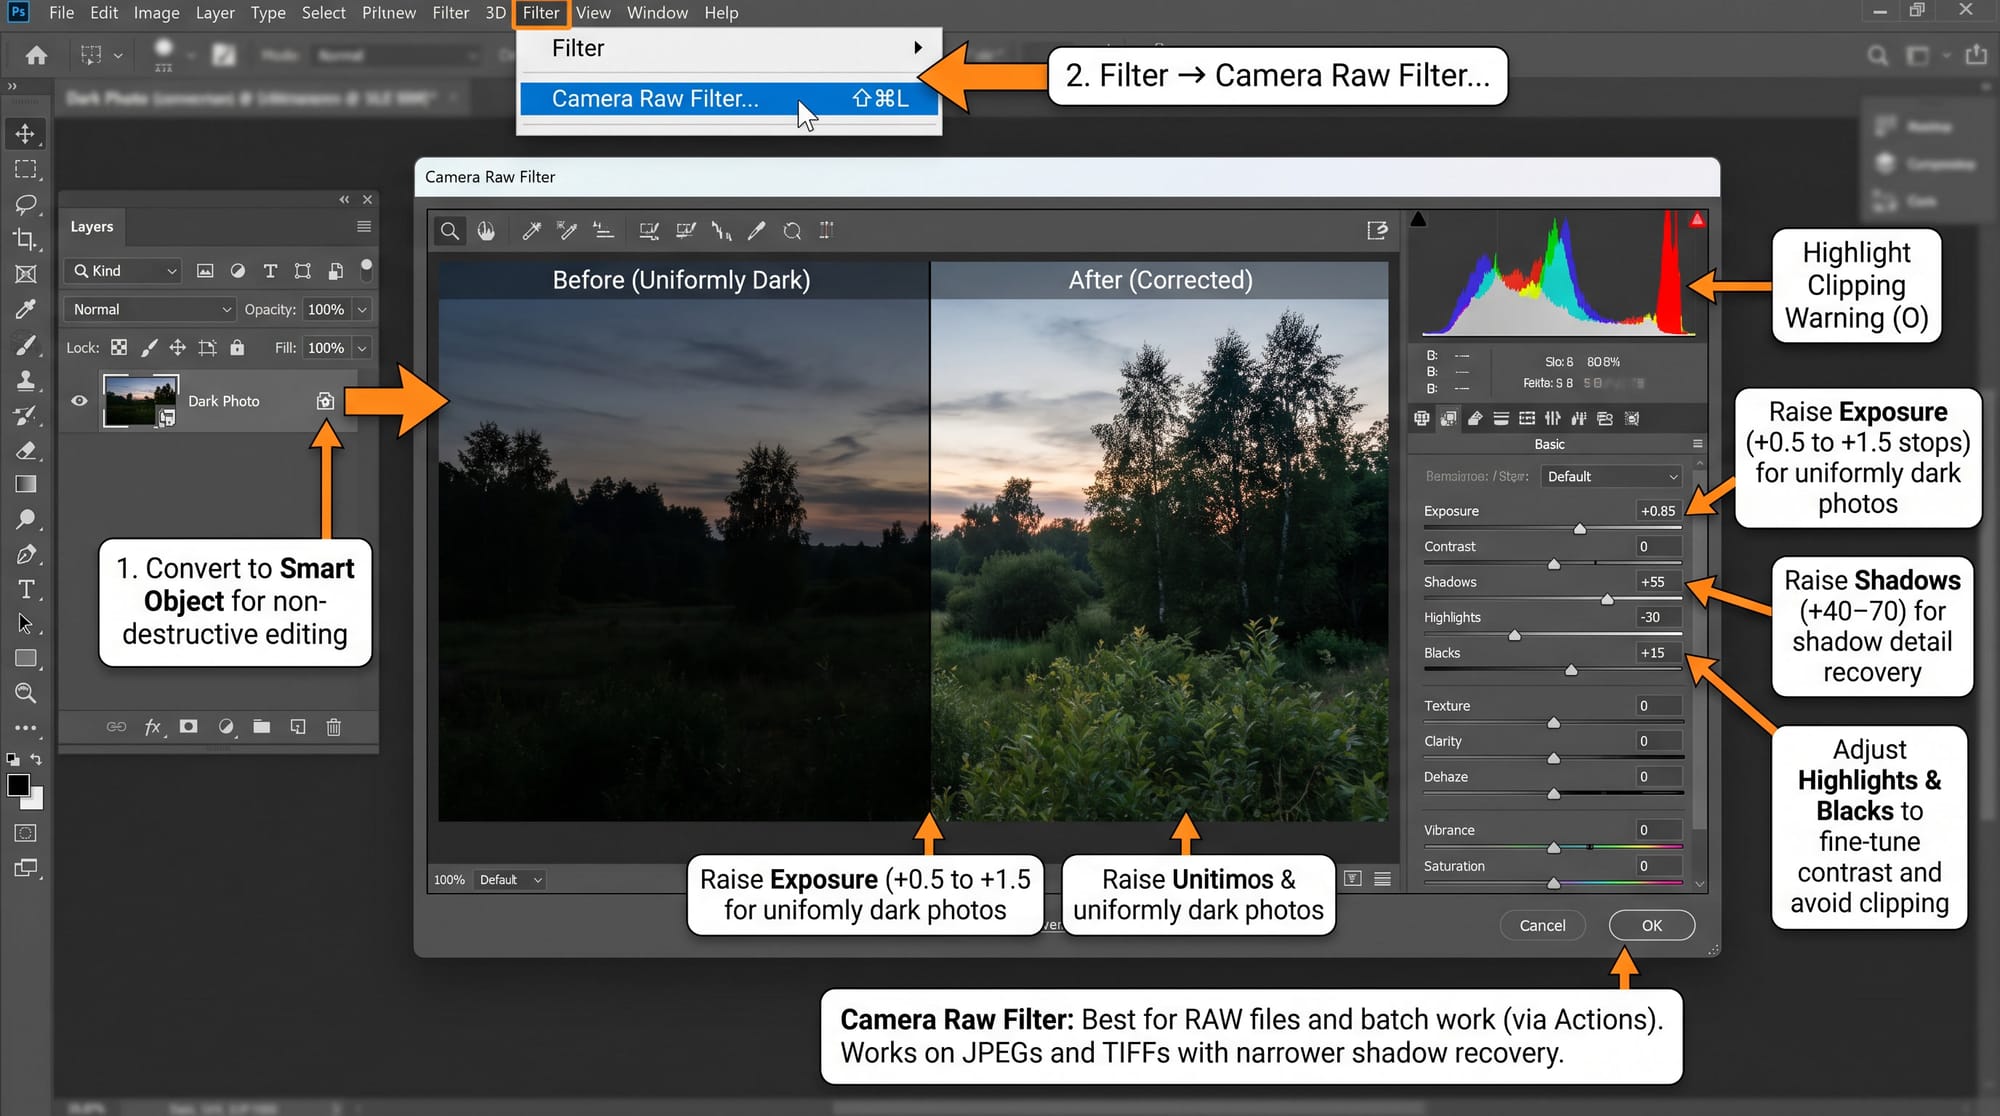
Convert your layer to a Smart Object first (right-click → Convert to Smart Object) for non-destructive editing. Then: Filter → Camera Raw Filter.
For a uniformly dark photo: raise Exposure by +0.5 to +1.5 stops. Watch the histogram for clipping on the right edge.
For a photo dark in the shadows only: leave Exposure near 0, raise Shadows to +40–70. This recovers shadow detail without affecting midtones or highlights.
After brightening, check Highlights — pull it down slightly (-20 to -40) if raising Exposure has pushed highlights toward clipping. Raise Blacks slightly (+10 to +20) if the image looks flat after the correction. These four sliders together — Exposure, Shadows, Highlights, Blacks — handle most dark photo corrections cleanly.
Camera Raw Filter works on JPEGs and TIFFs as well as RAW files. On JPEGs the shadow recovery range is narrower than on RAW, but for exposures 1–2 stops under it handles the correction well.
Which method to use when
The choice depends on what's actually dark in the photo and how much time you have.
The whole image is too dark and you want precise control: Curves with Luminosity blend mode. Most flexible, works on any file type.
Only the shadows are dark, highlights are fine (backlit subject, window light): Shadows/Highlights on a Smart Object. Specifically built for this situation and handles the transition between dark and light areas better than Curves.
Mildly dark photo, quick fix needed: Screen blend mode with a Levels layer. Two clicks, works well for moderate underexposure.
RAW file, or fixing multiple photos with the same correction: Camera Raw Filter as Smart Filter. Same sliders as Lightroom, saves as an Action for batch use.
If the dark photo also has significant noise from high ISO — which is common in low-light situations — fix the brightness first, then address noise. Shadow recovery increases noise visibility. Run Camera Raw Filter's Noise Reduction (in the Detail tab) or apply AI Denoise via Lightroom before returning to Photoshop. For more on fixing grain after recovering shadows, see the guide on how to fix grainy photos.
Frequently asked questions
What is the best way to fix a dark photo in Photoshop?
A Curves adjustment layer set to Luminosity blend mode gives the most control. Click in the lower-third of the diagonal line and drag upward to lift shadows, or click the centre to lift the entire image. Setting blend mode to Luminosity prevents the colour shift that Curves causes in Normal mode. For photos where only the shadows need lifting, Shadows/Highlights on a Smart Object is more precise than Curves because it analyses surrounding pixels to determine what counts as shadow.
Why does Photoshop add a colour cast when I brighten a dark photo?
Most brightening tools — Curves, Levels, Brightness/Contrast — affect both brightness and colour in Normal blend mode. Brightening amplifies existing colour imbalances in the shadows, which often look warm or magenta. The fix: change the blend mode of the adjustment layer to Luminosity. This restricts the adjustment to brightness only and leaves colour untouched. One change, immediate improvement on almost every dark photo correction.
What is the difference between Curves and Levels for fixing dark photos?
Levels has three control points: shadows, midtones, and highlights. Drag the middle (midtone) slider left to brighten. Curves gives you an unlimited number of control points along the entire tonal range, so you can brighten shadows while leaving highlights untouched, or create a custom brightness curve for complex corrections. For a simple overall brightening, Levels is faster. For targeted corrections — lift shadows without touching highlights — Curves is more precise.
How do I fix a dark photo in Photoshop without losing quality?
Use adjustment layers rather than Image → Adjustments. Adjustment layers are non-destructive — they apply changes without modifying the original pixels. For Shadows/Highlights (which has no adjustment layer option), convert the layer to a Smart Object first before applying it through Image → Adjustments. This stores the adjustment as an editable Smart Filter rather than baking it into the pixels.
Can Photoshop recover a completely black photo?
No. If an area of the photo is pure black (pixel value 0), there is no image data to recover — brightening it produces grey noise, not recovered detail. The same applies to RAW files where the shadows are fully clipped. Photoshop can brighten images that are underexposed but retain shadow detail; it can't invent detail that wasn't captured. For RAW files, Camera Raw Filter's Shadow slider can recover significantly more than you'd expect — RAW files contain more shadow data than JPEGs — but it has a hard limit.
Should I fix dark photos in Lightroom or Photoshop?
For RAW files, Lightroom is usually faster — the Shadows, Exposure, and Blacks sliders in the Basic panel do the same work as Camera Raw Filter, and the workflow is non-destructive by default. Photoshop makes sense when you need to combine multiple exposures, apply corrections to specific masked regions, or work on a JPEG that needs more than basic exposure adjustment. For simple underexposure on a RAW file, Lightroom. For complex or selective corrections, Photoshop. For how to fix dark photos in Lightroom specifically, see the guide on fixing dark or underexposed photos in Lightroom.