How to Fix Blurry Photos in Lightroom
Shot a portrait session last spring where I'd been shooting wide open at f/1.4 — good light, fast keeper rate, but about 30 frames came back softer than I wanted. Not motion blur, just missed focus by a few millimetres. Lightroom fixed most of them well enough to deliver. Here's how to fix blurry photos in Lightroom, and what the sliders actually do.
Quick answer: to fix a blurry or soft photo in Lightroom, go to Develop module → Detail panel → raise Amount to 60–80, keep Radius at 1.0–1.2, hold Alt/Option and drag Masking until only edges show white (around 40–70 for portraits). Always judge at 100% zoom. For low-resolution or heavily cropped photos, run Super Resolution first.
First: identify what kind of blur you have
Lightroom handles different types of blur differently. Zoom to 100% before touching any sliders.
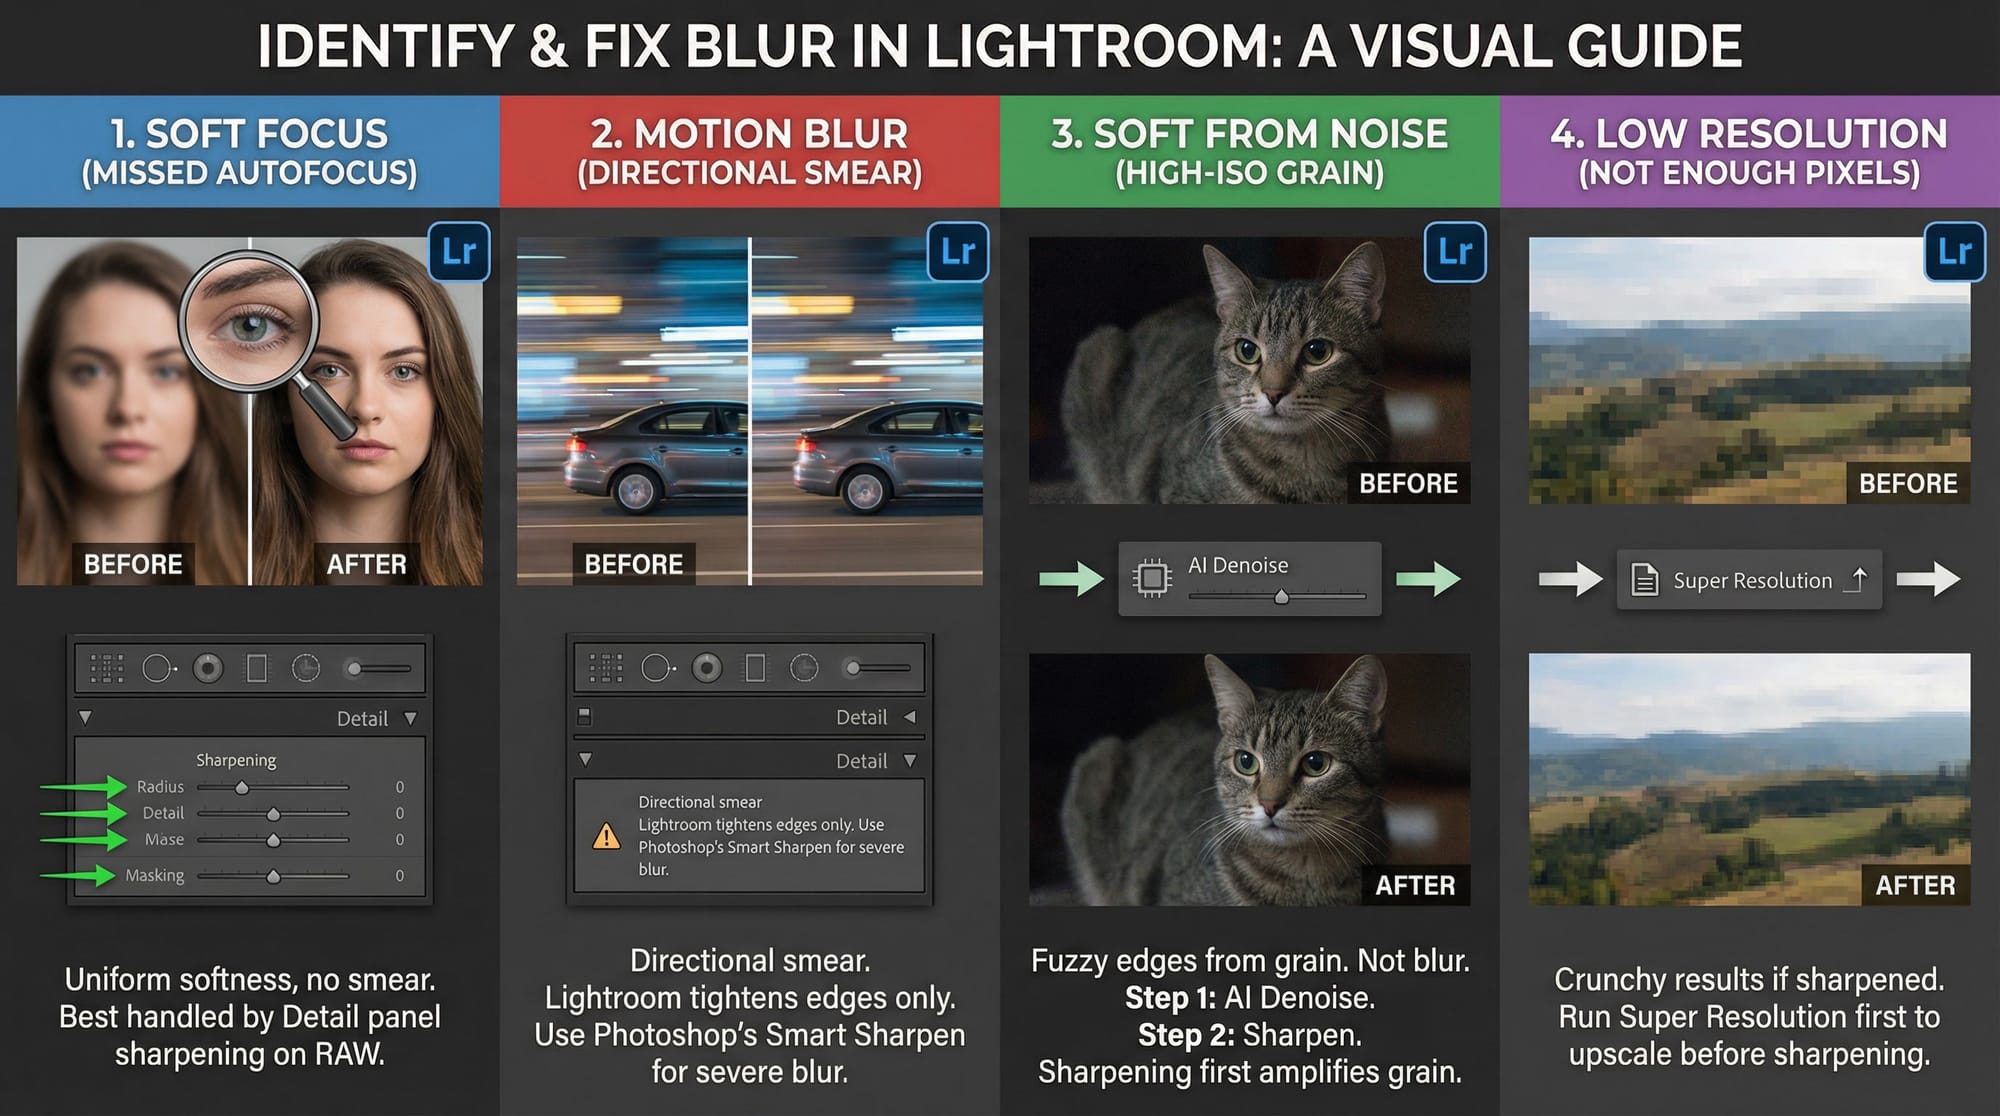
Soft focus (slightly missed autofocus) — uniform softness, no directional smear. This is what Lightroom handles best. The Detail panel sharpening can recover a lot here, especially on RAW files.
Motion blur — directional smear. Lightroom's sharpening tools don't address motion blur specifically. They can tighten the edges of a motion-blurred photo slightly but won't fix it. For severe motion blur, you need a dedicated sharpening tool like Photoshop's Smart Sharpen with Motion Blur mode.
Soft from noise — high-ISO grain making edges look fuzzy. This isn't blur — it's noise that reads as softness. Fix the noise first with AI Denoise, then sharpen. Sharpening before denoising amplifies the grain and makes the image look worse.
Low resolution or heavy crop — not enough pixels to look sharp at the intended output size. Run Super Resolution (covered below) before sharpening. Sharpening a low-res image without upscaling first produces crunchy, artificial results.
The Detail panel: sharpening workflow
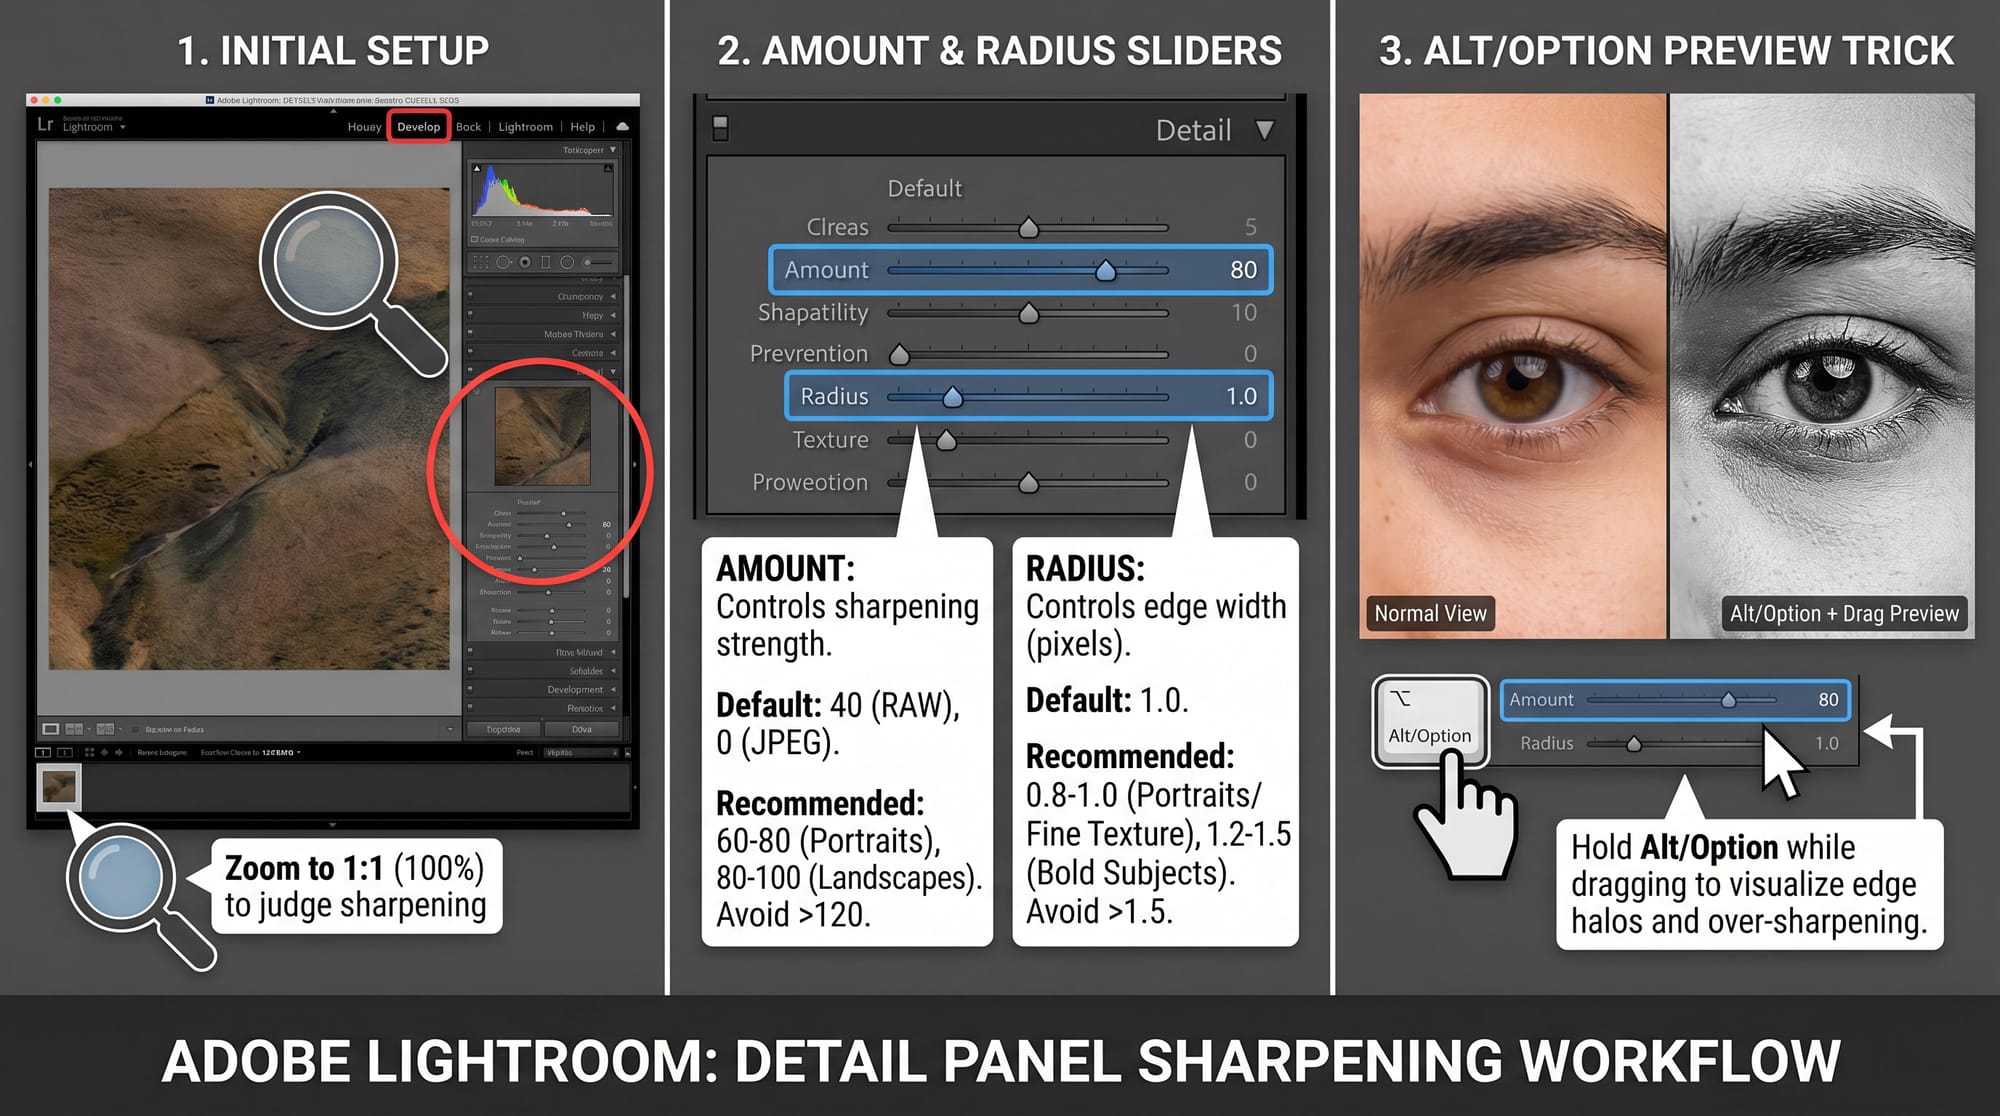
Open the Develop module in Adobe Lightroom. Scroll to the Detail panel. Zoom your main view to 1:1 (100%). You cannot properly judge sharpening at fit view — it always looks better than it is.
The four sliders work together. Here's what each one does and where to set it.
Amount — controls how much sharpening is applied. Default is 40 for RAW, 0 for JPEG. For a soft portrait, start at 60–80. For a landscape with fine detail (foliage, rock texture), 80–100. Going above 120 usually produces obvious artifacts — visible halos around edges. Hold Alt/Option while dragging to see the effect on a greyscale preview that makes over-sharpening visible before it looks wrong in colour.
Radius — controls how wide the sharpening effect extends around each edge, measured in pixels (0.5–3.0). Keep this at 1.0–1.2 for most images. Portraits: 0.8–1.0 for natural-looking skin. Landscapes with fine texture: 0.8–1.0. Large, bold subjects: 1.2–1.5. Above 1.5, edges start showing haloes visible at full size. Hold Alt/Option while dragging to see the edge width in preview.
Detail — controls how much fine texture gets sharpened (0–100). Low values sharpen only major edges. High values sharpen everything down to fine grain. Default is 25. For landscapes and product shots: 40–60. For portraits: keep at 25 or lower. Raising Detail on a face brings out pores and skin texture fast — sometimes intentionally, often not.
Masking — the most practically useful slider. It restricts sharpening to edges and protected smooth areas (sky, skin, out-of-focus backgrounds) from being sharpened. Hold Alt/Option while dragging — the image turns black and white. Black areas won't be sharpened; white areas will. Drag right until the smooth areas go black but the edges you want sharpened stay white. For portraits: 40–70 keeps sharpening on eyes and edges while protecting skin. For landscapes: 20–40. For images with complex textures everywhere: 0–20.
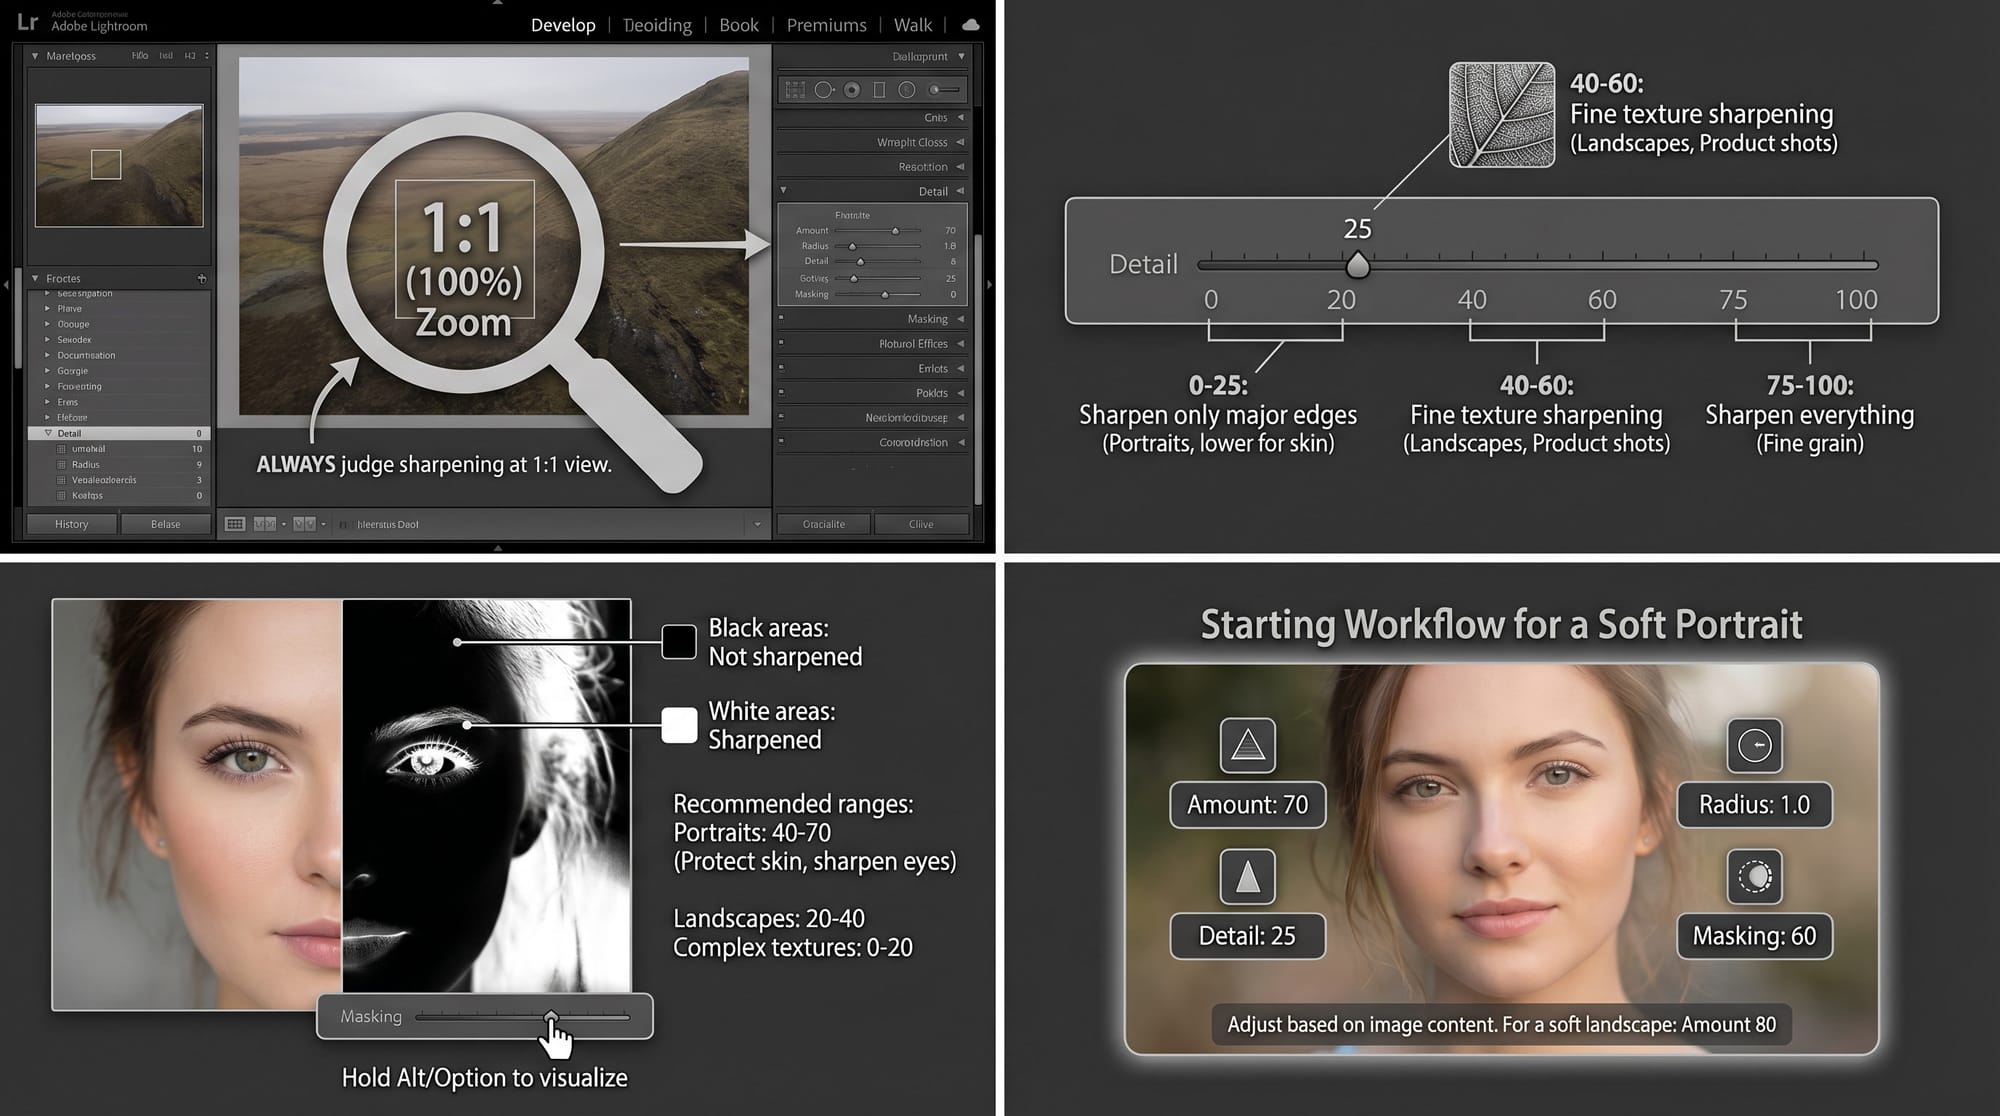
A starting workflow for a soft portrait: Amount 70, Radius 1.0, Detail 25, Masking 60. For a soft landscape: Amount 80, Radius 1.0, Detail 50, Masking 25. These aren't fixed rules — they're starting points. Adjust from there at 100% zoom.
Clarity and Texture: what they add that sharpening doesn't
The Basic panel's Clarity and Texture sliders work differently from Detail panel sharpening and are often more useful for fixing the overall impression of softness.
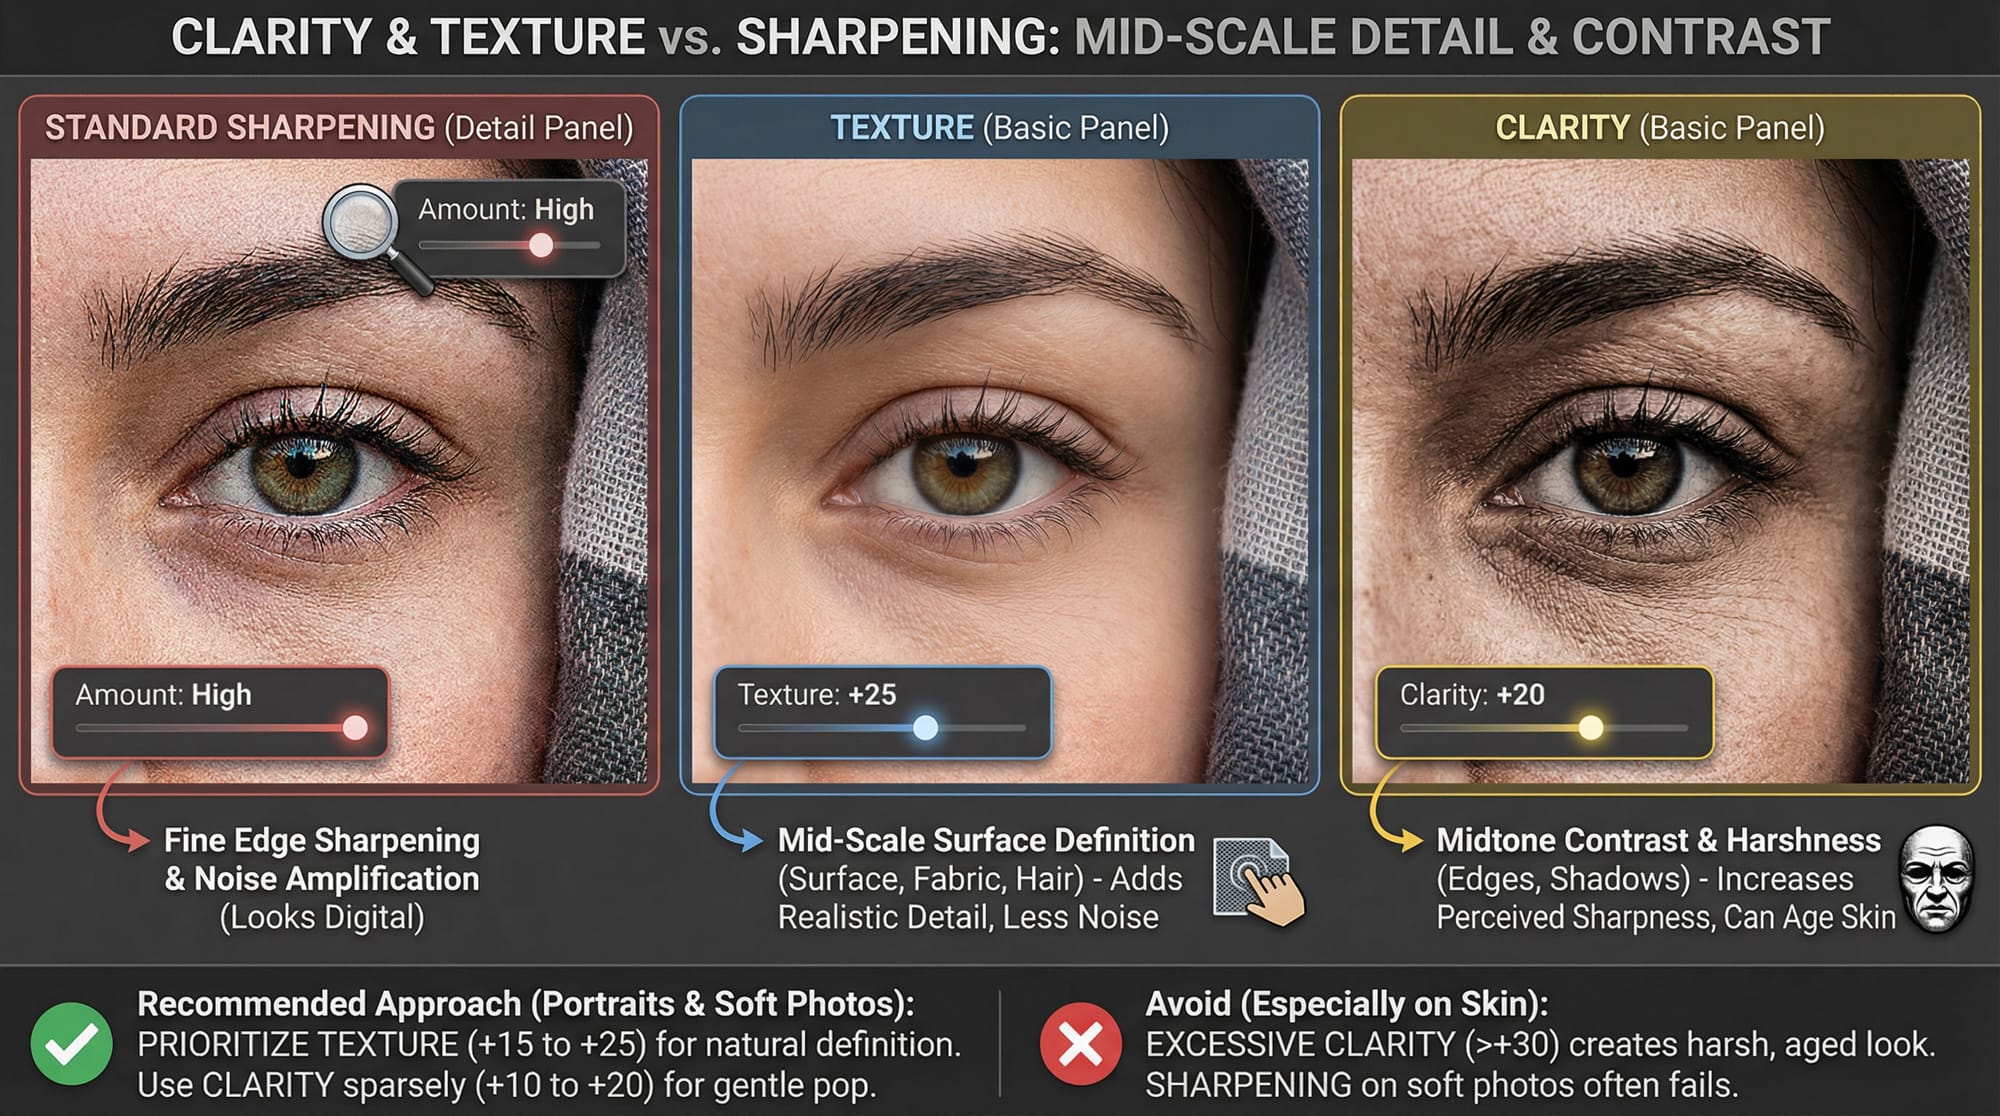
Texture (Basic panel) adds definition to mid-scale detail — surface texture, fabric, hair — without sharpening fine edges or amplifying noise. For a photo that looks "smooth" or flat rather than sharp, +15 to +25 Texture often gives back more apparent sharpness than cranking the Amount slider. It's the first thing I try on soft portraits before touching the Detail panel.
Clarity adds contrast to midtone edges, which makes the photo feel sharper without technically sharpening it. +10 to +20 on a soft image restores definition. Above +30 on portraits starts to look overprocessed — skin texture becomes harsh and faces look older. Clarity above +20 on skin is a common mistake on soft photos. More Texture, less Clarity is usually the better approach for portraits.
Super Resolution: when the photo is low-res or heavily cropped
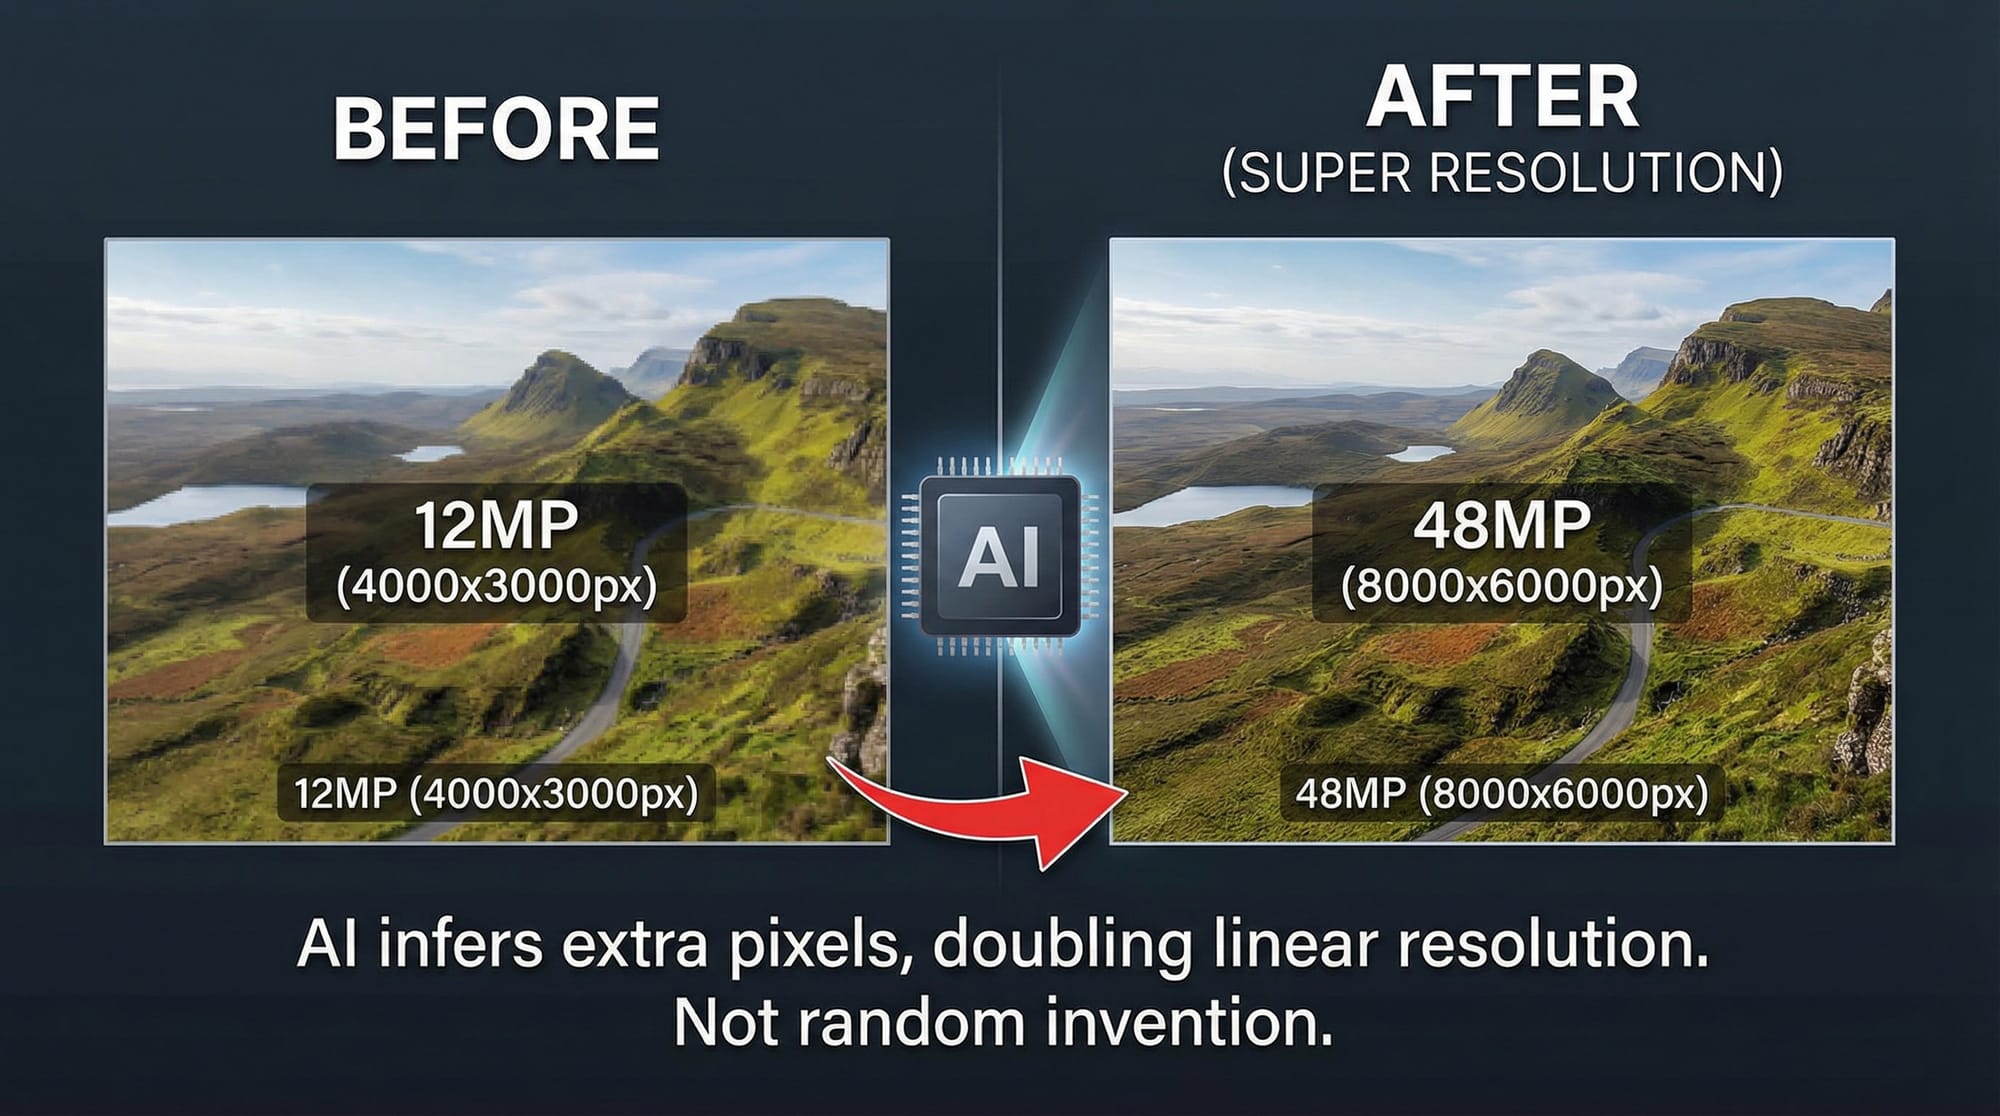
Super Resolution uses AI to double the linear resolution of an image — a 12MP file becomes 48MP. The extra pixels are inferred from the existing image data, not invented randomly. It works well on RAW files and acceptably on high-quality JPEGs.
Use it when: the photo was taken on an older camera with lower resolution; you cropped in heavily and need to print at a size larger than the cropped file supports; or the image looks soft because there simply aren't enough pixels to show fine detail.
To run it: in the Detail panel, click Super Resolution (available directly from the Detail panel in Lightroom Classic 14.4+). Alternatively, right-click the photo → Enhance → check Super Resolution → Enhance. Both paths produce the same result: a new DNG file alongside the original. Processing takes 30 seconds to 2 minutes. Note: Super Resolution cannot be applied to images larger than 128 megapixels. Run it before sharpening — the extra resolution gives the sharpening algorithms more pixels to work with, producing cleaner results.
What Super Resolution doesn't do: it can't recover focus that was genuinely missed or motion blur. If the original was soft, the upscaled version will be a larger soft image. The sharpening afterward can help, but Super Resolution on a badly out-of-focus shot won't produce a sharp photo.
AI Denoise before sharpening on high-ISO files
If the photo is both soft and noisy — common on high-ISO indoor shots — run AI Denoise before sharpening. Detail panel → Denoise → set to 40–60 → Enhance. Then sharpen.
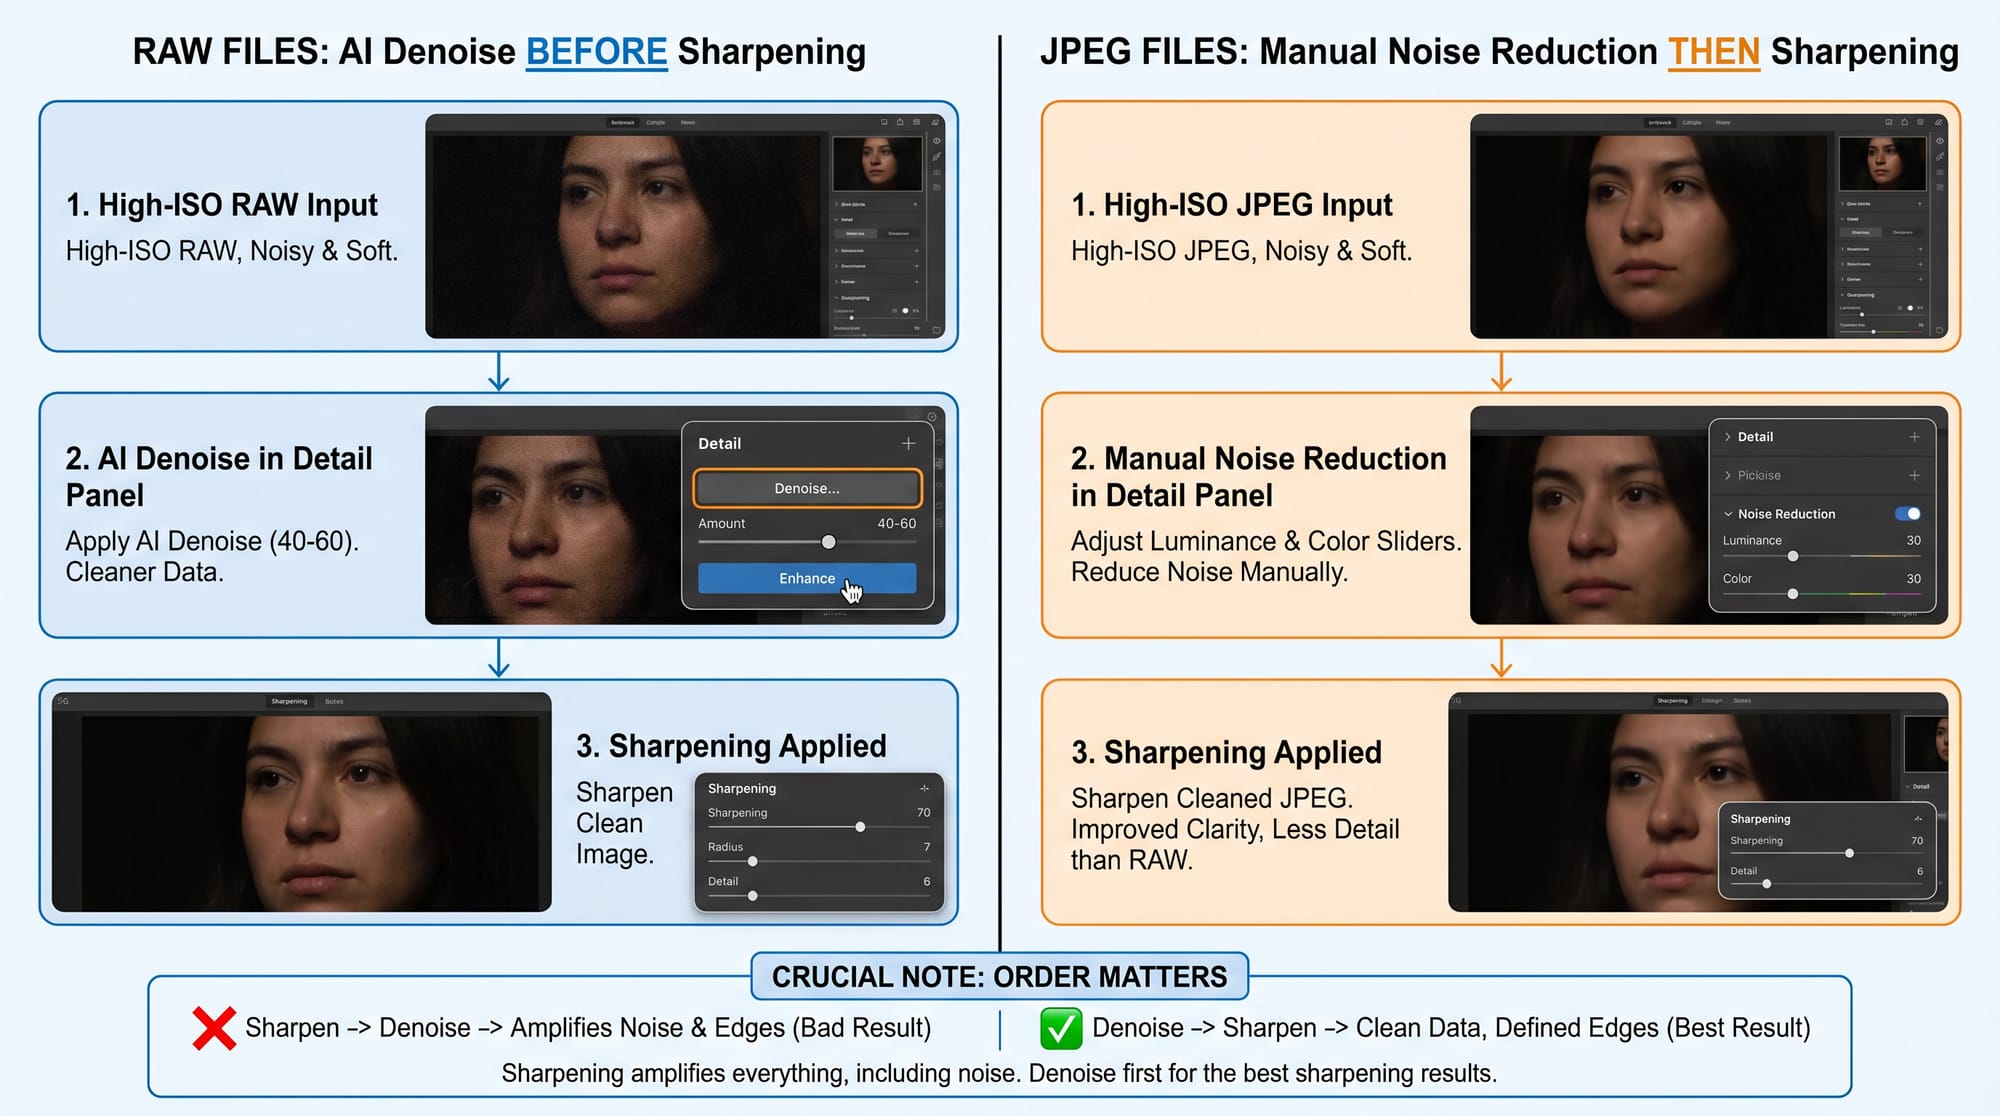
The reason order matters: sharpening amplifies both edges and noise. If you sharpen a noisy file, the noise gets louder along with the detail. If you denoise first, the sharpening has cleaner pixel data to work with and produces better edge definition with fewer artifacts.
AI Denoise works on RAW files only. For JPEGs, use the manual Luminance and Color sliders in the Noise Reduction section of the Detail panel, then sharpen. For more on noise reduction specifically, see the guide on fixing grainy photos.
Local sharpening with masks
Global sharpening applies to the entire frame. When you want to sharpen only the subject — especially eyes in a portrait — use a local mask.
In the Develop module, open the Masking panel (the circle icon in the toolbar). Add Mask → Select Subject. Lightroom uses AI to isolate the main subject. Once the mask is in place, add a Sharpening adjustment inside the mask: drag the Sharpness slider (not the same as the Detail panel Amount) to +30 to +60 for portraits. The background stays untouched.
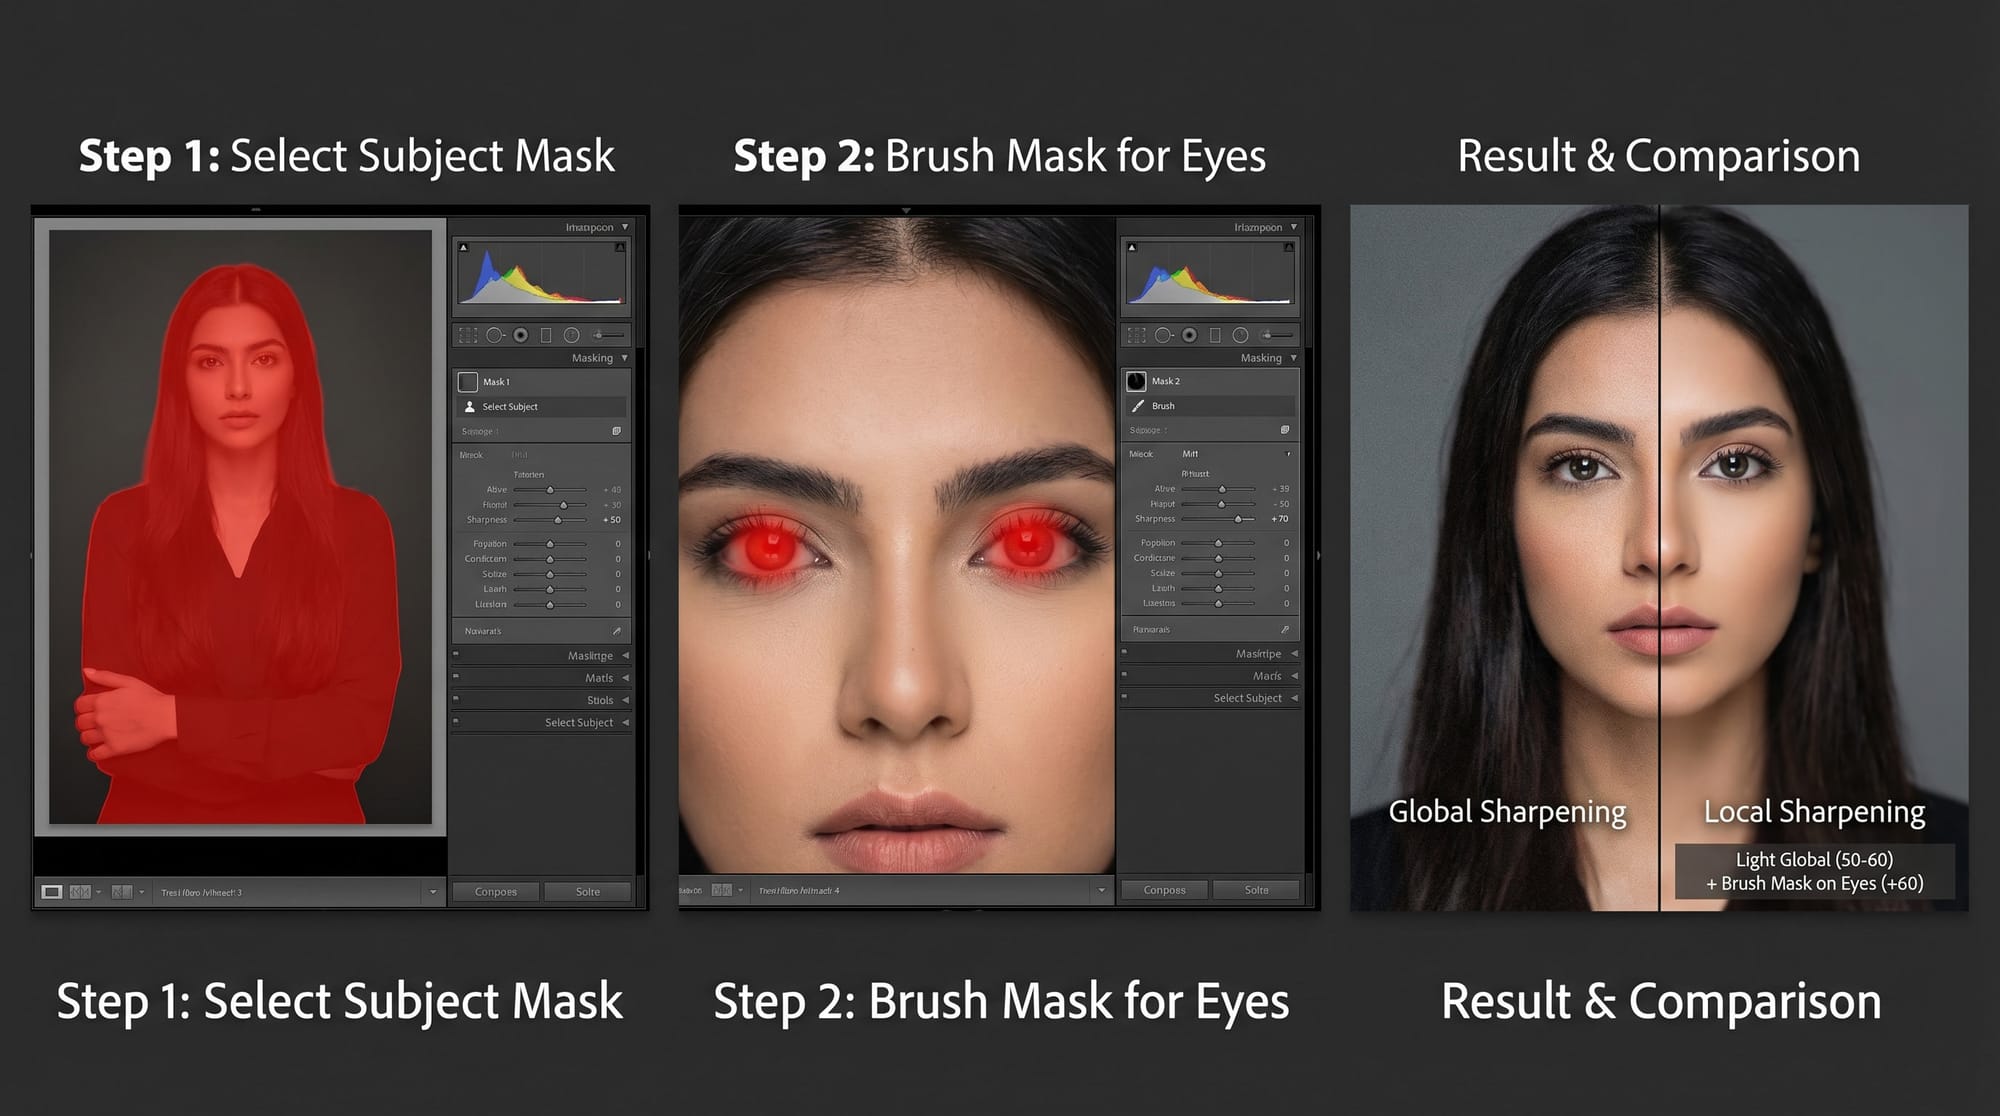
For more precision on eyes specifically: Add Mask → Brush. Set a small brush size, paint directly over the eyes at 100% zoom. Add Sharpness +50 to +80 within the brush mask. This is the most controlled way to sharpen a portrait — eyes get full treatment, skin gets none.
The local mask approach takes more time than global sharpening but consistently looks better on portraits. The combination I use most: light global sharpening (Amount 50–60, Masking 60–70) plus a brush mask on the eyes at +60.
When Lightroom sharpening isn't enough
Lightroom's sharpening tools handle soft focus and general softness well. They don't handle motion blur, severe missed focus, or compression blur (photos repeatedly saved as JPEG at low quality). For those situations:
Photoshop's Smart Sharpen (Filter → Sharpen → Smart Sharpen) with the Motion Blur angle matched to the smear direction is more effective on motion-blurred photos than anything in Lightroom. For severely out-of-focus shots or phone photos taken through glass, other dedicated sharpening tools can push further than Lightroom's Detail panel allows. The general guide on fixing blurry photos across all tools covers those cases in more detail.
Frequently asked questions
What is the best Lightroom setting to fix blurry photos?
Start in the Detail panel: Amount 60–80, Radius 1.0–1.2, hold Alt/Option and drag Masking until smooth areas go black (around 40–70 for portraits). Add Texture +15 to +25 in the Basic panel for overall definition. Always judge at 100% zoom — fit-view preview makes sharpening look better than it is. If the photo is also noisy, run AI Denoise before sharpening.
What does the Masking slider do in Lightroom sharpening?
It restricts sharpening to areas with defined edges and protects smooth areas from being sharpened. Hold Alt/Option while dragging — the image turns black and white. Black areas won't be sharpened (sky, skin, flat backgrounds); white areas will (edges, hair, textures). For portraits, setting Masking to 40–70 keeps sharpening on eyes and edges while protecting skin from looking porous or harsh.
Should I use Super Resolution before sharpening?
Yes, if the photo is low-resolution or heavily cropped. Super Resolution doubles the linear pixel count using AI — a 12MP image becomes 48MP. Run it first (right-click → Enhance → Super Resolution), then sharpen the resulting file. The extra resolution gives sharpening more pixels to work with. Super Resolution doesn't fix missed focus or motion blur — it only helps when the problem is insufficient resolution.
What's the difference between Clarity, Texture, and Sharpening in Lightroom?
Sharpening (Detail panel) targets fine edges at the pixel level and uses Amount, Radius, Detail, and Masking to control where and how much. Texture (Basic panel) adds definition to mid-scale surface detail — fabric, hair, skin texture — without affecting fine edges or noise significantly. Clarity adds contrast to midtone edges, making the image feel sharper overall but also more contrasty. For portraits, Texture before Clarity before Sharpening is usually the right order — it keeps skin looking natural while restoring definition.
Can Lightroom fix motion blur?
Not effectively. Lightroom's sharpening tools address softness and missed focus well, but directional motion blur requires different processing. Photoshop's Smart Sharpen filter (Filter → Sharpen → Smart Sharpen, Remove: Motion Blur) lets you set the angle of the blur and sharpens against it. That's the more appropriate tool for motion-blurred shots. Lightroom sharpening on a motion-blurred photo will tighten edges slightly but won't remove the directional smear.