How to Colorize Black and White Photos

My grandmother's 1951 wedding photo was sharp, well-preserved, and in black and white. I wanted to colorize it — to see what it actually looked like in color. I ran it through three different AI tools before finishing in Photoshop. Every tool handled the skin tones and the church window light correctly. Every tool painted her dress pale yellow. The dress was white. That's the part most guides skip: colorizing black and white photos with AI produces confident results, and some of those results are wrong.
Quick answer: the fastest way to colorize a black and white photo is a free AI tool like Palette.fm or Photoshop's Neural Filter → Colorize. Both produce usable results in under a minute. For photos where accuracy matters — family portraits, historical images — plan to correct specific colours manually afterward, especially clothing and eye colour.
How AI colorization works — and where it fails
AI colorization tools are trained on millions of photographs. They recognize objects in the image — sky, grass, skin, wood — and assign statistically likely colours based on what those things usually look like. This works well for things with predictable colours: blue sky, green foliage, warm skin tones, brown wood. It fails on anything where colour was a human choice: clothing, painted walls, eye colour, vehicles, specific fabrics.
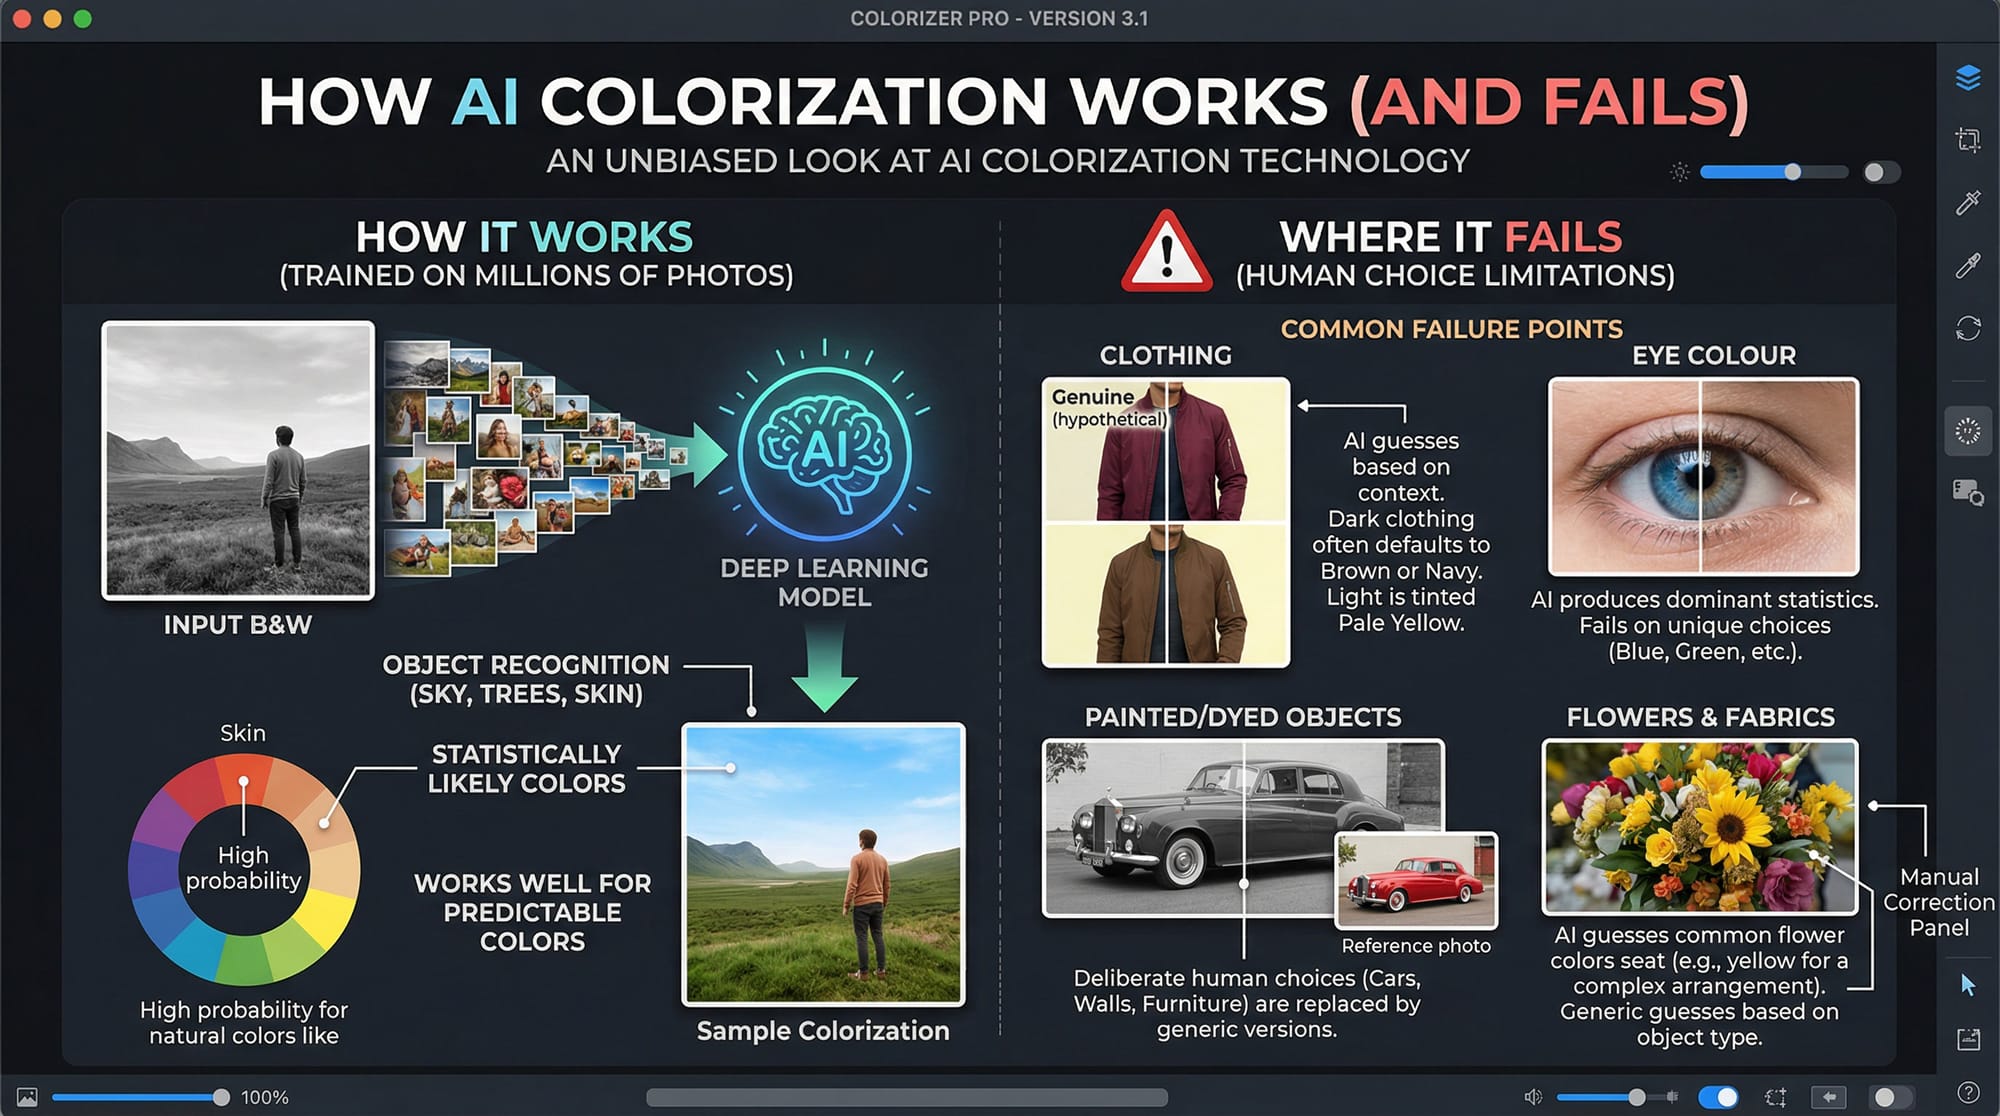
The consistent failure points across every AI tool:
Clothing — AI can't know what colour someone's jacket was. It guesses based on context. Dark formal clothing often comes out brown or navy when it might have been burgundy or olive. Light clothing is frequently tinted pale yellow when it was white.
Eye colour — AI consistently produces brown or grey eyes because those are statistically most common. Blue or green eyes need manual correction.
Painted or dyed objects — cars, walls, furniture, flowers in vases. Anything whose colour was a deliberate choice tends to come out a generic version of what that object "usually" looks like.
For old photos where you know the actual colours — from memory, other photographs, or family records — the workflow is: run AI first, then correct the wrong colours manually. AI handles 80% of the work; you handle the meaningful 20%.
How to colorize a black and white photo in Photoshop
Photoshop's Neural Filter Colorize is built into Adobe Photoshop and gives more post-colorization control than any online tool. It requires a Creative Cloud subscription and an internet connection for the first download.
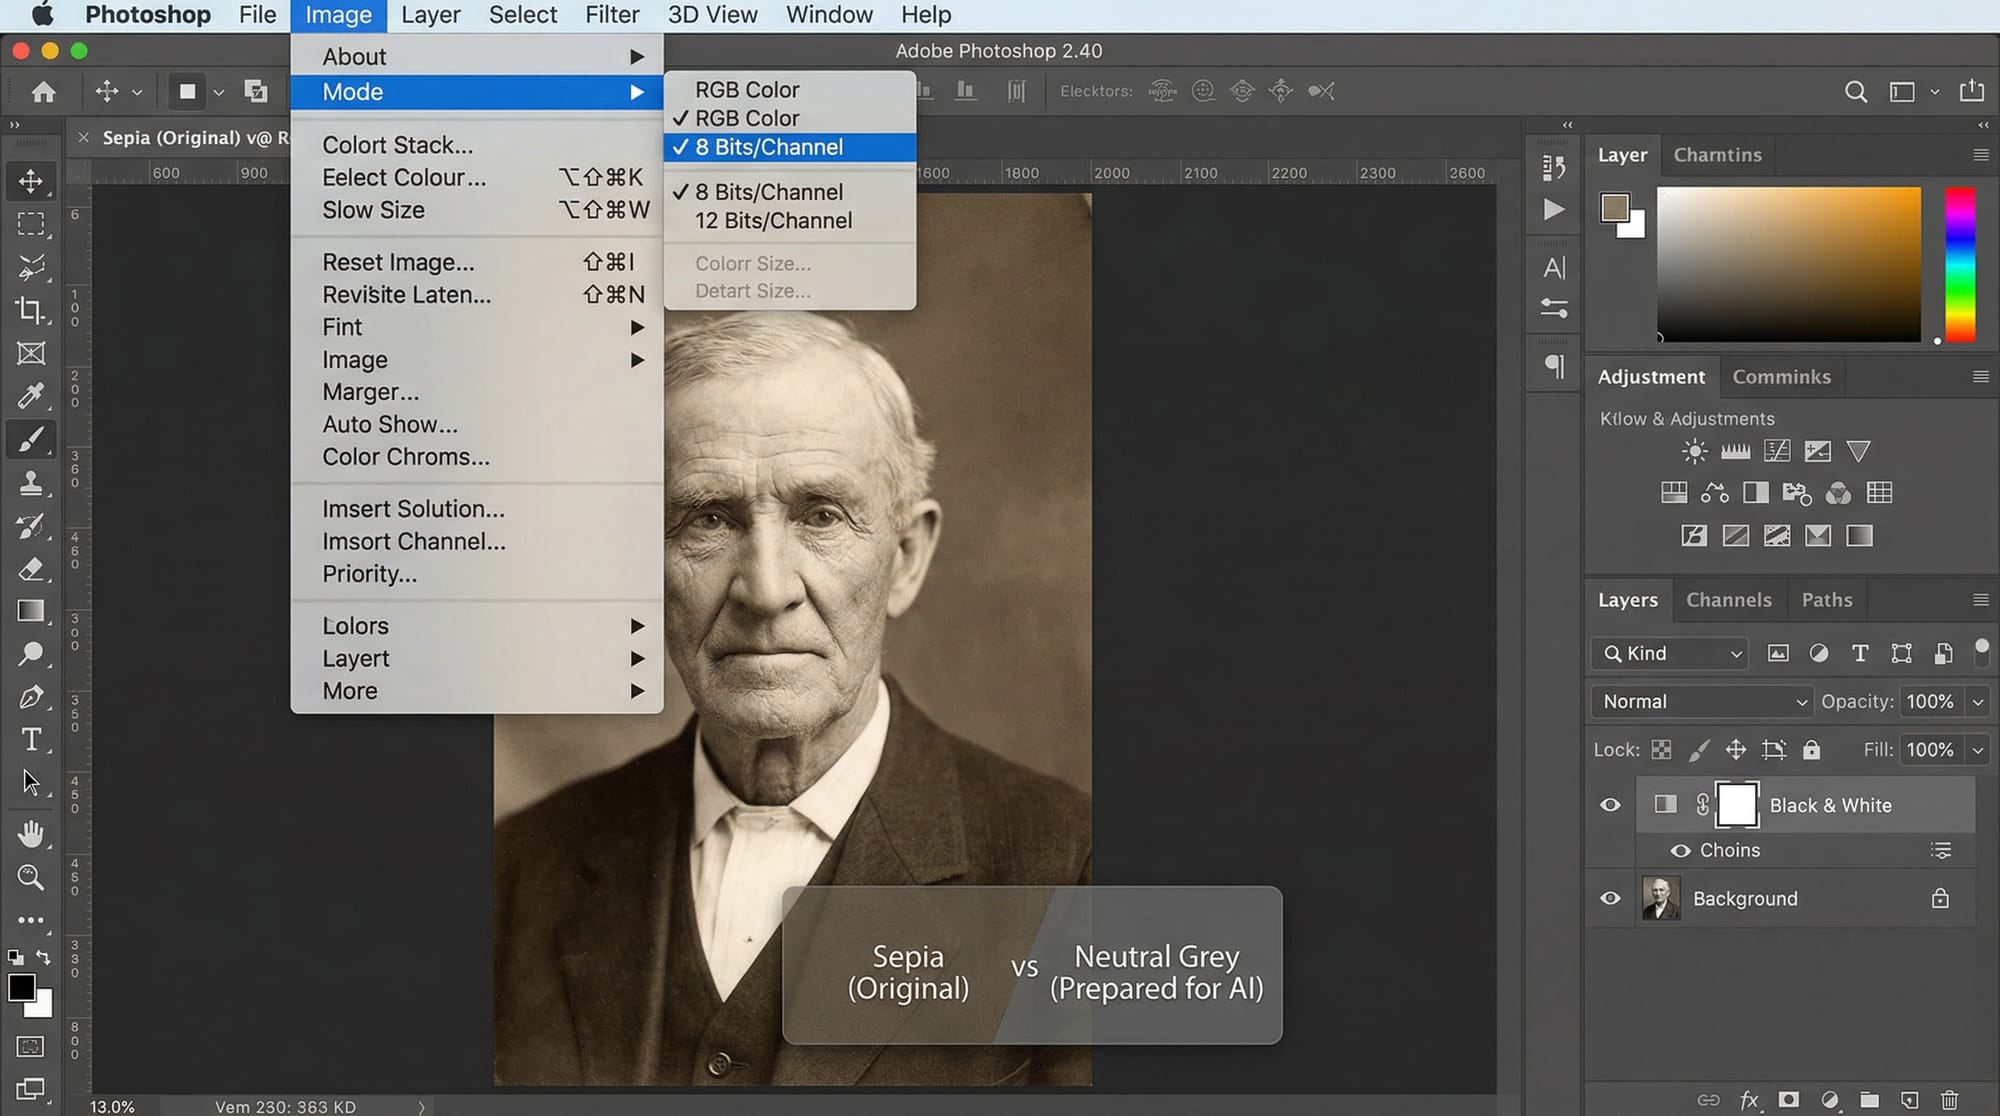
Step 1 — Prepare the image. Convert to RGB: Image → Mode → RGB Color. The Colorize filter only works in RGB 8-bit mode. If the photo is sepia-toned, add a Black and White adjustment layer first to neutralize the warm tint — AI performs better on neutral grey than on sepia.
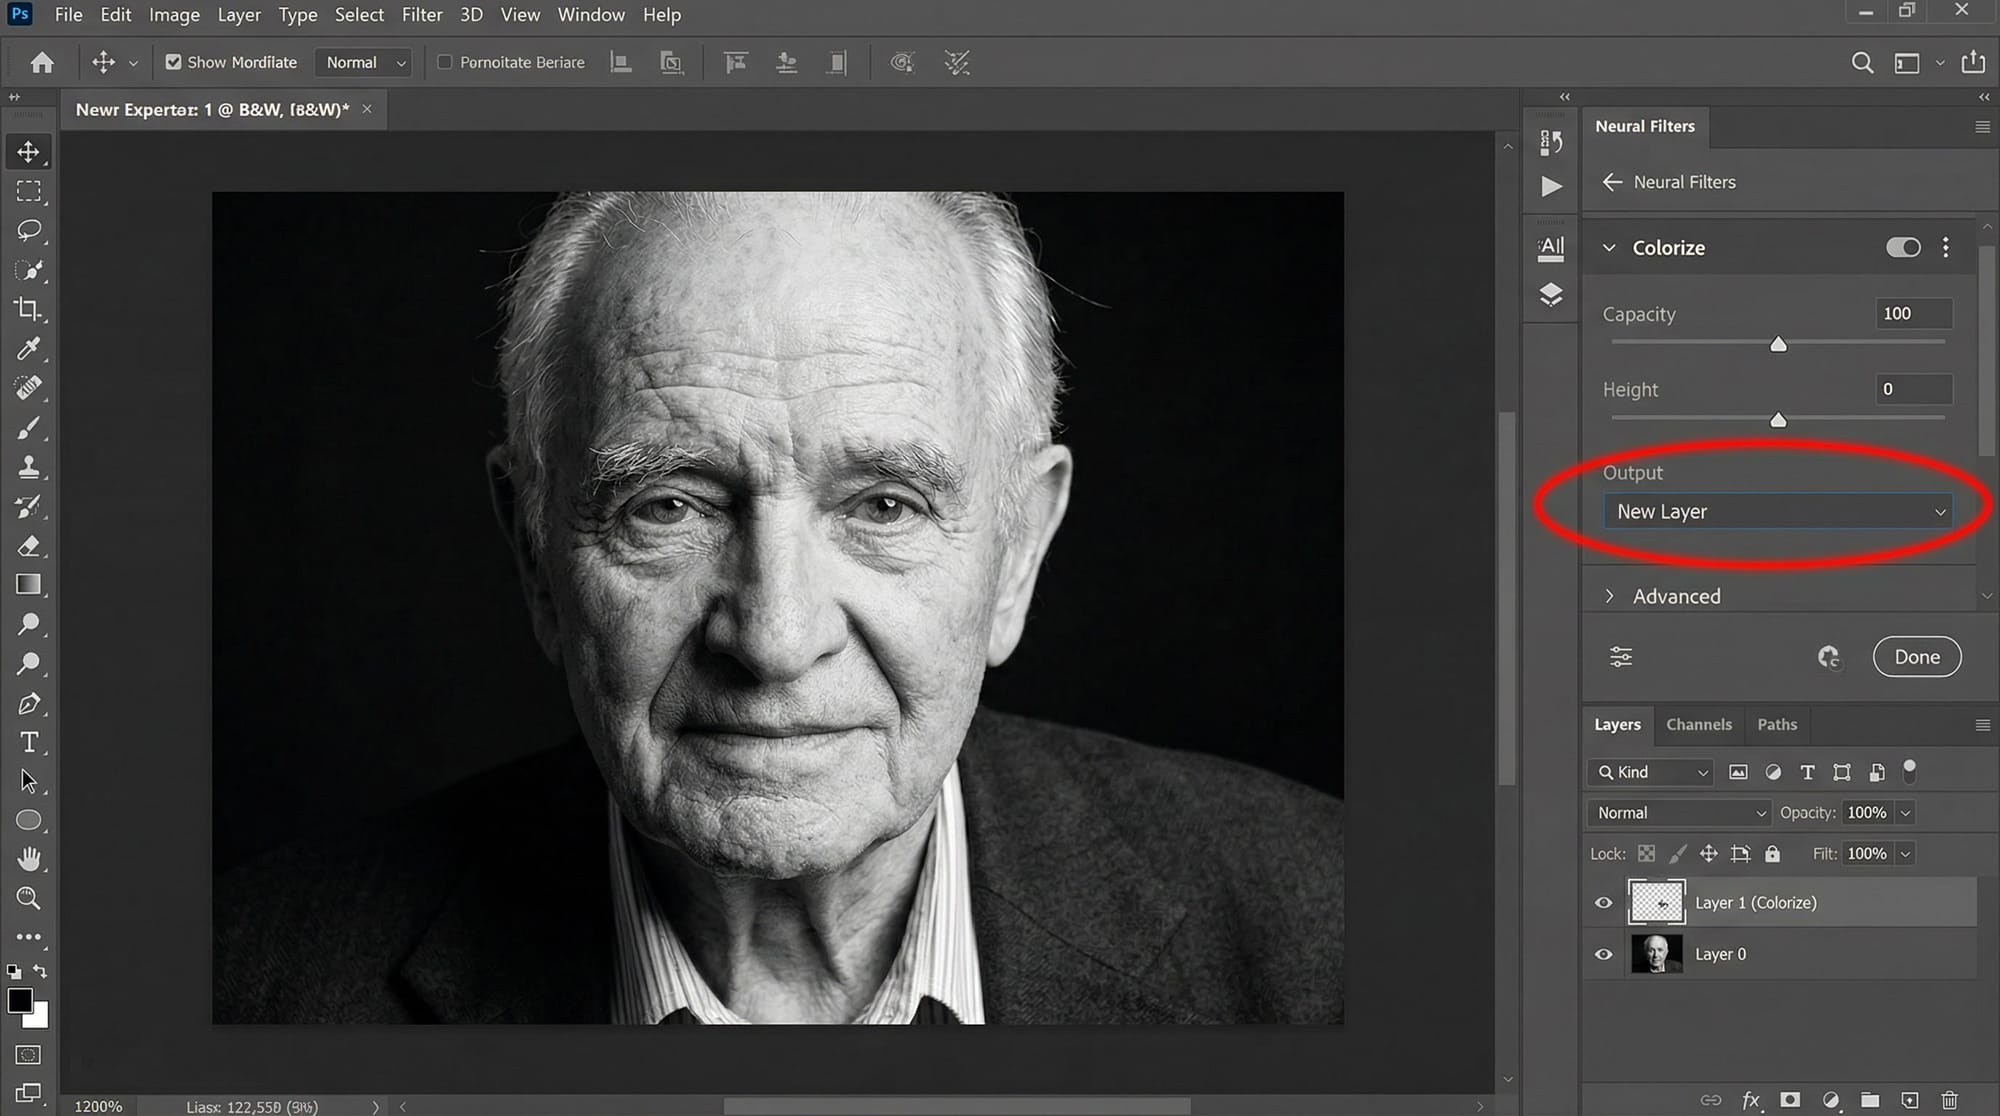
Step 2 — Open Neural Filters. Filter → Neural Filters. Find Colorize and toggle it on. If it shows a cloud icon, click to download it — about a minute. The filter processes and applies colours automatically.
Step 3 — Fix wrong colours with focal points. Where the colour looks wrong, click that area in the preview to drop a focal point. A colour picker appears — choose the correct colour. Focal points override the AI's guess for that region. This is where you fix the dress, the eyes, the walls.
Step 4 — Output to a new layer. In the Output dropdown, choose New Layer. This keeps the original intact and lets you reduce opacity or mask the colorization layer selectively.
Step 5 — Refine with Color blending mode. Add a blank layer above the Colorize output. Set it to Color blending mode. Paint with a soft brush at 30–50% opacity to correct specific areas — wrong fabric colours, unnatural backgrounds, oversaturated skin. Color mode affects only the hue; the luminance the original photo preserved stays untouched.
Known issue: the Colorize Neural Filter occasionally produces transparent pixels when outputting as a colour layer. If this happens, restart Photoshop and re-apply.
How to colorize a black and white photo online for free
For a quick result without opening Photoshop, three browser-based tools produce consistently usable results on old photos and portraits.
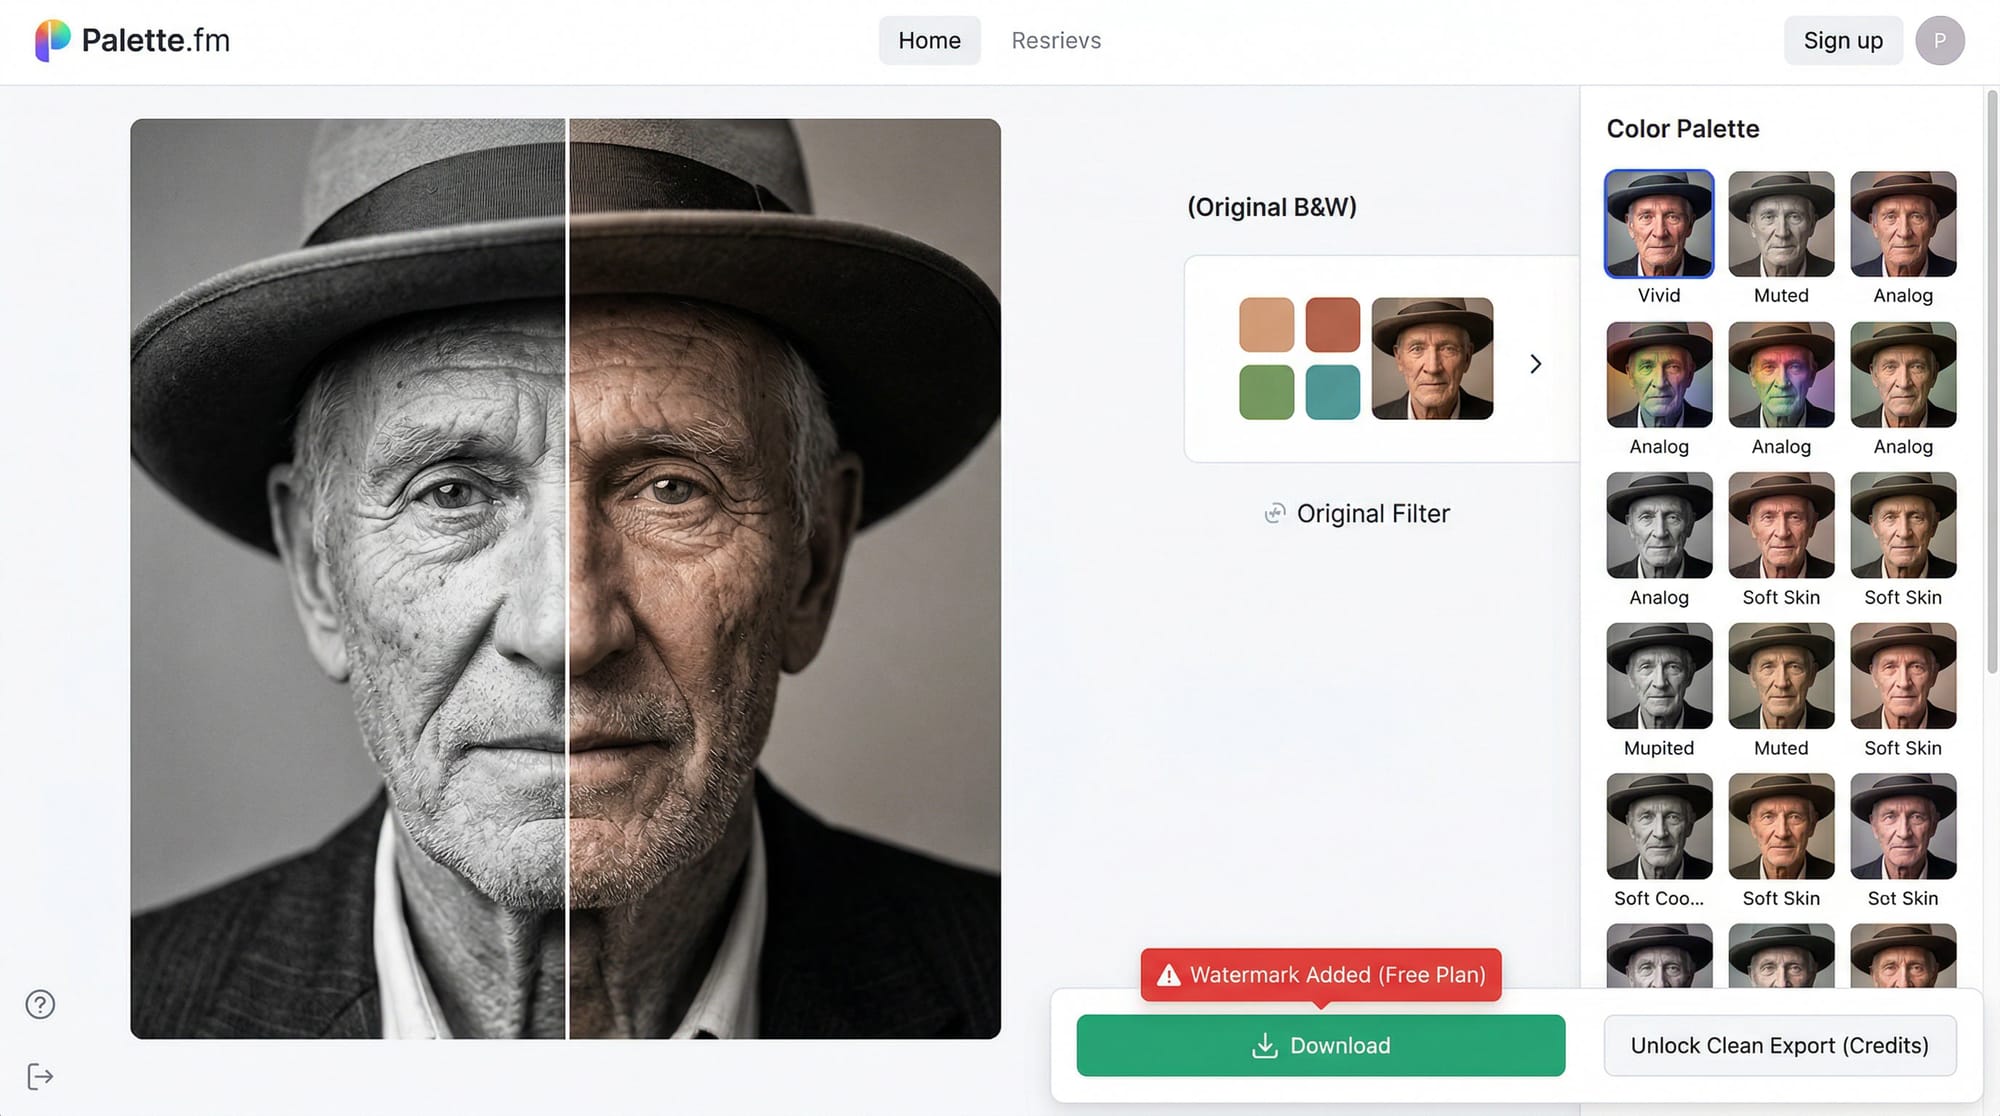
Palette.fm — reliable results on skin tones and natural environments. Upload, choose a colour style from 21 filter options, preview. The free version now adds a watermark to downloads — for a clean export you'll need a paid plan or credits. Worth testing first: unlimited free previews let you see the result before committing. Good starting point for any portrait or historical photo.
Canva's Colorify — built into Canva's photo editor, free with an account, no watermark. Results tend toward lower saturation than Palette.fm and quality is less consistent, but the advantage is immediate: you can continue editing the colourised image in Canva, resize it, add text, or export directly to social formats without switching apps.
Adobe Express — free with an Adobe account, consistent quality on portraits. Results export cleanly to Lightroom or Photoshop for follow-up corrections. If you're already in the Adobe ecosystem, this is the lowest-friction option.
All three make the same kinds of mistakes on clothing and eye colour. They differ mainly in skin tone quality, watermark policy, and how much editing control you get after colorization.
How to colorize a black and white photo on iPhone and Android
No built-in iOS or Android photo app includes colorization. The fastest mobile option is Palette.fm in a mobile browser — works the same as desktop without an app download.
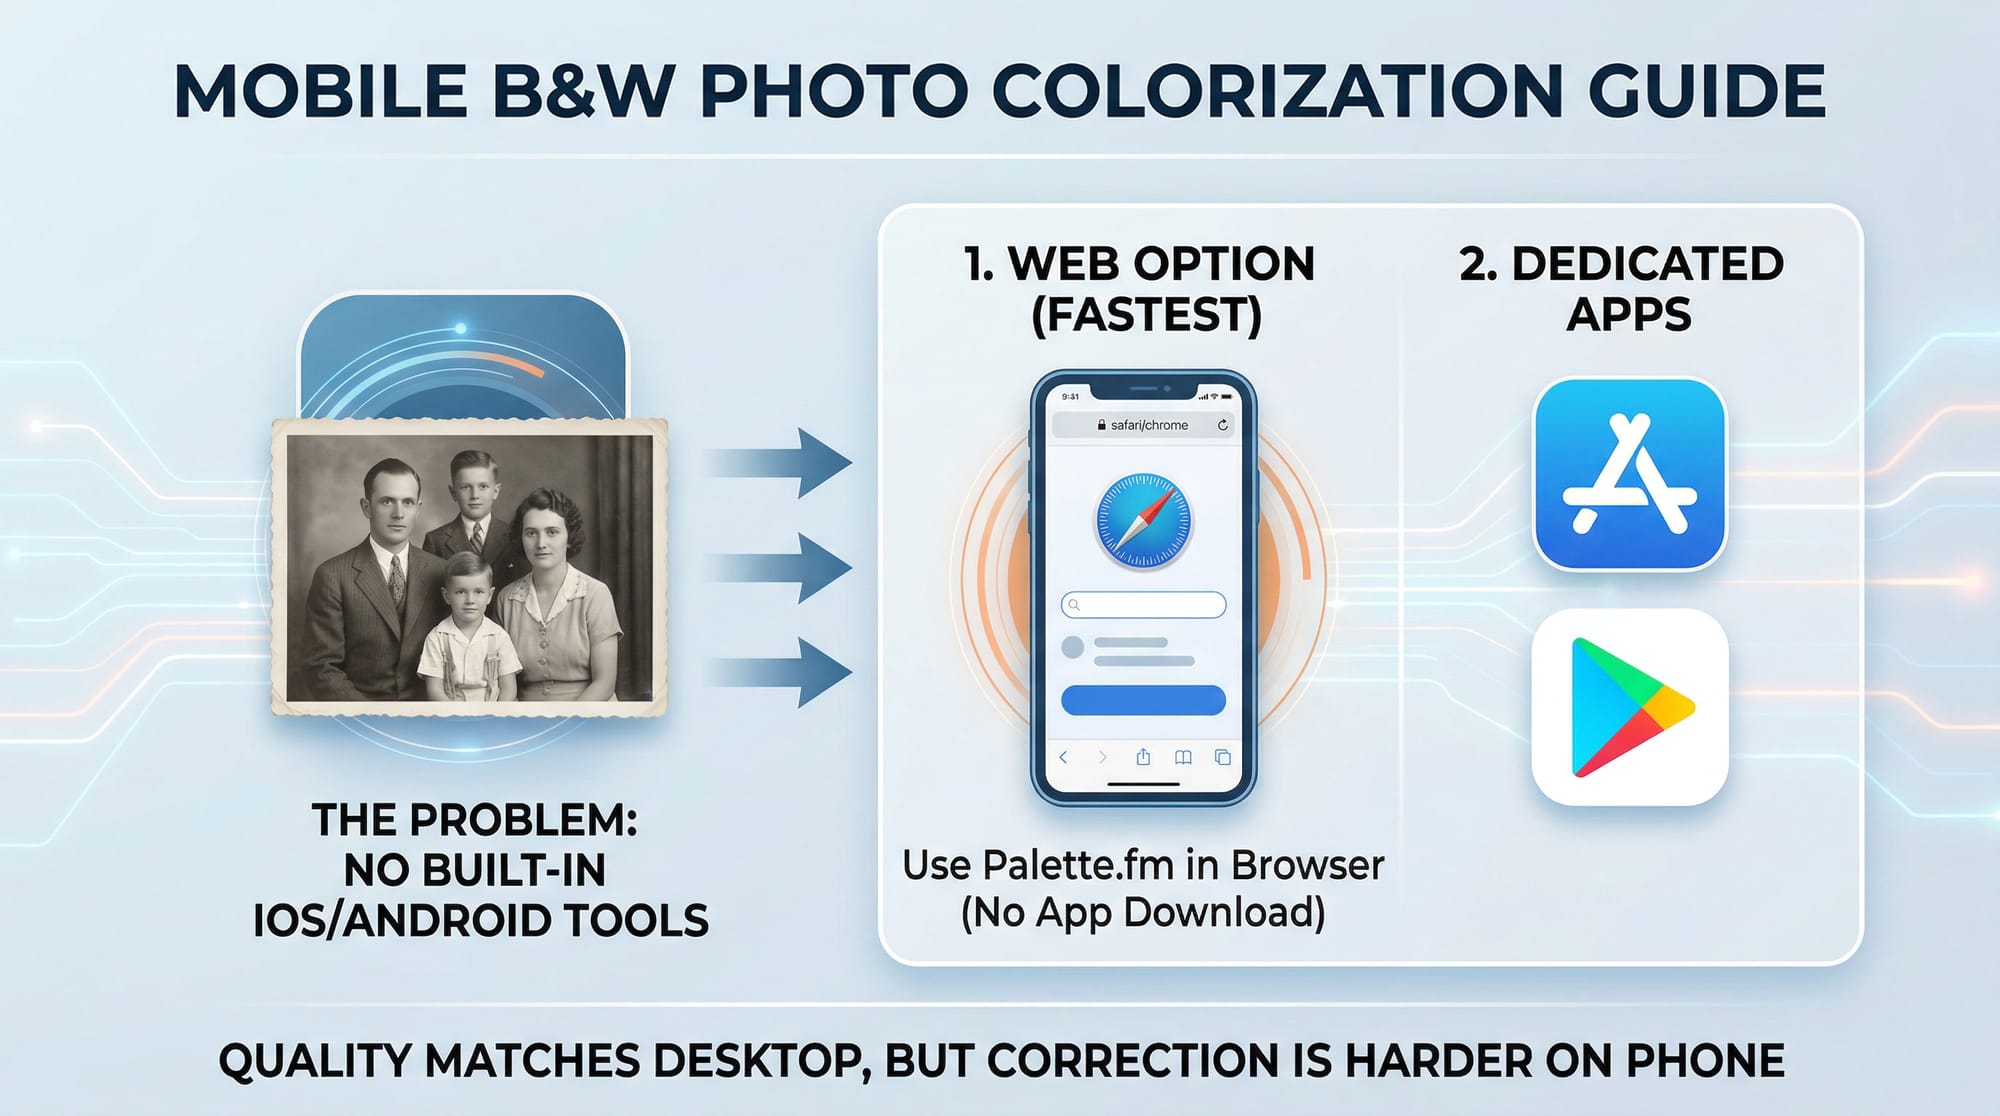
For a dedicated mobile app: Colorize! (iOS) produces decent results on portraits and handles batch processing for multiple old photos at once. Remini (iOS and Android) includes colorization alongside general AI enhancement — useful if you're restoring and colorising a damaged photo in one step.
Mobile colorization quality matches desktop online tools. The limitation is the correction step — fixing wrong colours is much harder on a phone than in Photoshop. If accuracy matters, do corrections on desktop.
How to manually correct AI colorization in Photoshop
After running any AI colorization — from Photoshop's Neural Filter or an online tool imported back into Photoshop — this is the correction workflow:
Create a new layer above the colourised image. Set the blend mode to Color. This layer controls only colour, not brightness — you can't accidentally damage the tonal range the original black and white photo preserved.
Select a Brush Tool, set opacity to 30–40%. Sample a colour that looks right for the area — use the eyedropper on a reference photo if you have one. Paint over the incorrect area in short strokes.
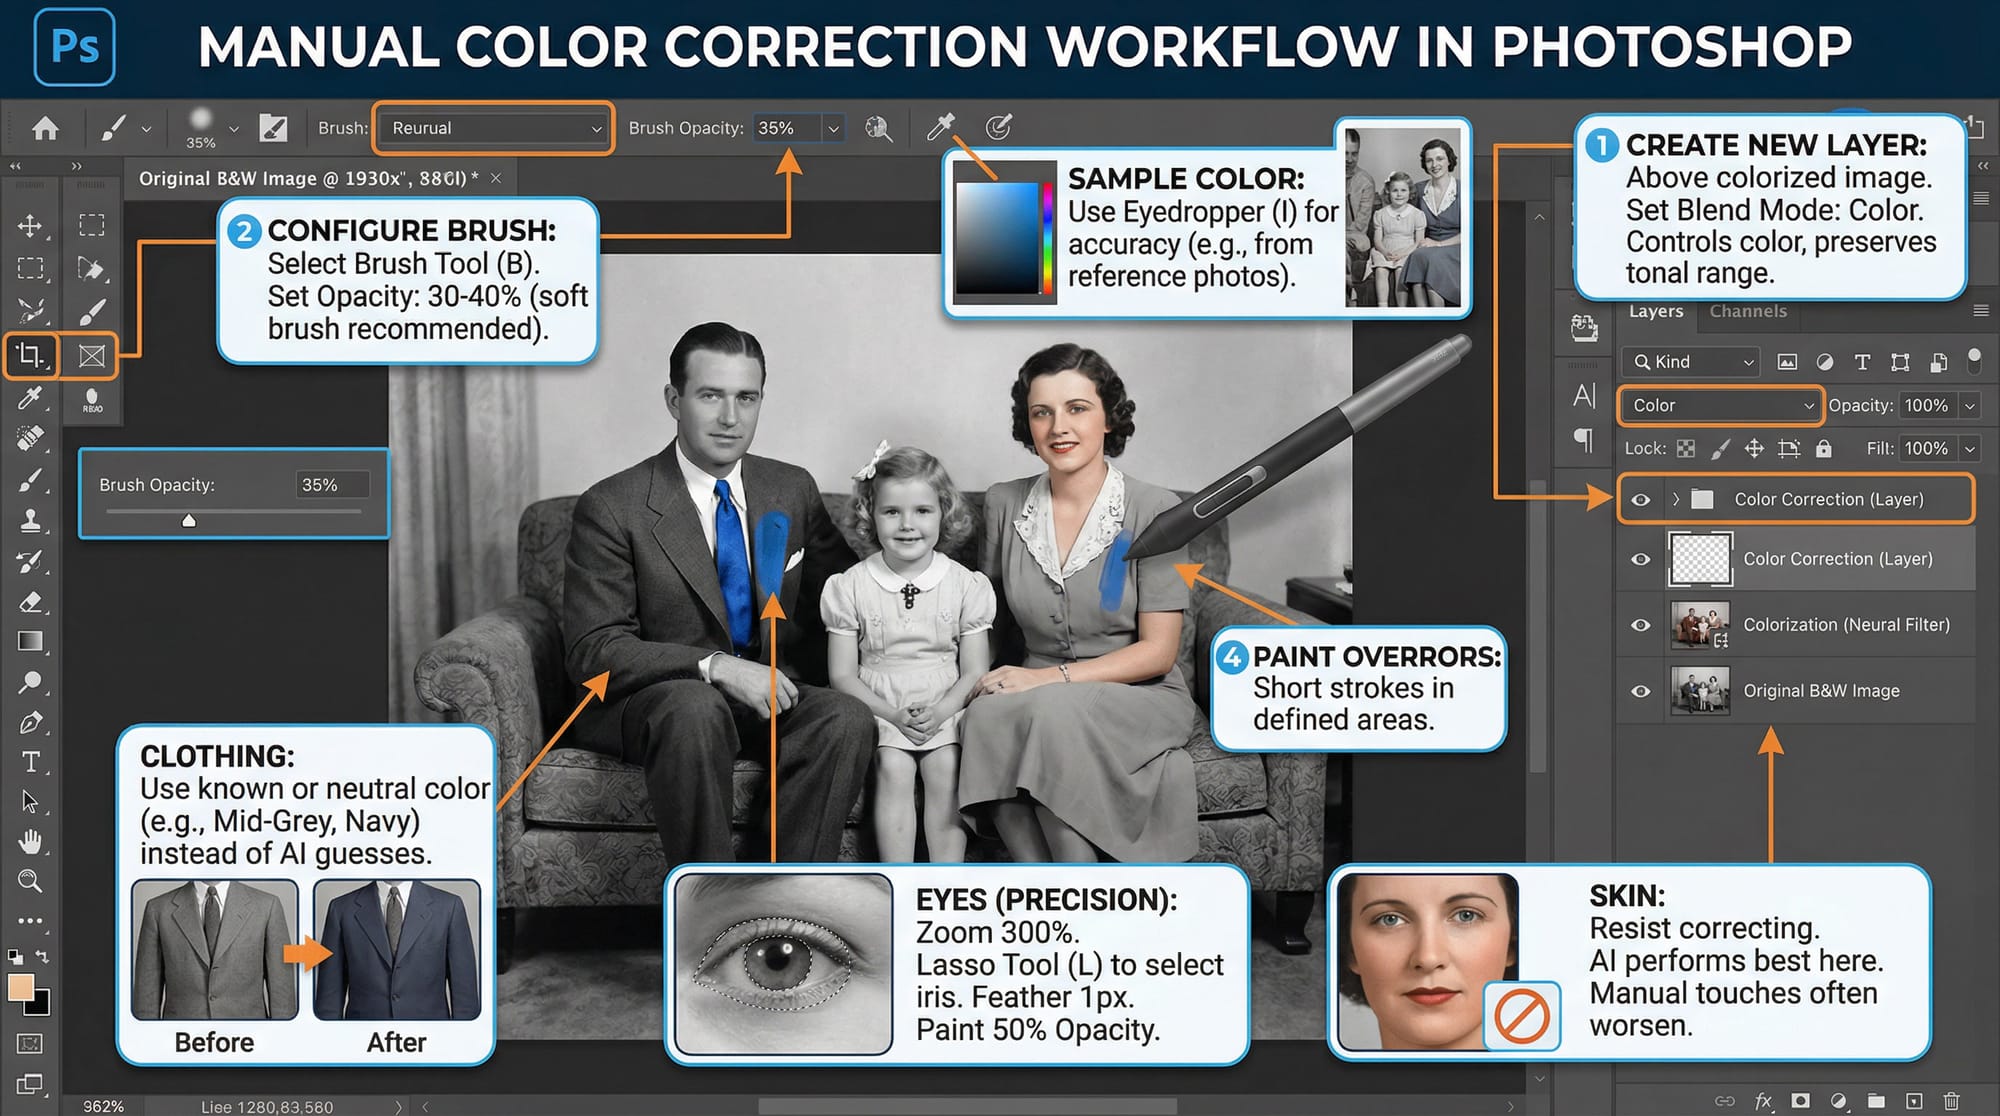
For clothing: if you know the actual colour, use it. If you don't, a neutral choice (mid-grey suit, off-white shirt, navy dress) is more convincing than the AI's sometimes-vivid guesses.
For eyes: zoom to 300%. Select the iris carefully with the Lasso tool, feather by 1px, and paint the correct colour at 50% opacity. Eyes are small enough that precision matters more than speed.
For skin: resist correcting unless the AI result looks genuinely wrong. Skin tones are where AI colorization performs best — manual corrections here often make things worse.
When colorization looks fake
Two things make colourised photos look obviously artificial.
Over-saturation. AI tools sometimes produce colours that are too vivid for the era. A portrait from the 1930s with bright saturated colours looks wrong immediately. After colorizing, pull overall saturation down 15–20% — the result reads as more historically plausible even when you can't verify the actual colours.
Colour bleeding at edges. Where two differently-coloured areas meet — a dark jacket against a light background — AI sometimes bleeds colour across the boundary. The fix: on your Color correction layer, paint a thin strip of the correct background colour along the edge at 15–20% opacity. Painstaking, but visible in print.
Frequently asked questions
What is the best free tool to colorize black and white photos?
Palette.fm for portraits and natural subjects — it handles skin tones better than most free tools and offers 21 colour style options. Note that the free version now adds a watermark to downloads; paid credits remove it. Canva's Colorify is watermark-free with a free account and works well if you want to continue editing after colorizing. Adobe Express (free with Adobe account) integrates cleanly into Lightroom and Photoshop workflows.
How accurate is AI photo colorization?
Reliably accurate for natural subjects — skin tones, sky, grass, wood, water. Unreliable for clothing, painted surfaces, eye colour, and dyed hair, where AI guesses based on statistical likelihood rather than historical knowledge. For old family photos where you know the actual colours, plan to correct clothing and eye colours manually after the AI pass.
Can Photoshop colorize black and white photos automatically?
Yes. Filter → Neural Filters → Colorize. It downloads on first use and requires an internet connection. The filter applies colours automatically and lets you drop focal points on specific areas to override wrong colours. Output as a New Layer to keep the original intact. It offers more correction control than any browser-based tool because you stay in Photoshop throughout.
How do I fix wrong colours after AI colorization?
In Photoshop, add a new layer above the colourised image and set its blend mode to Color. Paint the correct colour using a soft brush at 30–40% opacity. Color blend mode changes only the hue without affecting luminance — skin and fabric texture stay intact. This is the cleanest method for correcting specific areas without touching the rest of the image.
Why does my colorized photo look fake?
Two common causes: saturation is too high (pull it down 15–20% — older photos read as more authentic with slightly muted colours), or colour is bleeding across edges. For edge bleeding, paint the correct colour along the boundary on a Color blend mode layer at 15–20% opacity. If skin tones look wrong specifically, AI colorization struggles on underexposed or very high-contrast originals — improve the tonal range with Levels or Curves before colorizing.
Should I restore a damaged photo before or after colorizing?
Before. Remove scratches and fix tears first, then colorize. AI tools often misread physical damage as photographic content and try to colour it, which makes damage more visible rather than less. A clean image produces significantly better colorization results. For a full restoration workflow before colorizing, see the guide on how to restore old photos.