How to Fix an Overexposed Photo

Shot a portrait session last summer in direct midday sun. The client wanted outdoor shots, the venue had no shade, and I underestimated how badly the sky would blow. Ended up with 60 frames where the sky was pure white and the subjects' shoulders were clipping. I recovered about 50 of them. Ten were gone — and the difference between recoverable and not is something most guides skip entirely. Here's how to fix an overexposed photo, and how to know when you can't.
Quick answer: to fix an overexposed photo in Lightroom, pull Highlights to -80 first, then drop Whites to -40 to -60, then reduce Exposure by -0.3 to -0.7 to rebalance. RAW files can recover 1.5 to 2 stops of overexposure this way. Blown JPEG highlights are largely unrecoverable — the data was never saved.
First: check whether your highlights are actually blown
Before touching a slider, press J in Lightroom's Develop module. This activates the clipping indicators. Overexposed, washed-out areas turn red. Areas that are just bright — but still have data — show nothing.
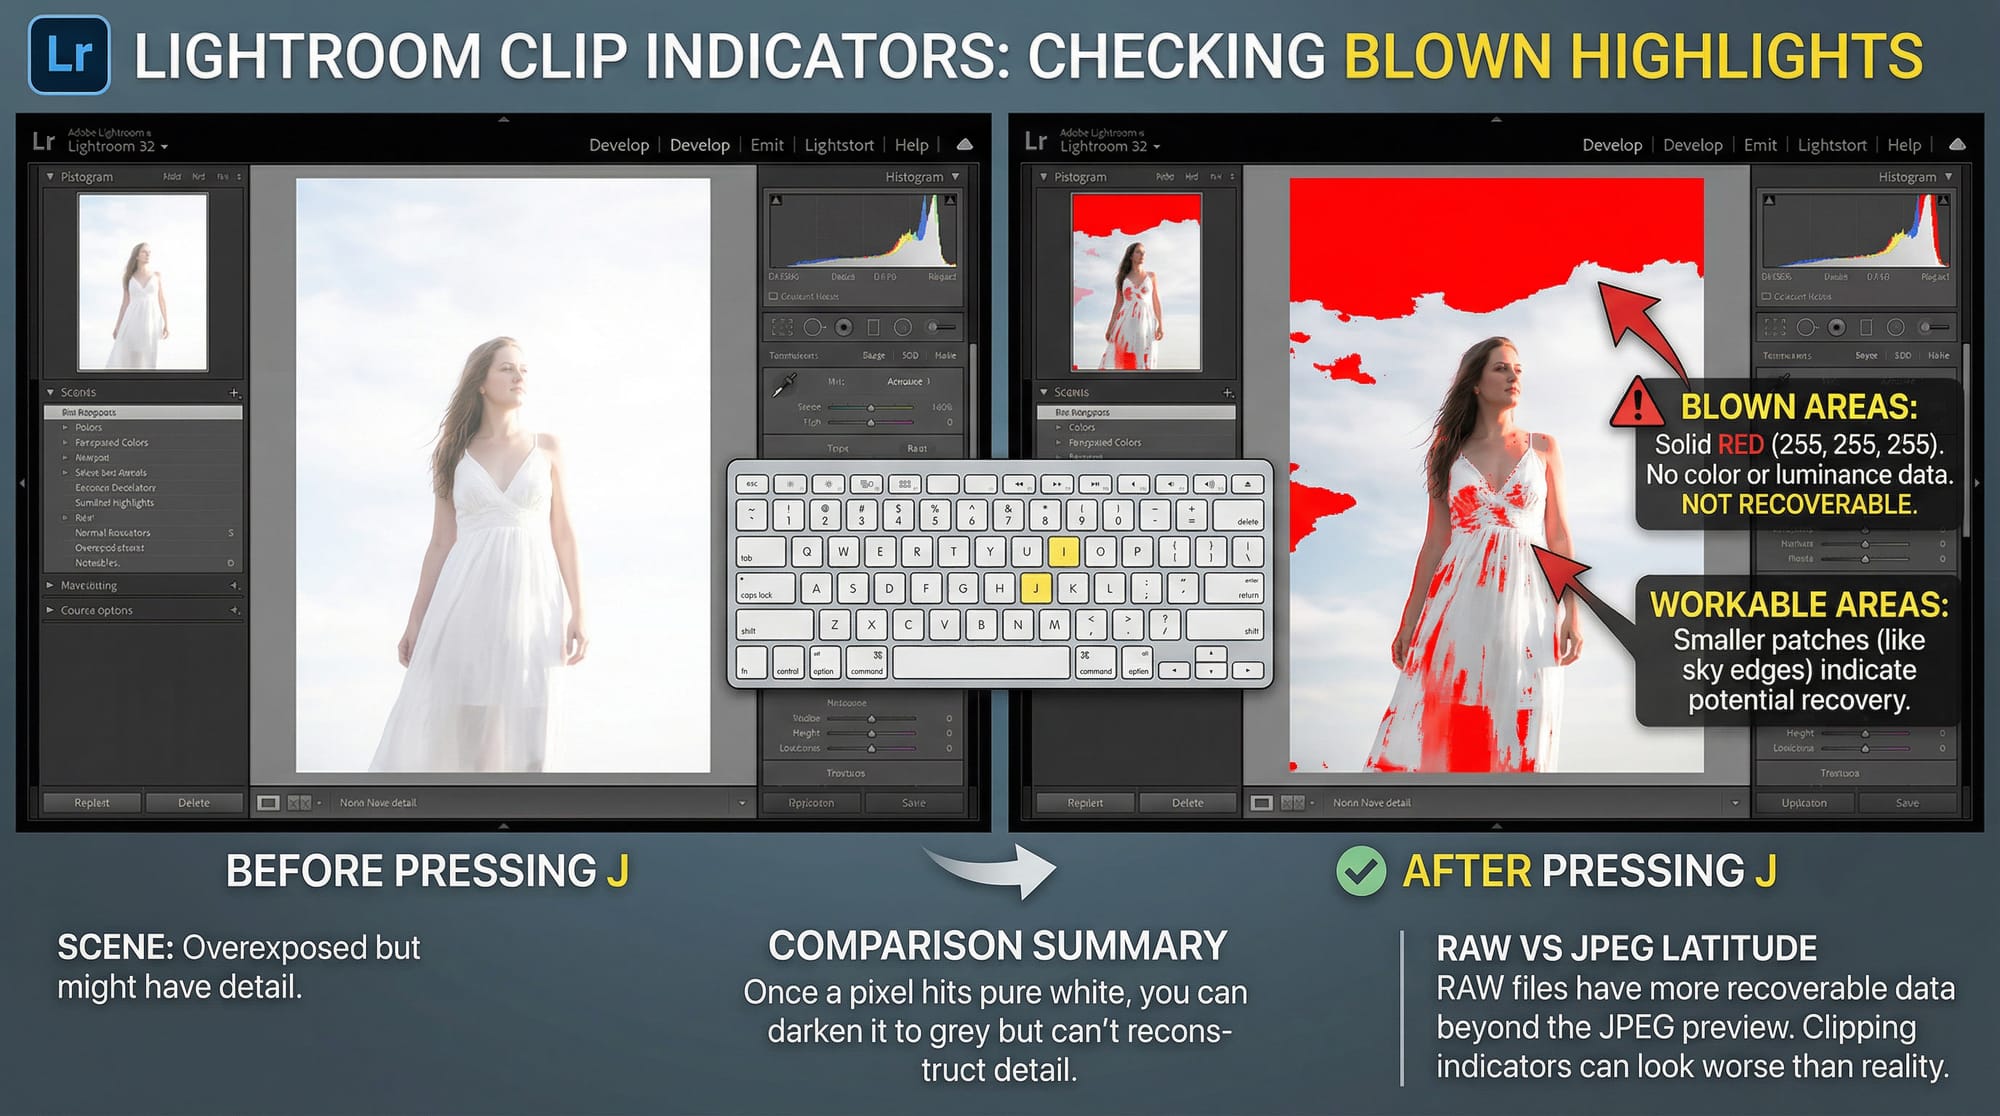
If only a small patch of sky or a specular highlight on glass turns red, you have a workable file. If a face, a white shirt, or large sections of the frame are solid red, the situation is harder. Large areas of clipped highlights mean pure white pixels — no colour data, no luminance data, nothing to recover. Once a pixel hits 255,255,255, you can darken it to grey but you can't reconstruct detail that wasn't recorded.
RAW files have more latitude here than JPEGs. The raw sensor data extends beyond what the JPEG preview shows, so clipping indicators in Lightroom can look worse than reality on a RAW file. Pull the sliders before giving up.
How to fix an overexposed photo in Lightroom
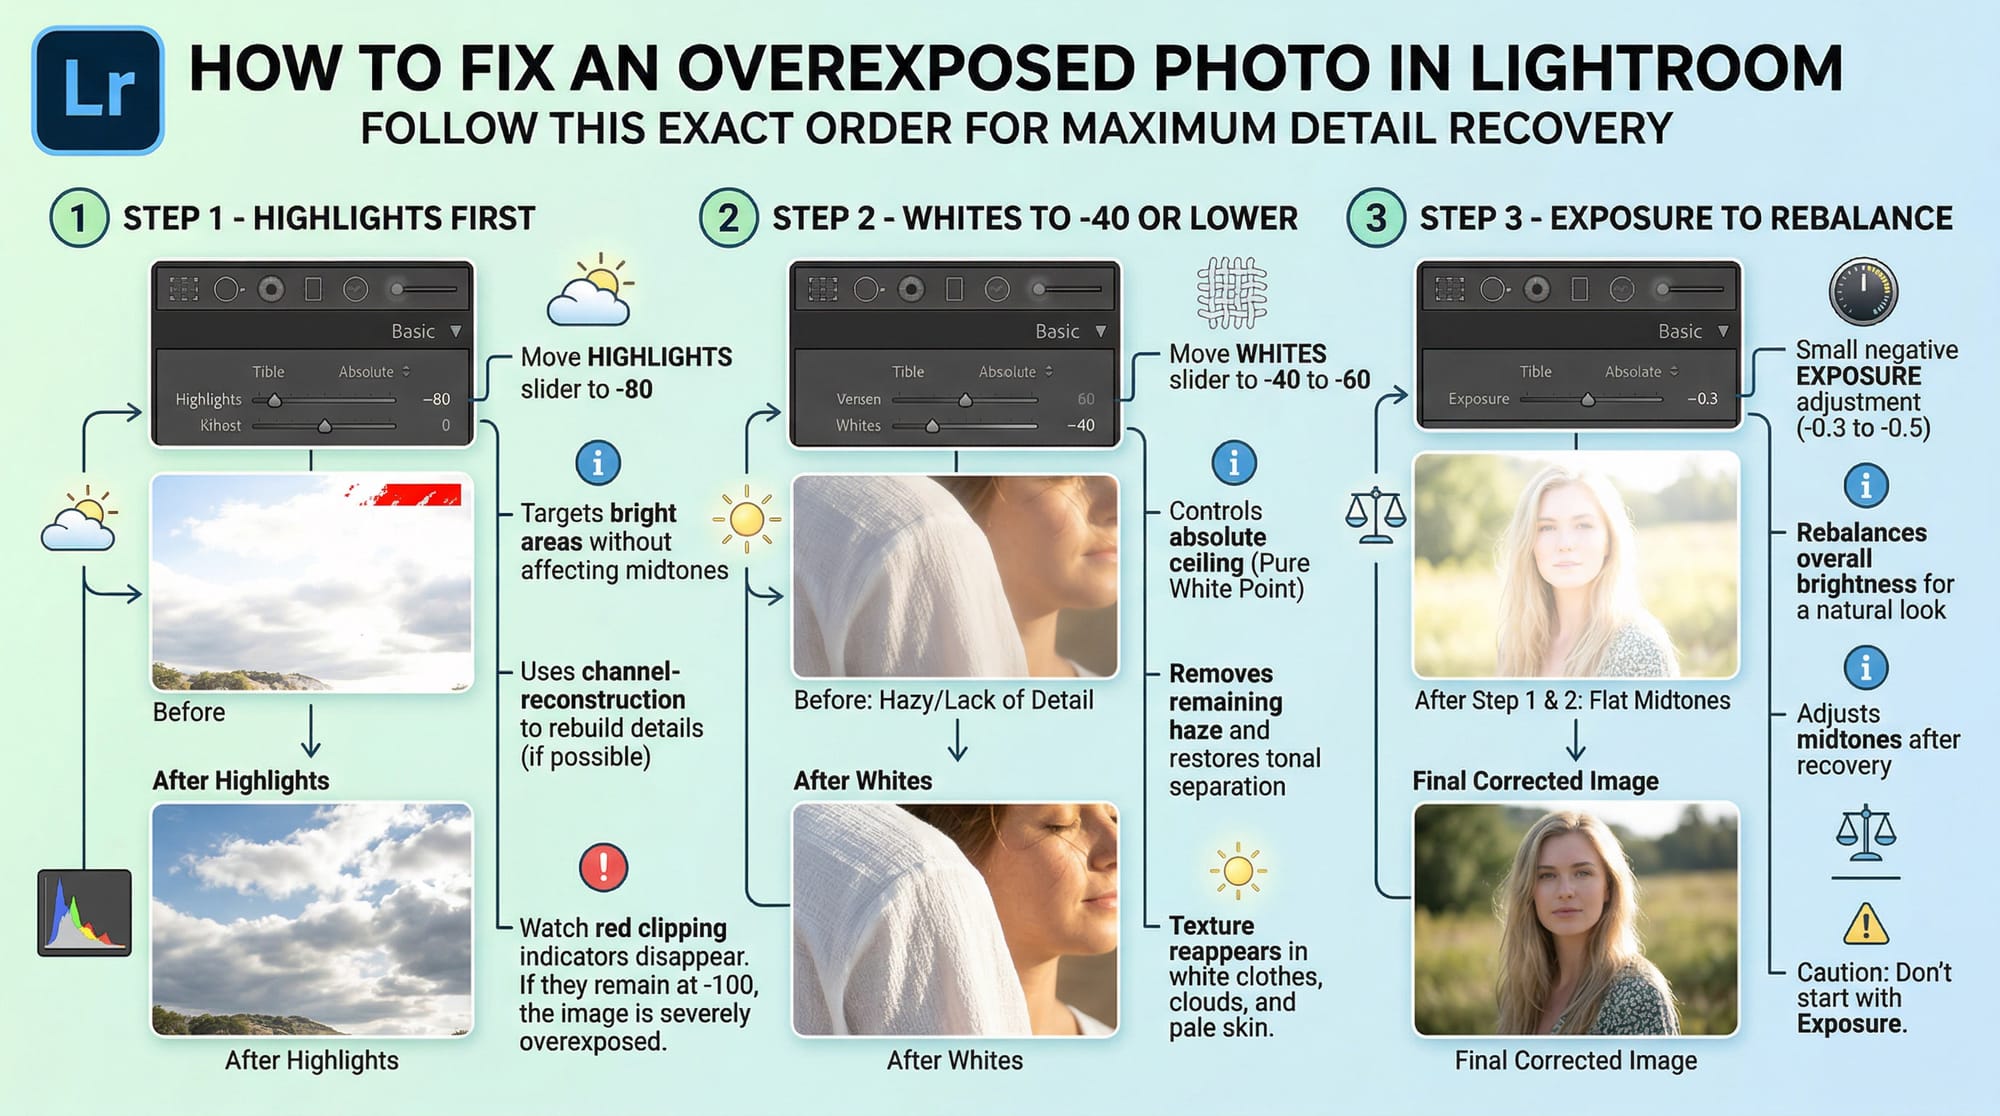
Open the Develop module. Work in this exact order.
Step 1 — Highlights to -80 first. The Highlights slider in Adobe Lightroom targets bright areas without touching midtones or shadows. It also has a channel-reconstruction algorithm: if one of the three colour channels (red, green, blue) clipped while the others didn't, Highlights can rebuild it from the remaining two. Start at -80 and watch the red clipping indicators disappear. If they don't clear completely at -100, the overexposure is beyond what Highlights can fix alone.
Step 2 — Whites to -40 or lower. Where Highlights affects the upper range of bright tones, Whites controls the absolute ceiling — the pure white point. Pull it left to -40 or -60. After Highlights has recovered most of the detail, Whites removes the remaining haze and restores tonal separation in bright areas. Texture reappears in white fabric, cloud edges, and pale skin.
Step 3 — Exposure to rebalance. After pulling Highlights and Whites down, the midtones often look slightly flat or dull. Add a small negative Exposure adjustment — -0.3 to -0.5 — to bring overall brightness back to where it looks natural. Don't start with Exposure. If you drop Exposure first, you darken the whole frame including areas that were fine, and blown highlights often stay blown because Exposure moves everything uniformly.
Step 4 — Lift Shadows slightly. The corrections above sometimes leave shadow areas looking too dark relative to the now-recovered highlights. Bring Shadows up to +15 or +20 to restore tonal balance. This is a finishing step, not a fix.
Step 5 — Dehaze for blown skies. If the problem is specifically an overexposed, washed-out sky, use a Lightroom AI mask to isolate it and apply Dehaze within the mask. Dehaze adds contrast and saturation to washed-out areas — it often recovers blue sky colour that looks completely gone after the standard slider corrections.
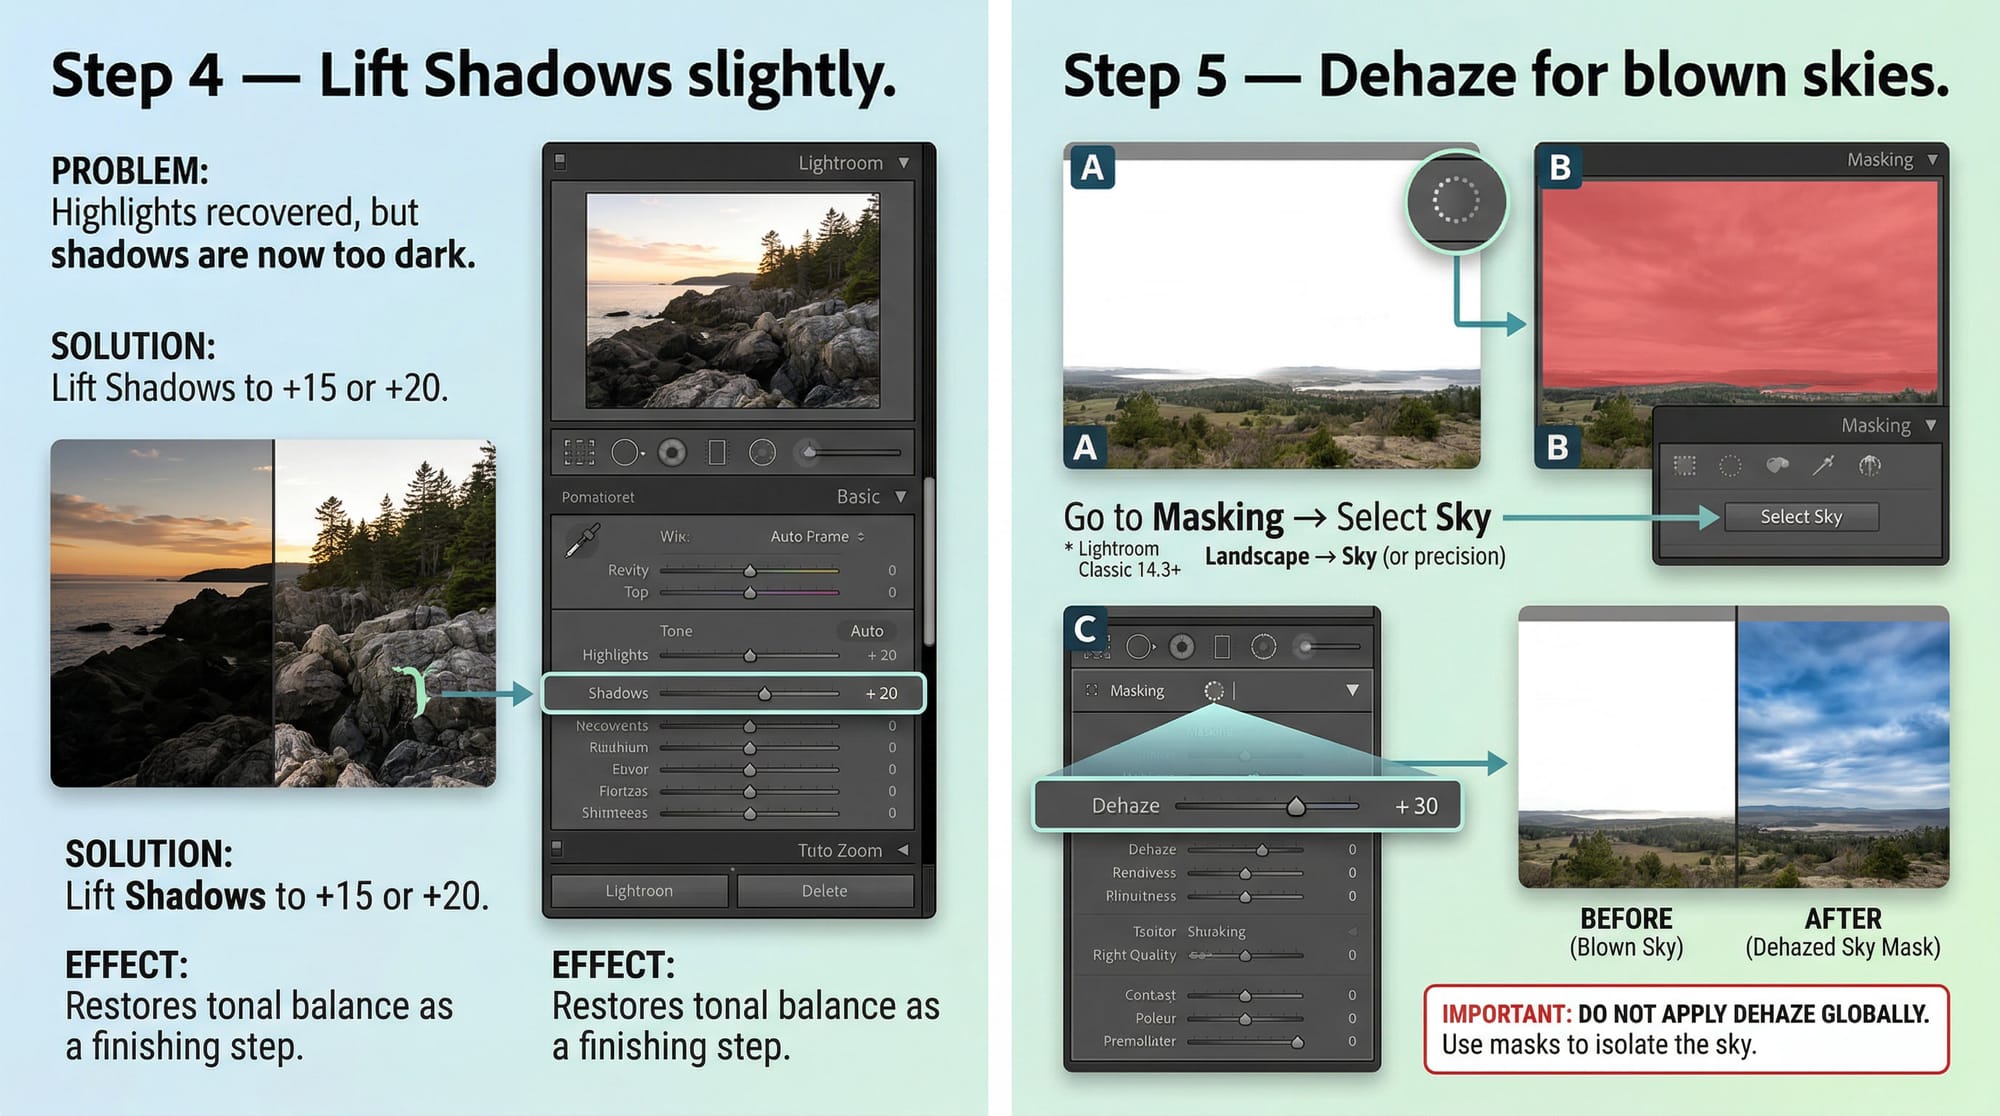
For the mask: go to Masking → Select Sky for a quick one-click selection. If you're on Lightroom Classic 14.3 or later (April 2025 update), Masking → Landscape → Sky gives a more precise result — it handles trees and buildings along the skyline better than Select Sky alone. Once the mask is in place, apply Dehaze +20 to +35 within it. Don't apply Dehaze globally; it makes skin look unnatural.
For partially overexposed frames — a bright sky behind a correctly exposed subject — skip global adjustments entirely. Use the sky mask and apply Highlights, Whites, and Dehaze reductions only to the bright area. The subject stays untouched.
How to fix an overexposed photo in Photoshop
Photoshop gives two methods that work differently. Use the first for global overexposure, the second for partially blown areas.
Multiply blend mode — fastest approach for globally bright images:
- Duplicate the background layer: Ctrl/Cmd + J.
- In the Layers panel, change the blend mode from Normal to Multiply. The image darkens immediately.
- If it's too dark, reduce the layer Opacity — try 60–75% as a starting point.
- Add a layer mask and paint black over any areas that got too dark (faces, shadows, anything that was already correct). The Multiply effect disappears where you paint.
Multiply works by mathematically darkening every pixel. It's fast and looks natural because it doesn't clip highlights the way a blunt Exposure reduction does. For a frame that's uniformly 1 stop over, one Multiply layer at 70–80% opacity usually fixes it.
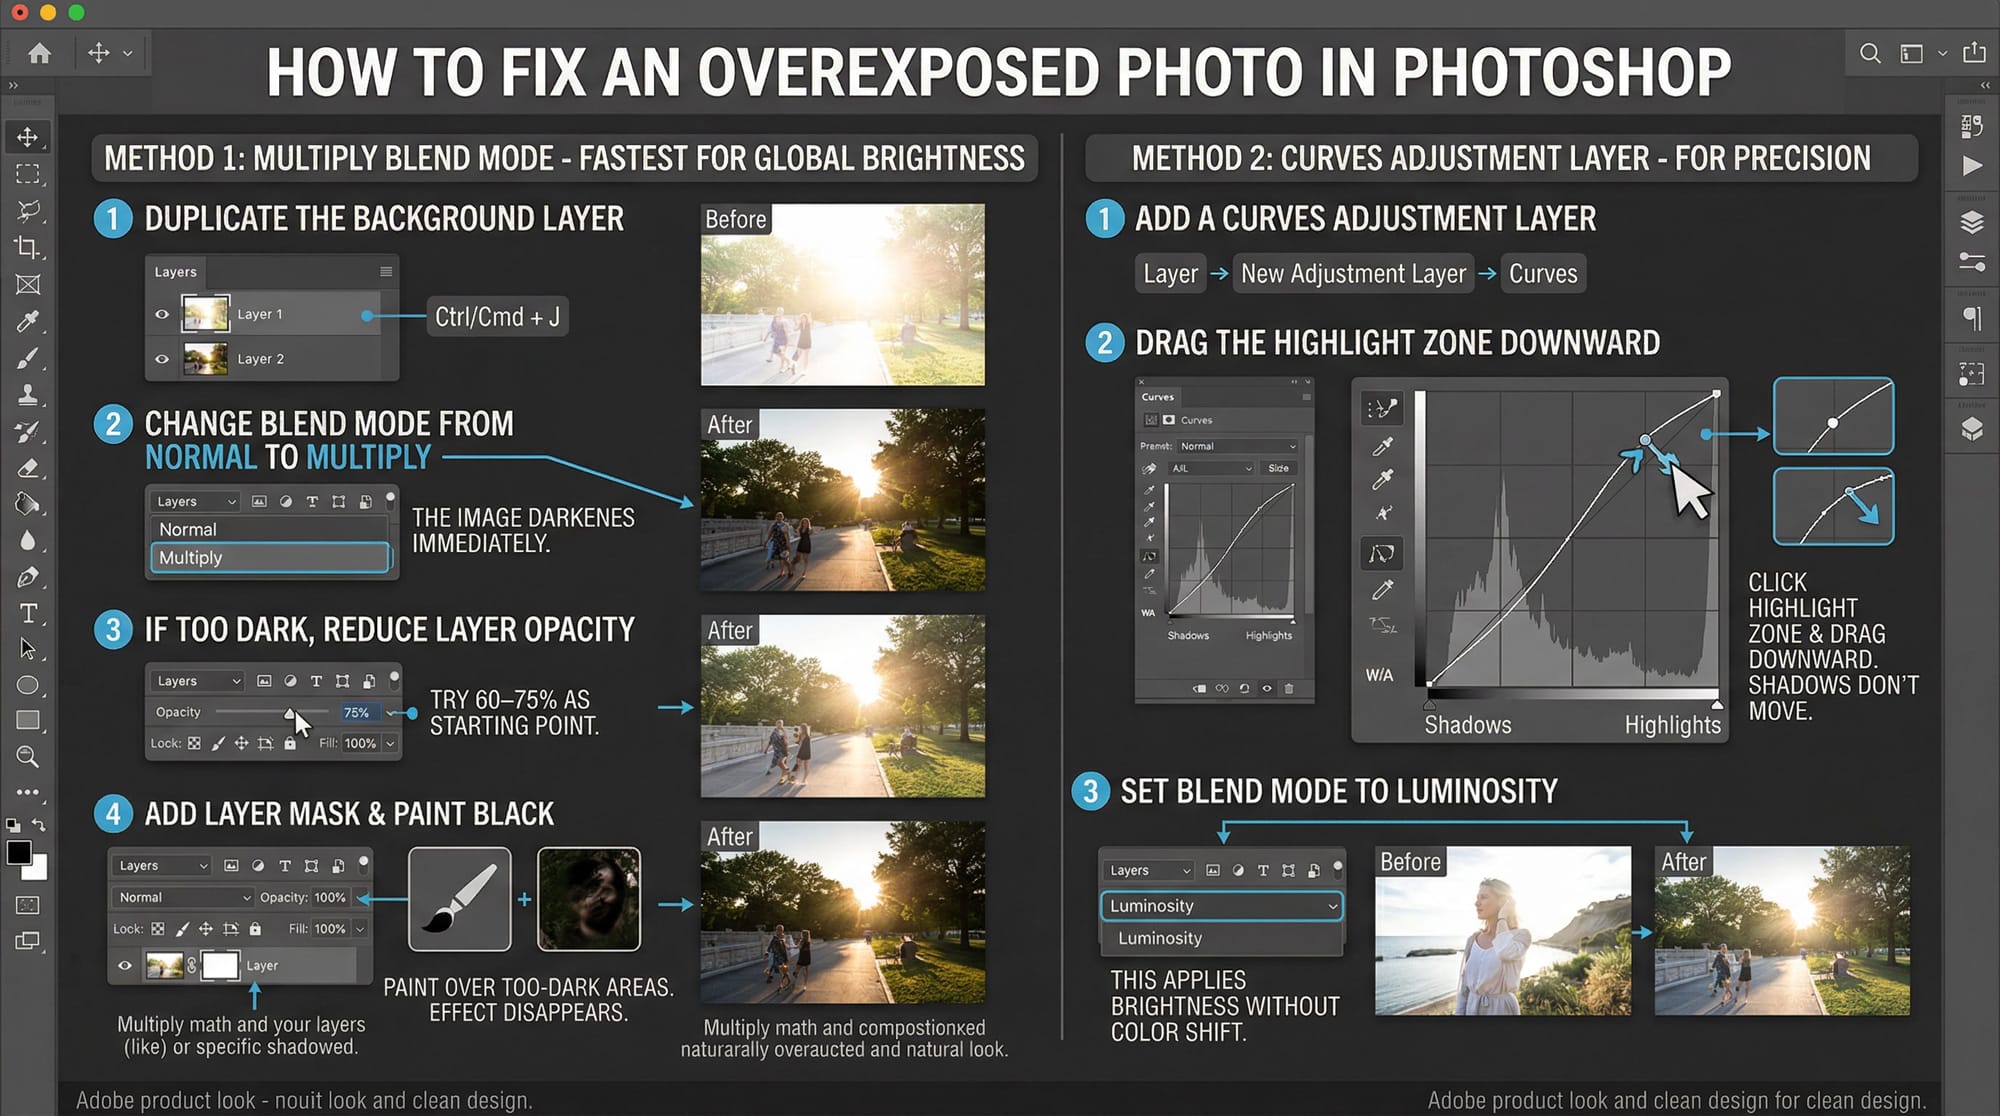
Curves Adjustment Layer — for precision:
- Add a Curves adjustment layer (Layer → New Adjustment Layer → Curves).
- Click the upper-right area of the curve — the highlight zone — and drag it downward. The bright areas recover without the shadows moving.
- Set the blend mode of the Curves layer to Luminosity. This applies the brightness correction without desaturating the image — it prevents the grey, washed-out look that can appear when you darken in Normal mode.
- For a blown sky with a correct foreground, add a layer mask to the Curves layer and paint black over the foreground. The correction applies only to the sky.
Photoshop's Camera Raw filter (Filter → Camera Raw Filter) gives you the same Highlights and Whites sliders as Lightroom, applied as a non-destructive Smart Filter. If the overexposure is in the highlights specifically, this is faster than Curves and produces better results on RAW files opened directly in Photoshop.
How to fix an overexposed photo on iPhone and Android
Mobile fixes work on mild to moderate overexposure. Severely blown frames won't come back on a phone any more than on desktop.
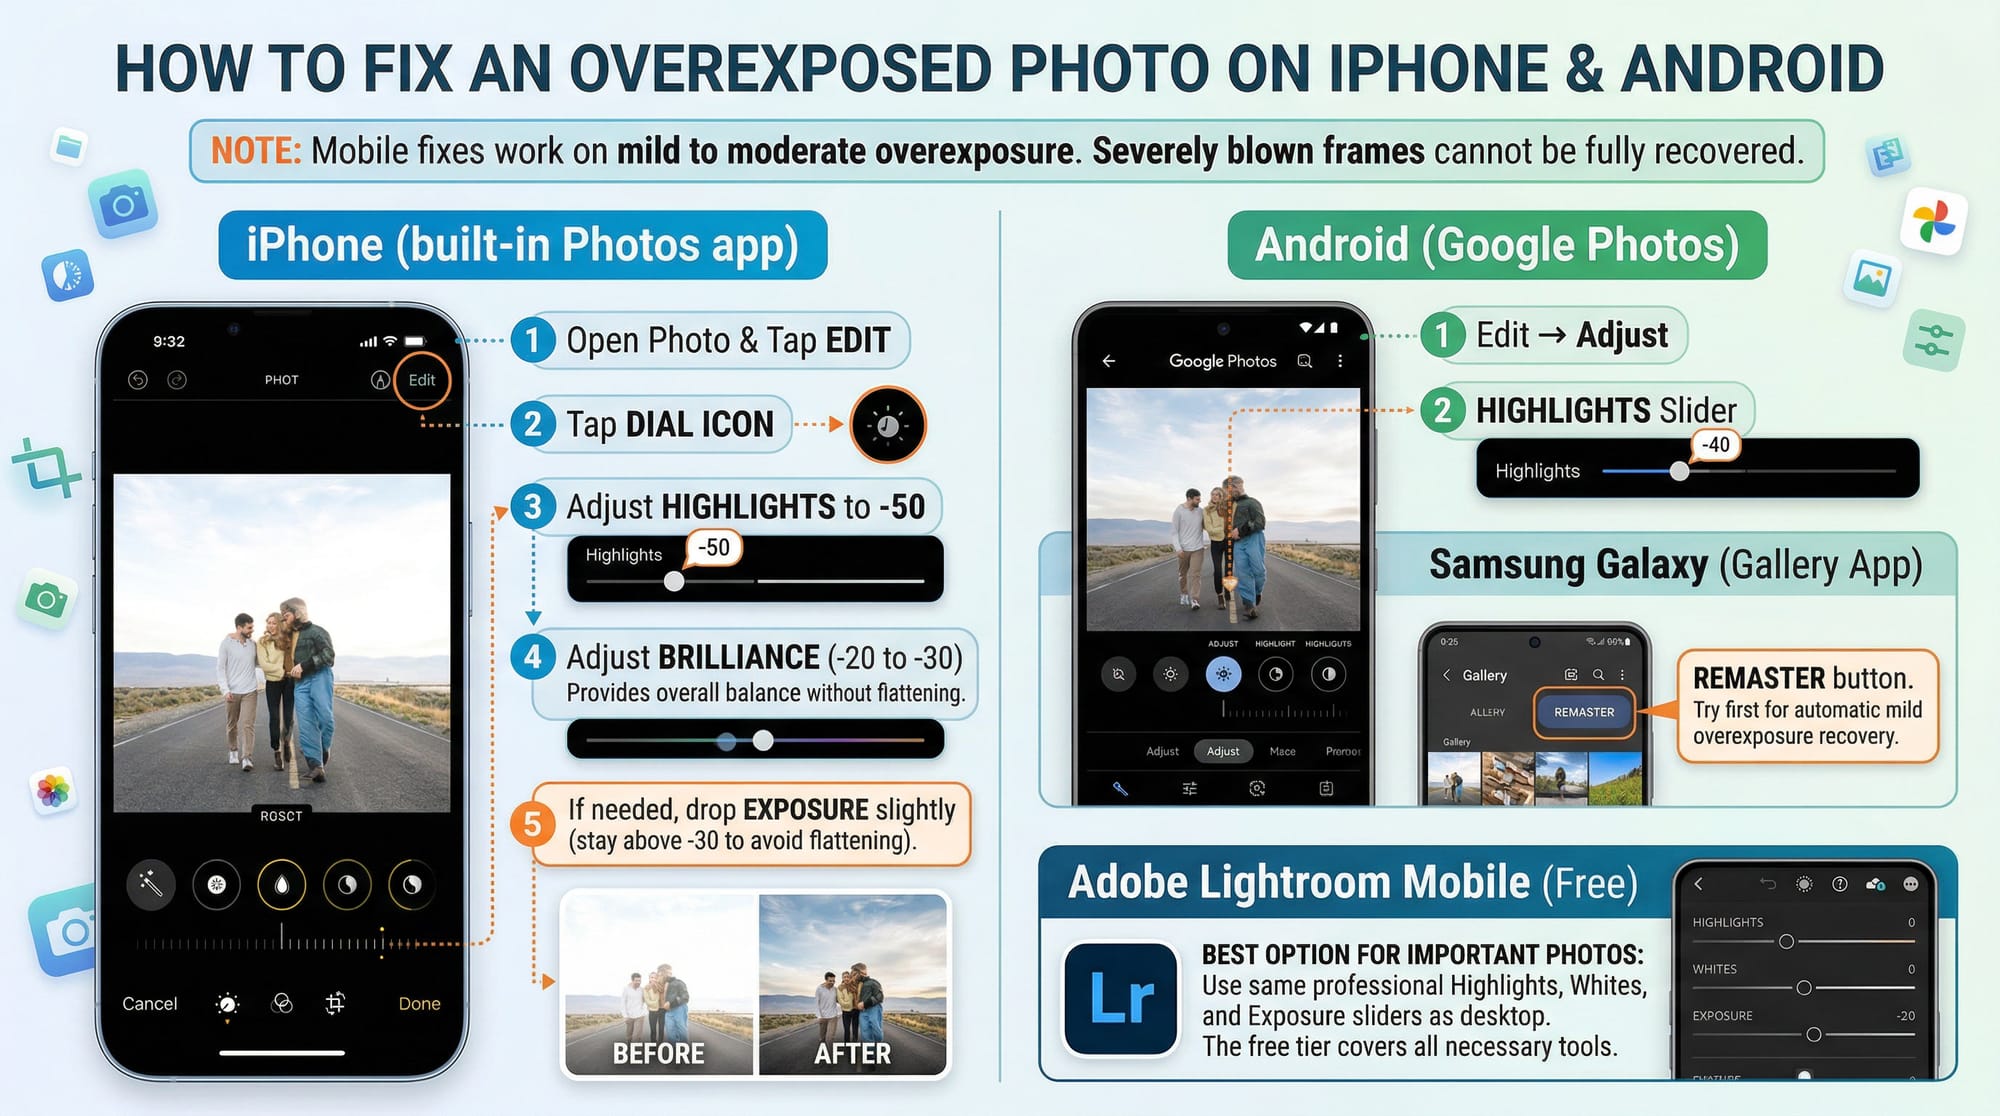
iPhone (built-in Photos app):
- Open the photo, tap Edit, then the dial icon.
- Find Highlights and drag it left to -50 first.
- Add Brilliance at around -20 to -30 for overall balance — it handles brightness without flattening the image the way Exposure does.
- If you need more recovery, drop Exposure slightly — stay above -30 on iPhone JPEGs or the image goes flat.
Android (Google Photos): Edit → Adjust → Highlights slider, drag left. Samsung Galaxy's Remaster button handles mild overexposure automatically and is worth trying first.
Lightroom Mobile (free): the same Highlights, Whites, and Exposure sliders as desktop Lightroom. For any photo that matters, this is worth the extra minute. The free tier covers all the tools you need for overexposure recovery.
When overexposure can't be fixed
Two situations where recovery fails regardless of what you do.
All three colour channels clipped together. If red, green, and blue all hit 255 in the same area, Lightroom's channel-reconstruction algorithm has nothing to work with. The area is pure white. You can darken it to grey, but detail will not return. In Photoshop you can sometimes disguise this by cloning texture from a nearby area, but you're not recovering — you're inventing.
JPEG files overexposed by more than 1 stop. JPEG compression discards highlight data at capture. A RAW file at 2 stops over often has recoverable detail. The same shot in JPEG usually doesn't — the sensor recorded it, but the format threw it away. This is the most practical argument for shooting RAW in challenging light.
The quick test: in Lightroom, pull Highlights to -100 and Whites to -100. If the clipping indicators clear, the data is there. If large areas of the frame stay red, recovery isn't possible.
Quick comparison: which tool for which situation
| Situation | Best tool | Realistic result |
|---|---|---|
| Globally bright, 1 stop over (RAW) | Lightroom Highlights + Whites + Exposure | ✓✓ Excellent |
| Blown sky, correct foreground | Lightroom Sky mask + Dehaze | ✓✓ Excellent |
| Globally bright, 1 stop over (JPEG) | Lightroom Highlights + Whites | ✓ Good for mild overexposure |
| Uniform overexposure, fast fix needed | Photoshop Multiply blend mode | ✓ Good — natural-looking result |
| Partial overexposure, complex areas | Photoshop Curves + layer mask | ✓✓ Excellent with care |
| Blown highlights, JPEG, 2+ stops | Nothing reliably recovers clipped JPEG data | ✗ Minimal |
| Quick fix on phone | iPhone Highlights slider or Lightroom Mobile free | ✓ Good for mild overexposure |
Frequently asked questions
What is the best slider to fix an overexposed photo in Lightroom?
Highlights first, not Exposure. The Highlights slider targets only the bright areas of the image and has a channel-reconstruction algorithm that can rebuild clipped colour. Pull it to -80 as a starting point. Follow with Whites at -40 to -60 to clear the absolute white point. Only adjust Exposure after — and only to rebalance the midtones, not as the primary fix. Dropping Exposure first darkens everything including areas that were already correct.
Can you recover blown highlights from an overexposed photo?
Sometimes, depending on how overexposed and what format. RAW files shot 1 to 1.5 stops over usually have recoverable highlight data — pull Highlights to -100 and Whites to -100 in Lightroom and check whether the clipping indicators clear. If they do, the data is there. JPEG files are harder: the format discards highlight detail at capture. Areas that are pure white across all three colour channels cannot be recovered in any format.
How do I fix an overexposed sky without darkening the subject?
Use Lightroom's AI masking: Masking → Select Sky, or Masking → Landscape → Sky for more precision on Lightroom Classic 14.3+. Apply Highlights, Whites, and Dehaze reductions within the mask only. The subject stays untouched. In Photoshop, add a Curves adjustment layer and paint black on the layer mask over the subject so the correction applies only to the sky.
How do I fix an overexposed photo on iPhone?
Open the photo in Photos, tap Edit, then the dial icon. Pull the Highlights slider left to around -50 first. Then reduce Brilliance slightly (-20 to -30) for overall balance. Keep Exposure above -30 — iPhone JPEGs lose detail fast below that. For better results on photos that matter, Lightroom Mobile (free) has a full Highlights and Whites slider set that matches the desktop version.
How do I fix an overexposed photo without Lightroom?
In Photoshop, duplicate the layer and set the blend mode to Multiply — it darkens the image immediately and you reduce opacity until it looks right. Topaz Labs' free web tool handles mild overexposure without any software installation. On iPhone, the built-in Photos app Highlights slider and Brilliance control cover most cases without a third-party app.
What's the difference between Highlights and Whites in Lightroom?
Highlights affects the upper range of bright tones and has a channel-reconstruction feature for recovering clipped colour. Whites sets the absolute white point and moves the very brightest pixels specifically. For overexposed photos, use Highlights first because of the reconstruction algorithm — it's smarter recovery. Follow with Whites to clear remaining haze and restore contrast at the tonal ceiling.
Why does my photo still look washed out after reducing exposure?
Because Exposure moves the whole tonal range uniformly — shadows, midtones, and highlights all shift together. If the highlights are blown, reducing Exposure darkens everything but doesn't specifically target the problem area. Use Highlights and Whites instead, which work on the bright zones only. After pulling those down, use Exposure only to rebalance the midtones if needed. Adding Blacks -10 to -20 also helps restore depth and stops the image looking flat after highlight recovery.