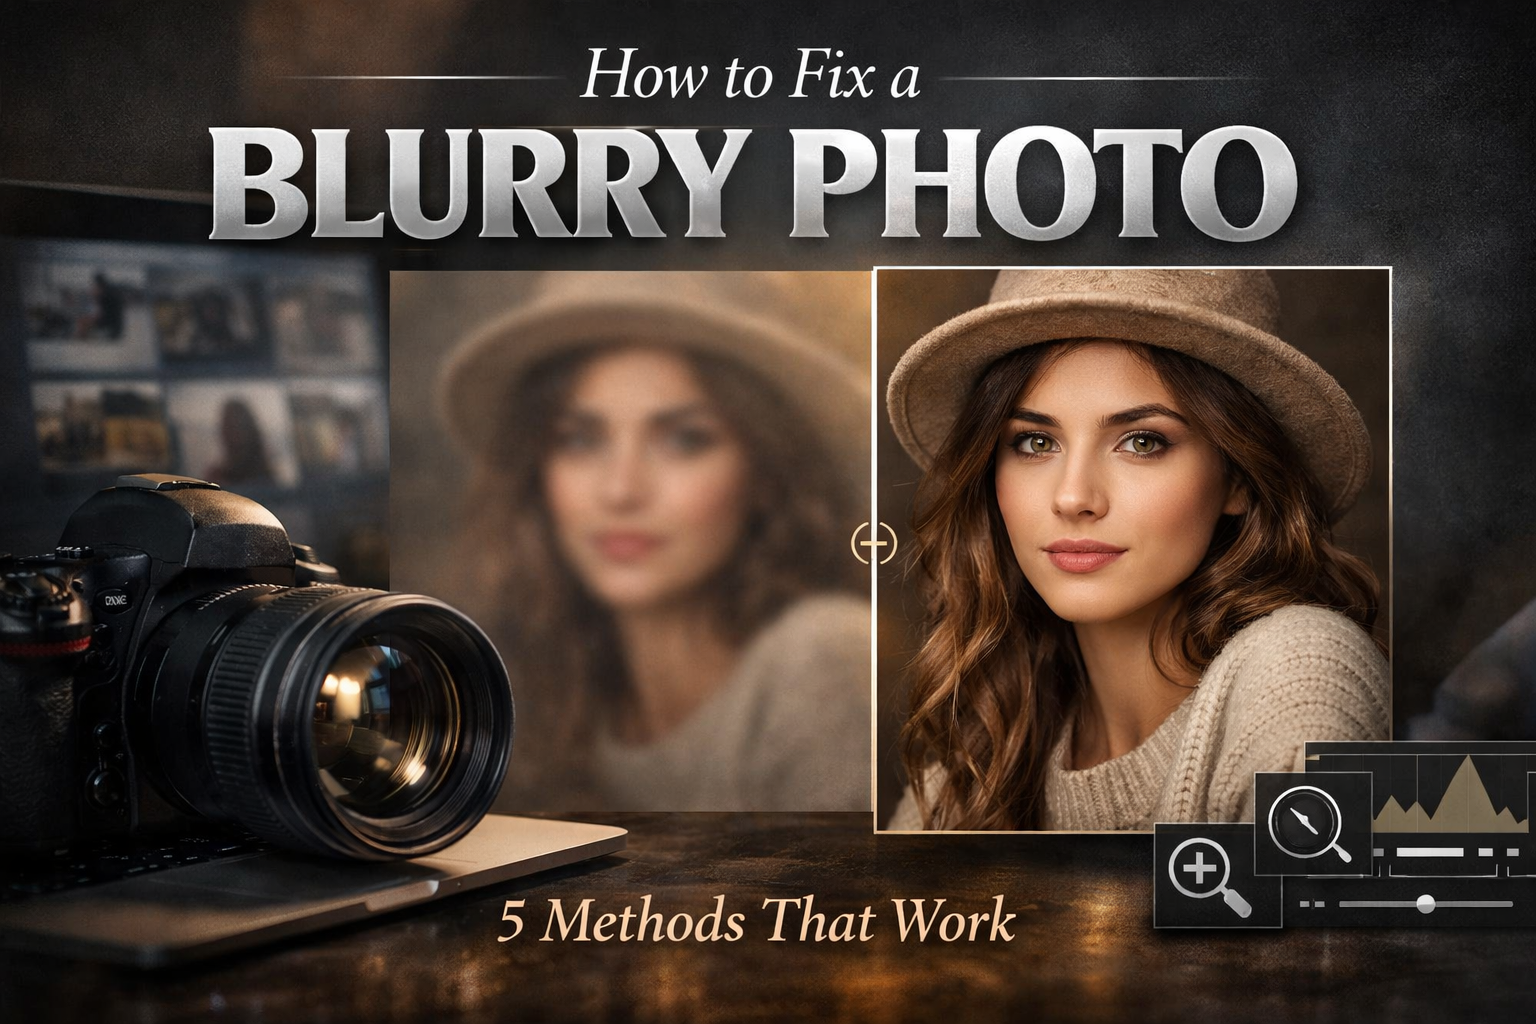
How to Fix a Blurry Photo (5 Methods That Work)
The photo looked perfect on the camera's back screen. Good light, everyone's eyes open, solid composition. Then you open it on your laptop and one face is soft — that motion blur smear that no amount of squinting makes better. I've deleted hundreds of shots like that before I figured out which problems are actually fixable and which ones aren't worth the time.
Here's the short answer: you can fix a blurry photo in Lightroom (Detail panel + Super Resolution), Photoshop (Smart Sharpen), or with AI tools like Topaz Photo — but the method depends entirely on why the photo is blurry in the first place. Using the wrong tool on the wrong type of blur is how you end up with an image that looks like it's been sandpapered.
This guide walks through five methods in order of effort, from the free 30-second fix to the full workflow for serious cases.
First: identify what kind of blur you're dealing with
Before you open any editor, zoom in to 100% and look at the blur pattern. This step alone will save you 20 minutes of trying the wrong approach — and it's the one step every other guide skips.
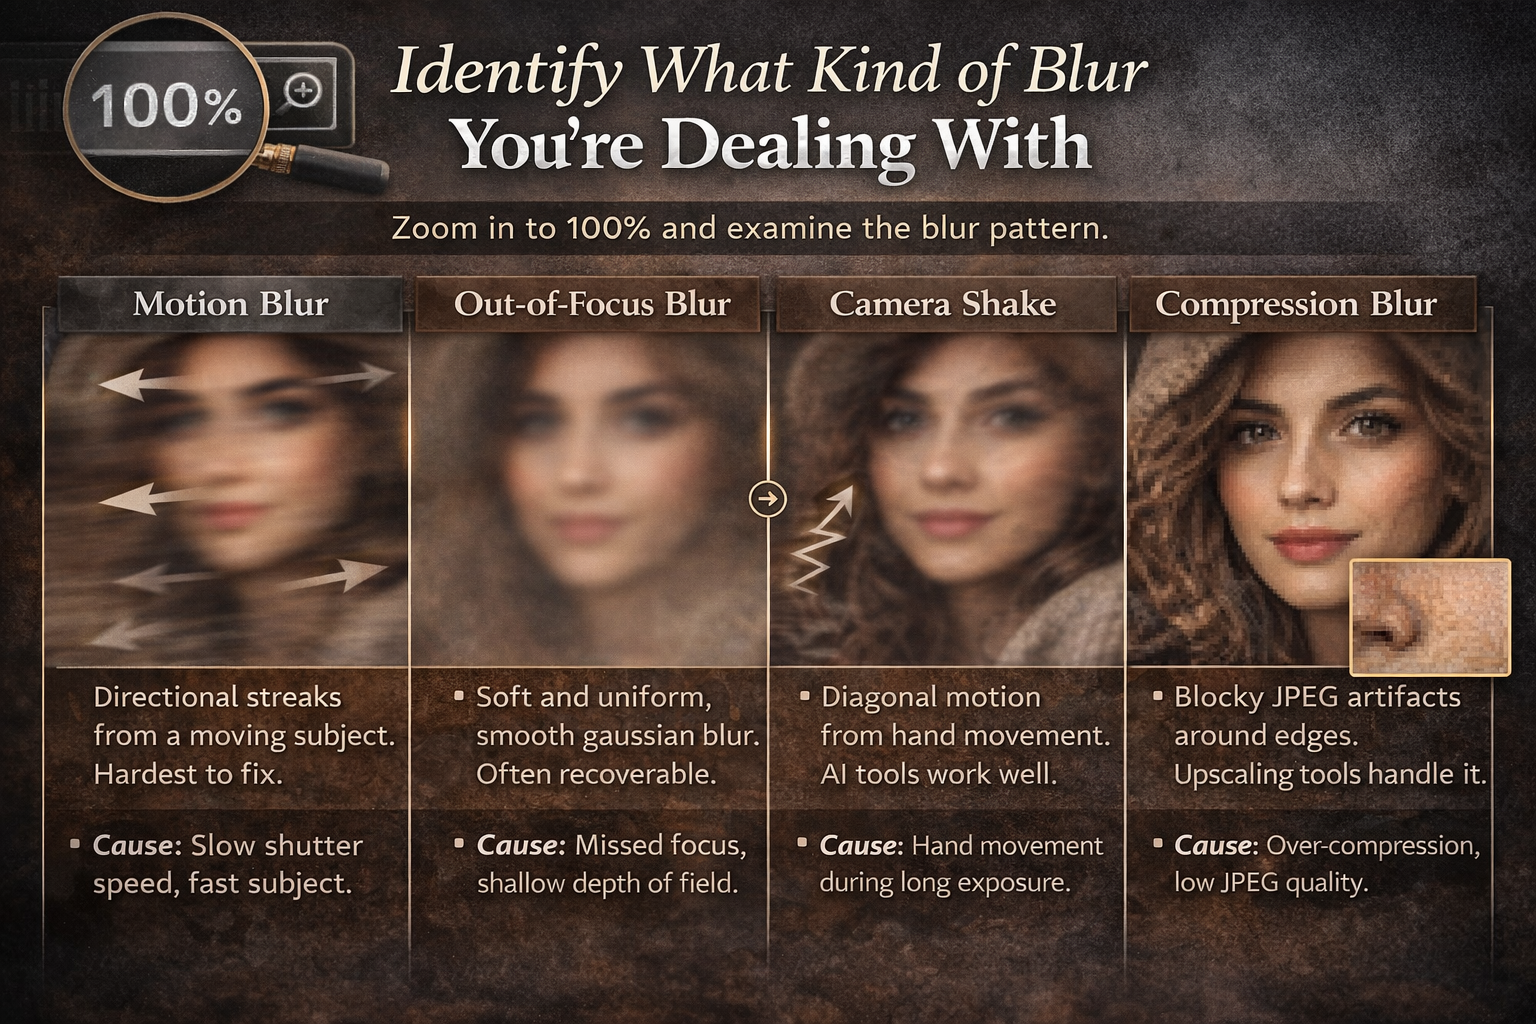
Motion blur leaves directional streaks. The subject is smeared in one direction. Usually caused by too slow a shutter speed or a moving subject. This is the hardest type to fix because real pixel information is gone.
Out-of-focus blur is soft and uniform — no streaks, just a smooth gaussian softness. Often recoverable, especially with AI tools. Happens when autofocus locks on the wrong thing or depth of field is too shallow.
Camera shake looks like motion blur but tends to move diagonally or in a slight arc. Caused by hand movement during a slow exposure. AI tools handle this better than any manual method.
Compression blur shows up as blocky JPEG artifacts around high-contrast edges. Happens when photos get over-compressed or repeatedly saved as JPEG at low quality. Upscaling AI tools address this best.
Knowing which one you have determines whether you reach for Lightroom, Topaz, or whether fixing is worth attempting at all.
Method 1: Fix a blurry photo in Lightroom
For mild to moderate blur, Lightroom's workflow is the right starting point — and in 2025 it's more capable than most people realise. The Detail panel handles traditional sharpening, but two newer tools change what's possible: Super Resolution (doubles pixel count via AI) and AI Denoise. Used in the right order, the three together recover a lot of shots I used to bin.
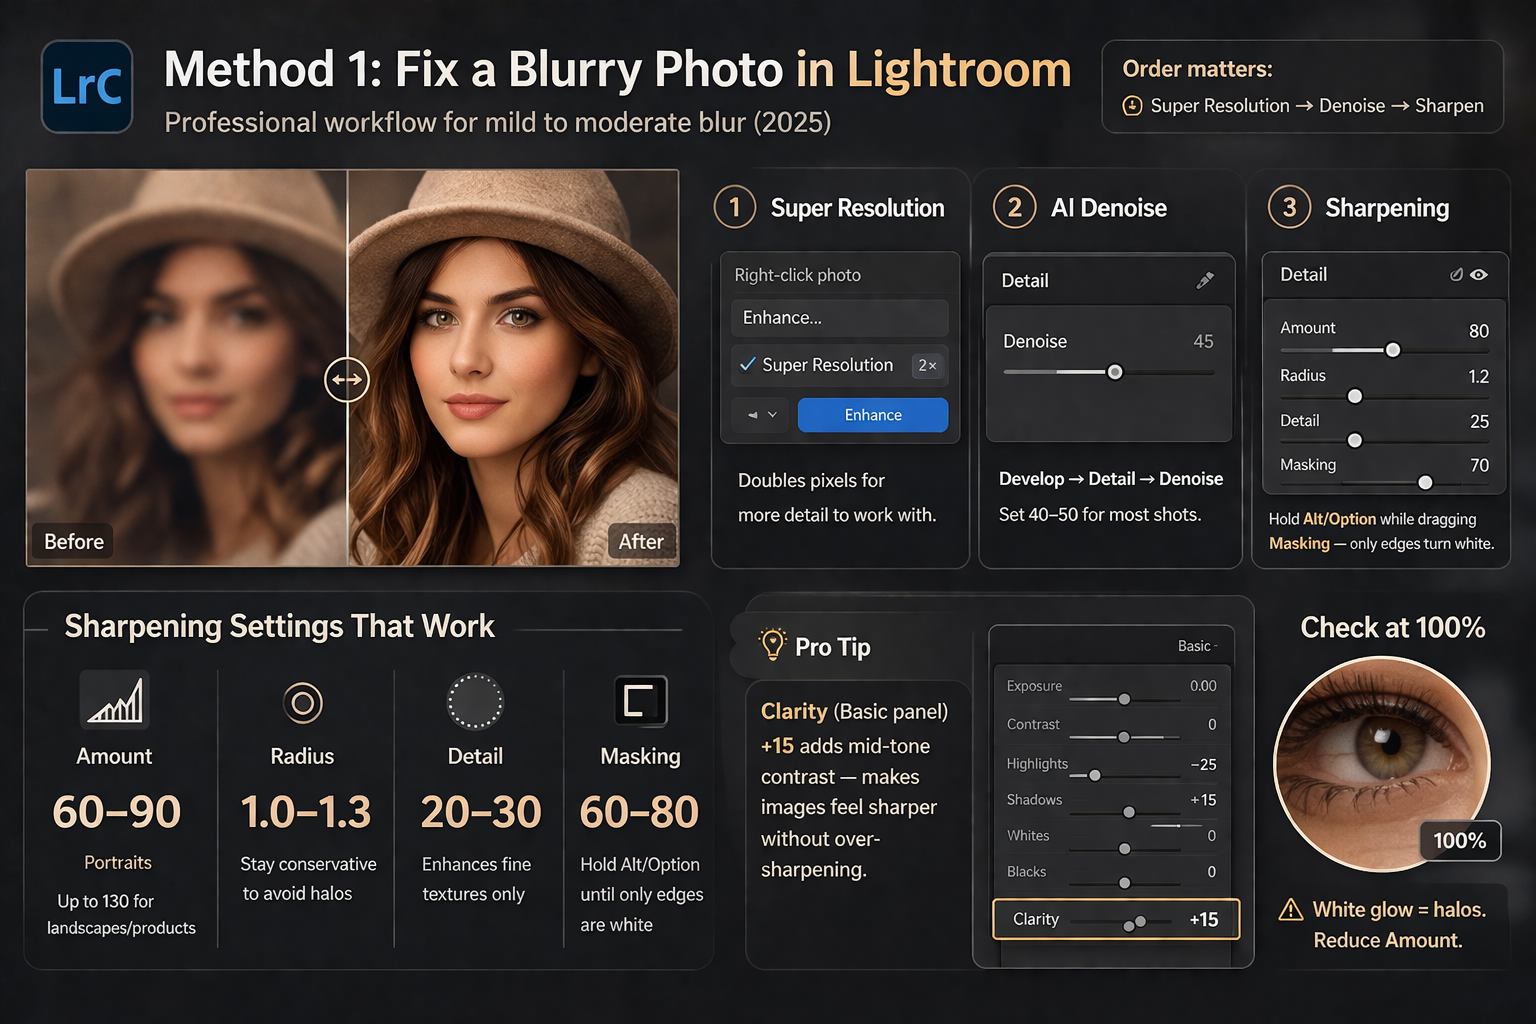
The order matters. Always run Super Resolution and Denoise before sharpening — sharpening after denoising produces cleaner edges than the other way around.
- Super Resolution (optional but recommended for cropped or soft images): Right-click the photo in Lightroom → Enhance → check Super Resolution → Enhance. This doubles the linear resolution and gives the sharpening algorithms more pixels to work with. Use it on any shot that was cropped in or came from a lower-resolution source.
- AI Denoise (if the shot has any noise): In the Develop module → Detail panel → click Denoise. Set the slider around 40–50. Lightroom Classic 14.4+ applies this non-destructively without creating a separate DNG file — no folder clutter.
- Sharpening — Amount: Hold Alt/Option while dragging the Amount slider. The preview turns grayscale so you're judging edge contrast, not colour. Set Amount between 60–90 for portraits, up to 130 for landscapes or product shots.
- Radius: Keep it at 1.0–1.3. Higher values create halos around edges. Stay conservative.
- Masking: Hold Alt/Option while dragging the Masking slider until only the edges and textures show white — skin and sky turn black. This stops sharpening from biting into smooth areas and amplifying noise. For portraits, Masking around 60–80 is typical. I rarely go below 40 on any portrait.
- Zoom to 100% and check an eye or a detailed edge. If you see a white glow around edges, back the Amount down. That halo effect is permanent and obvious in print.
One thing most tutorials miss: the Clarity slider in the Basic panel adds mid-tone contrast and makes images feel sharper without touching edge sharpening. Bumping Clarity to +15 alongside conservative Detail settings often looks more natural than cranking Amount alone — especially on faces.
Method 2: Fix a blurry photo in Photoshop (Smart Sharpen)
Photoshop's Smart Sharpen (Filter → Sharpen → Smart Sharpen) beats Lightroom in two specific situations: when you need to sharpen different areas at different strengths using layer masks, and when the blur has a clear directional angle — like camera shake at a specific trajectory.
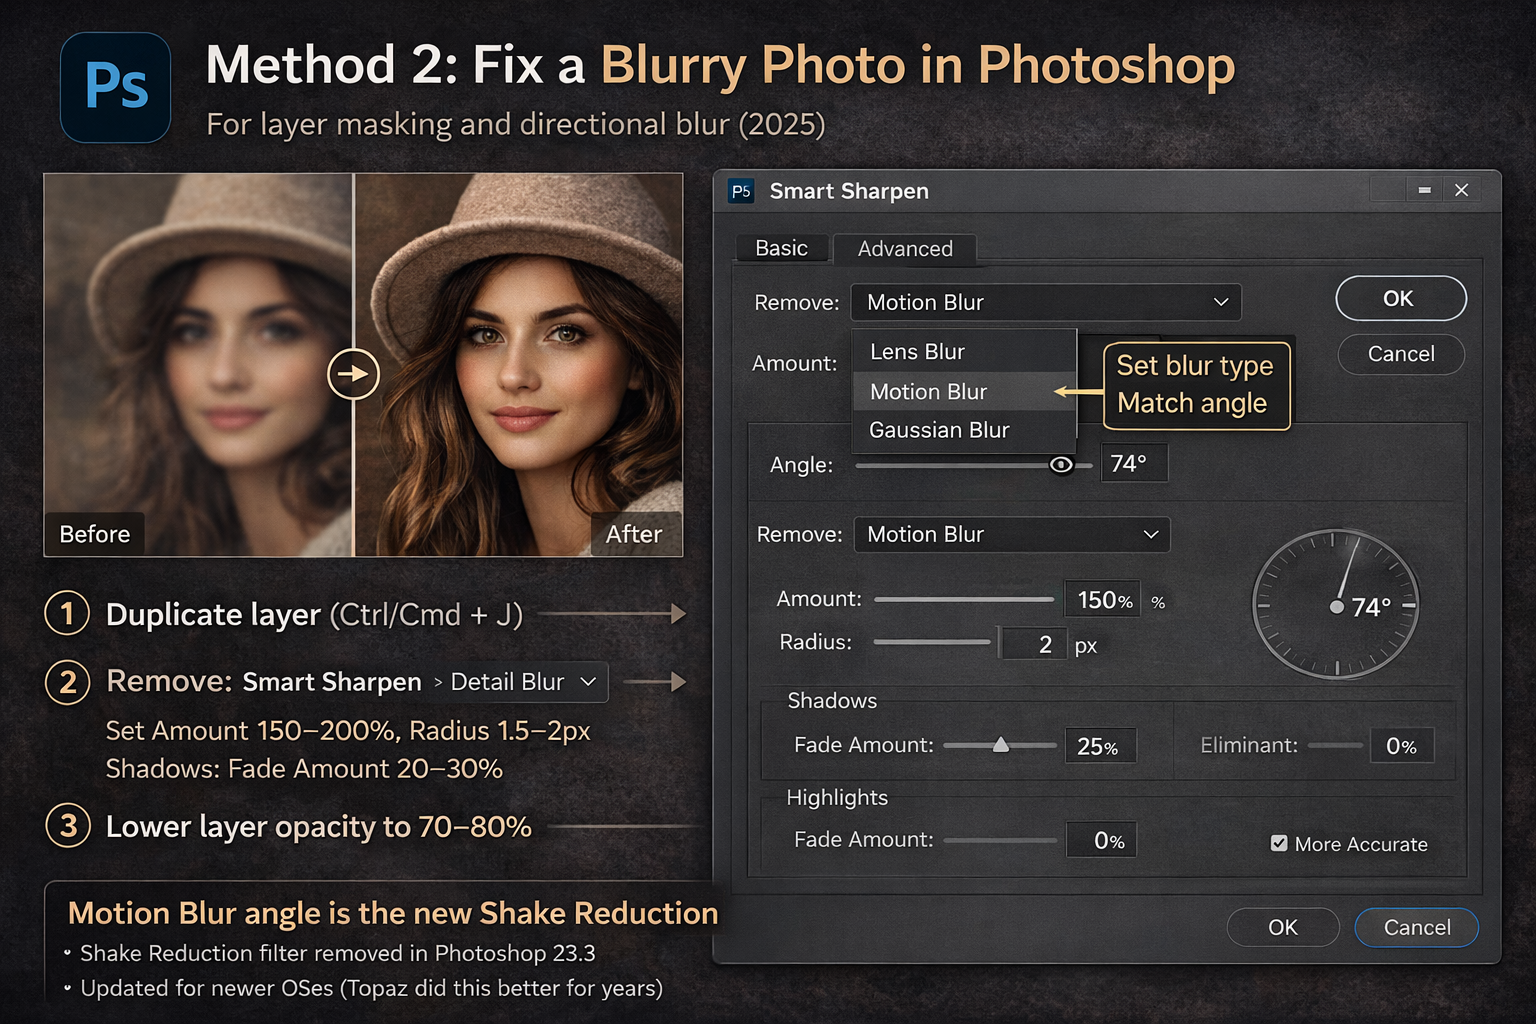
- Duplicate your layer first (Ctrl/Cmd + J). Always. Non-destructive.
- Go to Filter → Sharpen → Smart Sharpen.
- In the Remove dropdown, choose the blur type. Lens Blur works best for out-of-focus shots. Motion Blur mode lets you set the angle of the blur — match it to the smear direction in the photo. Getting this angle right is the difference between a clean result and a mess.
- Set Amount around 150–200% and Radius 1.5–2px. This sounds aggressive — the Shadows/Highlights fade compensates.
- Expand Shadows and set Fade Amount to 20–30%. This softens the effect in dark areas where noise would otherwise get loud.
- Click OK, then reduce the layer opacity to 70–80%. At 100% Smart Sharpen usually looks processed; at 75% it tends to look like it was always that sharp.
Worth knowing: Adobe removed the old Shake Reduction filter (Filter → Sharpen → Shake Reduction) in Photoshop 23.3 — it became incompatible with newer operating systems. Most tutorials still reference it. Shake Reduction is gone; Smart Sharpen with Motion Blur angle is now the native approach. And honestly, Topaz was doing this better for three years before Adobe pulled the filter anyway.
Method 3: Topaz Photo (best results for out-of-focus and camera shake)
This is the one I reach for when the shot matters and Lightroom isn't cutting it. Topaz Photo runs AI models trained specifically on different blur types — the Portrait model on eyes and fine hair detail is noticeably better than any manual approach. On a portrait where autofocus missed by 3–4mm at f/1.8, the Portrait model recovered detail that Lightroom's sharpening didn't come close to.
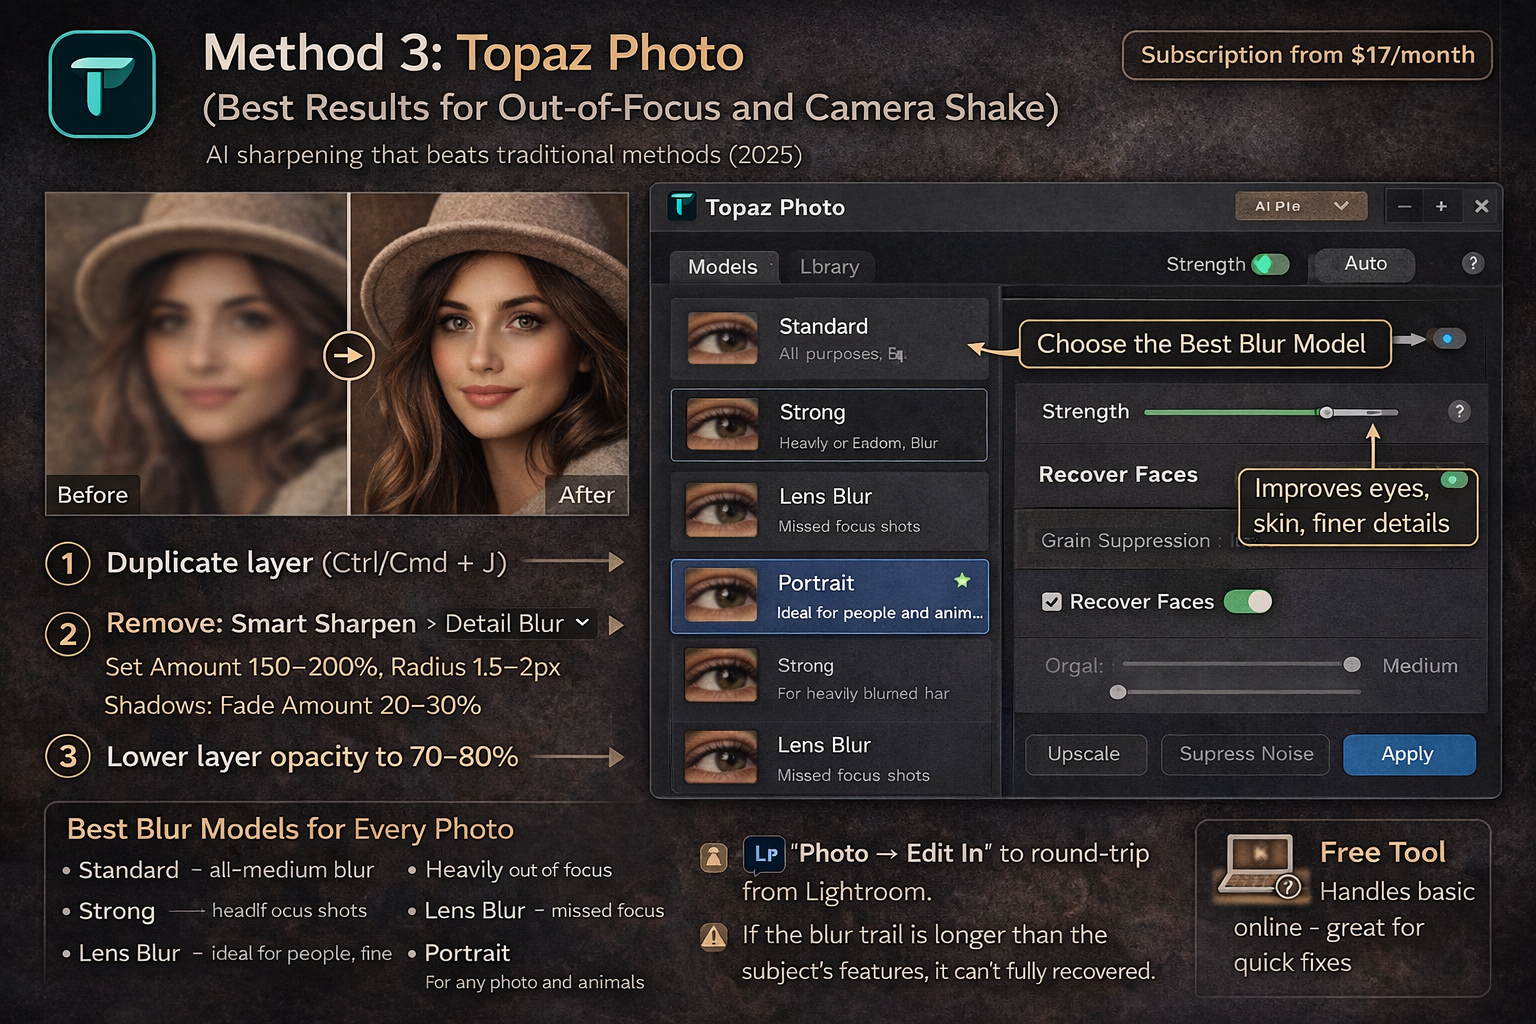
Topaz Photo is subscription-based (from $17/month or ~$199/year). There's also a free web tool that handles basic blur without a subscription.
- Open your image in Topaz Photo (desktop app or web). Autopilot runs automatically and picks the best model — check its choice, but it's usually right.
- Under Sharpen, choose the model manually if you want control:
- Standard — all-purpose, low to medium blur. Start here.
- Strong — for heavily blurred or badly out-of-focus images. Don't use Strong before trying Standard — it's easy to over-sharpen.
- Lens Blur — specifically for out-of-focus shots where the lens missed focus.
- Portrait — for any photo with people. Handles skin texture and hair better than the general models.
- Wildlife — fur, feathers, fine texture. The general models can produce plastic-looking results on animals; Wildlife doesn't.
- The Strength slider is controlled by Autopilot by default — a green dot shows when it's on autopilot. Override manually only if the result looks over- or under-processed.
- Enable Recover Faces for any portrait. It runs a separate model on face regions and is the most visible quality difference from free tools.
- Process and export. If you're working in Lightroom, use Photo → Edit In → Topaz Photo to round-trip without leaving your catalog.
The real limit: Topaz is excellent on out-of-focus shots and moderate camera shake. For severe motion blur — a subject moving fast during a 1/30s exposure — even Topaz can only reduce the damage. If the blur trail is longer than the subject's features, not enough information was captured to reconstruct.
Method 4: Free online tools
For a one-time fix without installing anything, there are solid free options. I use Fotor when I need to show a client a rough fix in the browser during a meeting — 40 seconds, no software, done. These tools work well on compression blur and mild out-of-focus shots. They won't replace Topaz for portraits that matter.
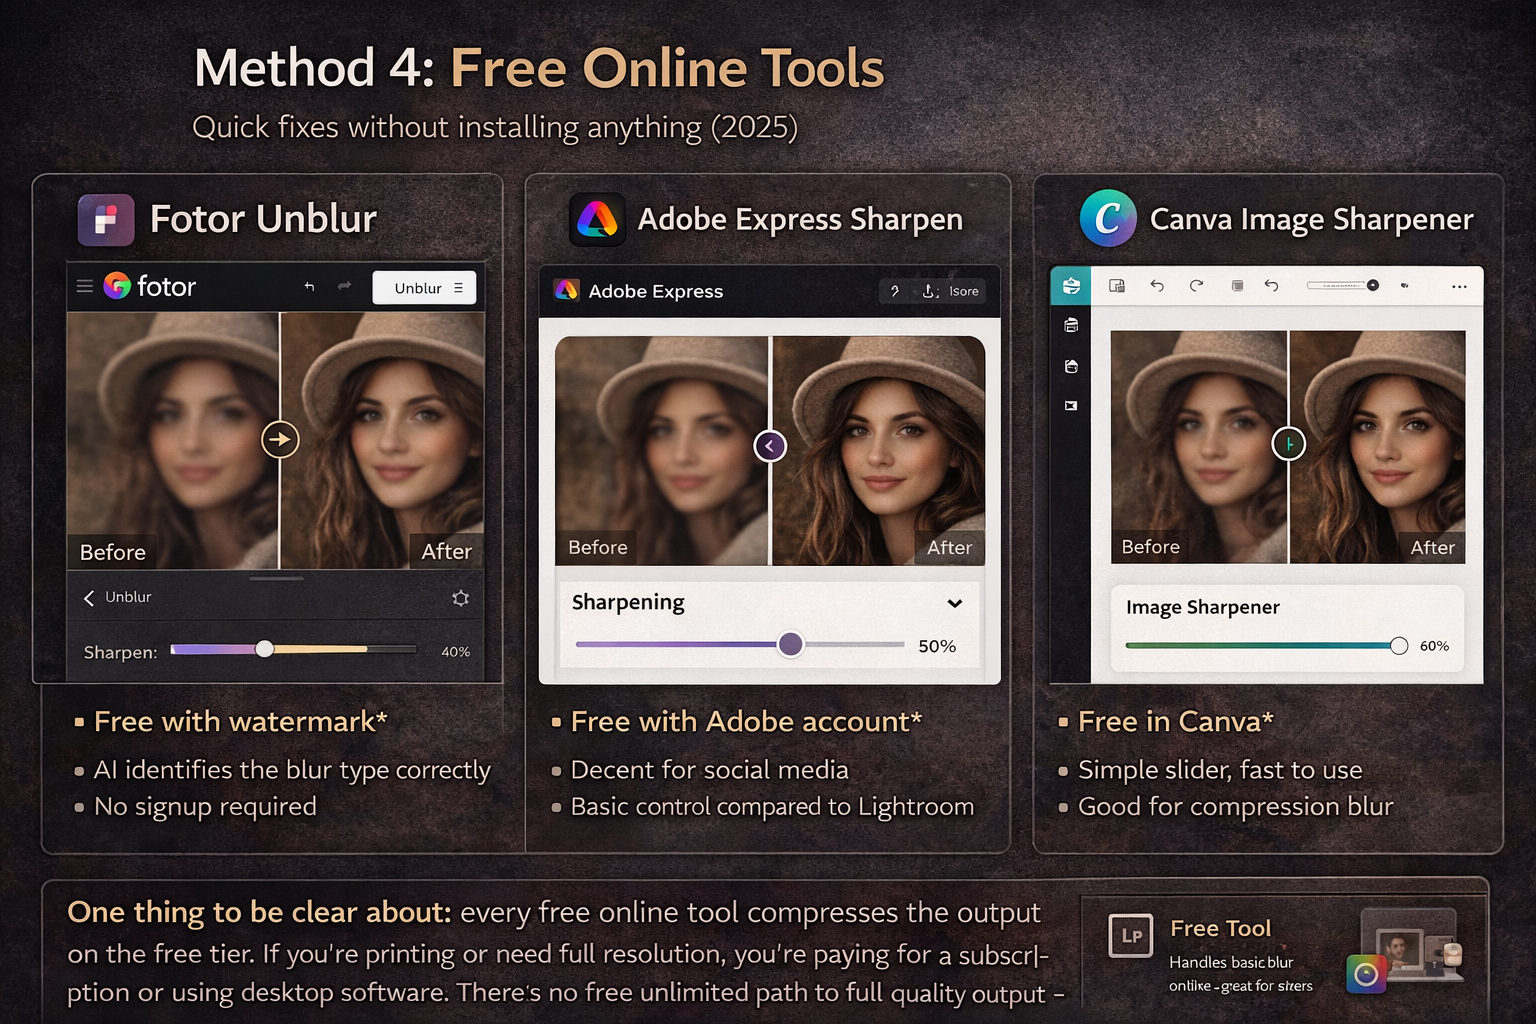
- Fotor Unblur — handles moderate focus blur well, free with watermark on the free tier. No signup required for basic use. The AI correctly identifies the blur type most of the time.
- Adobe Express Sharpen — free with an Adobe account, decent for quick social media fixes. Limited control compared to Lightroom.
- Canva Image Sharpener — straightforward slider, useful for compression blur on product photos or screenshots where you don't need a full editor.
One thing to be clear about: every free online tool compresses the output on the free tier. If you're printing or need full resolution, you're paying for a subscription or using desktop software. There's no free unlimited path to full-quality output — that ceiling hasn't changed.
Method 5: Fix blurry photos on iPhone and Android
Mobile fixes work best on mild blur — the results are more limited than desktop, mainly because you're starting with a compressed file and the sharpening algorithms have less to work with. That said, I've confirmed a keeper was salvageable while still at the event using Lightroom Mobile, which is worth knowing.
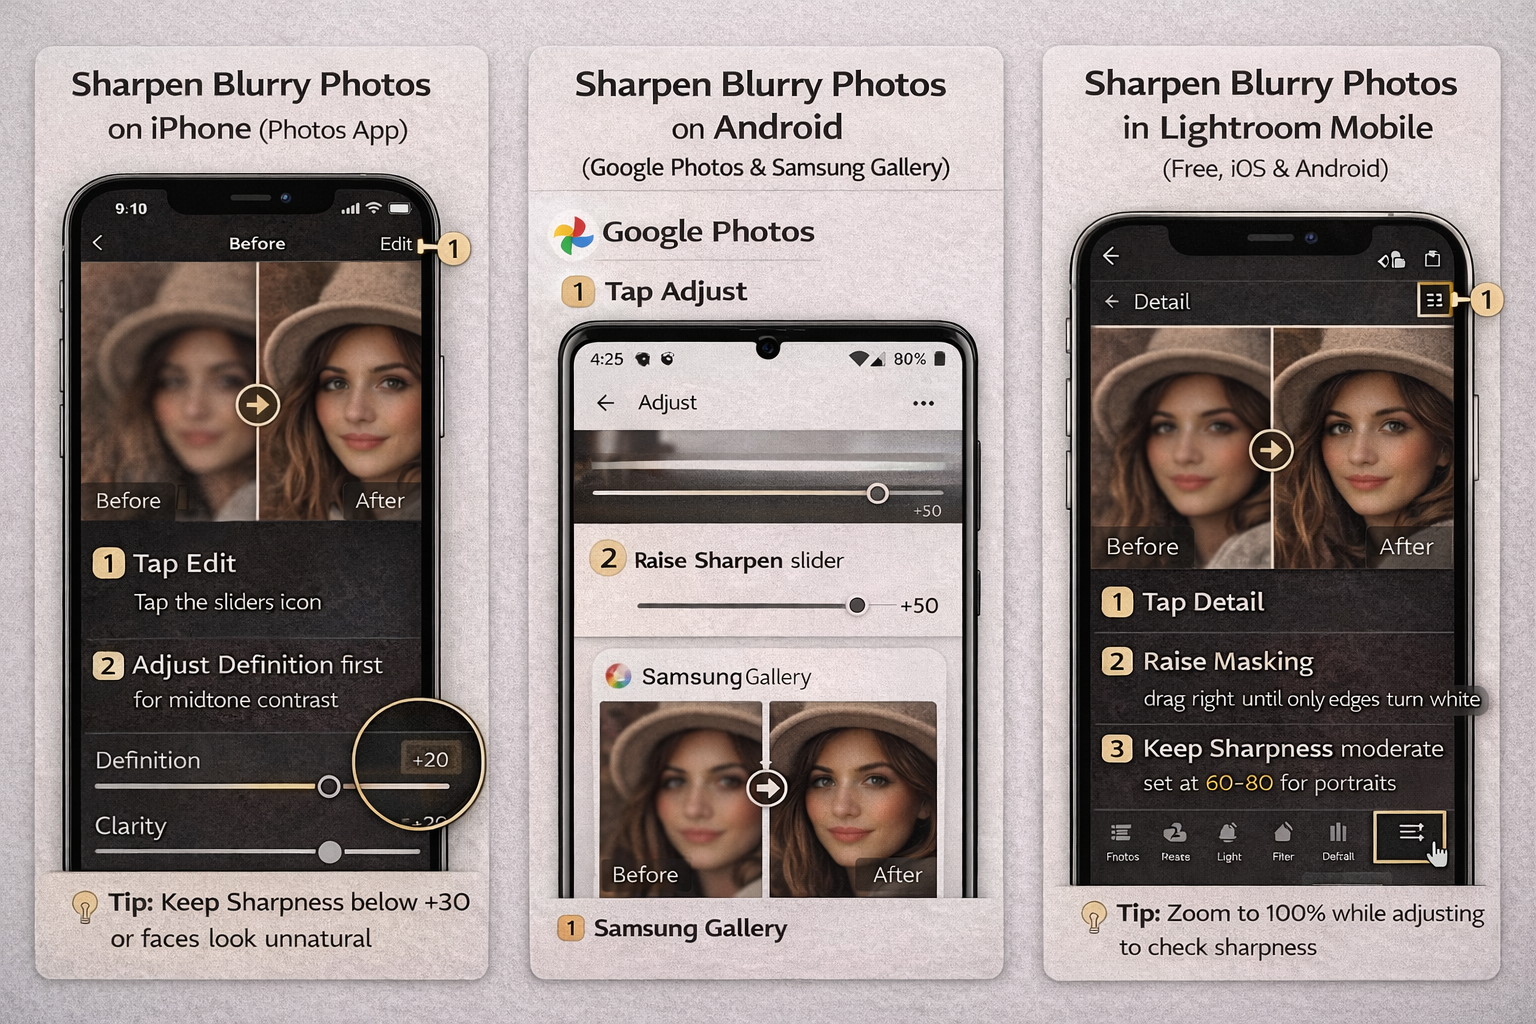
On iPhone (built-in Photos app):
- Open the photo → Edit → tap the dial icon (adjustments).
- Find Definition and drag it up first — it adds mid-tone contrast similar to Lightroom's Clarity. Start here before touching Sharpness.
- Add Sharpness carefully — stay below +30 or faces start looking plastic. Definition + low Sharpness usually looks better than high Sharpness alone.
On Android: Google Photos → Edit → Adjust → Sharpen. Samsung Gallery has a Remaster button that applies one-click AI enhancement — it works well on portrait focus blur and is worth trying before manual adjustments.
Lightroom Mobile (free, iOS and Android) — the best mobile option:
- Import your photo → tap the Edit icon → scroll to Detail.
- This is the same Detail panel as Lightroom Classic — Amount, Radius, Masking all work identically. Hold-press the Masking slider to see the mask preview.
- For the Masking slider on mobile: drag right until only edges are highlighted, then back off slightly. Same 60–80 range as desktop for portraits.
Lightroom Mobile's free tier has the Detail panel fully unlocked. The paid subscription adds AI Denoise and Super Resolution — for free, manual sharpening with good Masking control is still enough for most social media use.
When to stop trying
Not every blurry photo is fixable, and knowing when to move on saves time. If the blur trail is longer than the subject's face width — that photo is gone. If the entire frame is soft because of a dirty lens or fogged glass — no software reconstructs what the lens didn't capture. And if a JPEG has been resaved at low quality repeatedly, sharpening makes the compression artifacts more visible, not less.
What AI tools have changed: shots I would have deleted in 2019 are now routinely keepable. Mildly out-of-focus portraits at f/1.8, moderate camera shake in dim light, faces photographed through windows — all of these respond to Topaz Photo's current models in ways that weren't possible three years ago. The ceiling for what's fixable has moved. It just hasn't moved to the point where physics stops mattering.
Quick comparison: which method for which blur type
| Blur type | Best tool | Realistic result |
|---|---|---|
| Mild out-of-focus | Lightroom Detail panel | ✓ Good — often looks natural |
| Moderate out-of-focus (portrait) | Topaz Photo — Portrait model | ✓✓ Very good — faces especially |
| Camera shake (mild–moderate) | Topaz Photo — Standard or Strong | ✓ Good |
| Motion blur (fast subject) | Topaz Photo — Strong model | ~ Partial — reduces, doesn't eliminate |
| Compression / JPEG artifacts | Free online tool or Topaz Gigapixel | ✓ Good for web and product photos |
| Severe motion blur | No tool reliably reverses it | ✗ Minimal — move on |
Frequently asked questions
Can you completely fix a blurry photo?
Depends on the type and severity. Mild out-of-focus shots and moderate camera shake are highly recoverable with tools like Topaz Photo or Lightroom's Detail panel. Severe motion blur — where the subject moved significantly during the exposure — cannot be fully fixed by any current tool because the sharp pixel data was never captured. Knowing the difference before opening an editor is the most time-saving thing in this guide.
What is the best free tool to fix blurry photos?
Lightroom Mobile (free tier) is the strongest free option with real control — the Detail panel is fully unlocked and matches the desktop version. For a no-account, browser-based fix, Fotor's online unblur tool handles mild blur well. Adobe Express is free with an Adobe account and covers basic sharpening for social media use.
How do I fix a blurry photo on my phone?
On iPhone: Photos → Edit → Definition slider first, then Sharpness — stay below +30. On Android: Google Photos → Edit → Adjust → Sharpen, or Samsung Gallery's Remaster button for portraits. For the best mobile results: install Lightroom Mobile (free) and use its Detail panel — it has Masking support and matches desktop quality.
Why does sharpening make my photo look worse?
Over-sharpening creates halos around edges and amplifies noise in smooth areas like skin. In Lightroom, hold Alt/Option while dragging the Masking slider to see exactly where sharpening is being applied — push it right until only edges and textures are white. In Photoshop Smart Sharpen, set the Shadows Fade Amount to 20–30% and reduce final layer opacity to around 75%. If it still looks processed, the problem is usually Radius set too high — bring it back below 1.5.
Is Topaz Photo worth it for fixing blurry photos?
For photographers who regularly shoot portraits, events, or anything in challenging light — yes. The Portrait model and Recover Faces feature produce results that aren't possible in Lightroom alone. For occasional fixes, the free web tool at topazlabs.com handles basic blur without a subscription. The desktop app starts at $17/month and includes all models including Wildlife and the newer Portrait model.