How to Restore Old Photos: Complete Step-by-Step Guide
My grandmother's wedding photo lived face-down in a drawer for thirty years. When I finally turned it over, the emulsion had cracked across her face and the whole left side had gone deep amber — the kind of fade that looks permanent. It wasn't. Two hours in Photoshop and one pass through Topaz Photo later, my mom cried when she saw it. That's what old photo restoration actually looks like in practice: not magic, but a specific sequence of steps applied in the right order.
To restore an old photo: scan the original at 600 DPI minimum, run an AI restoration pass first (Photoshop Neural Filters or Topaz Photo), then fix remaining damage manually with the Healing Brush and Clone Stamp. The order matters — most guides get it backwards.
This guide covers the full process, from pulling a print out of a shoebox to a finished file ready to reprint or share.
Step 1: Scan the original correctly — this is where most restorations are lost or won
Everything downstream depends on the quality of your digital scan. A bad scan means working with less information than the original photo actually contains, and no AI tool can invent detail that wasn't captured.
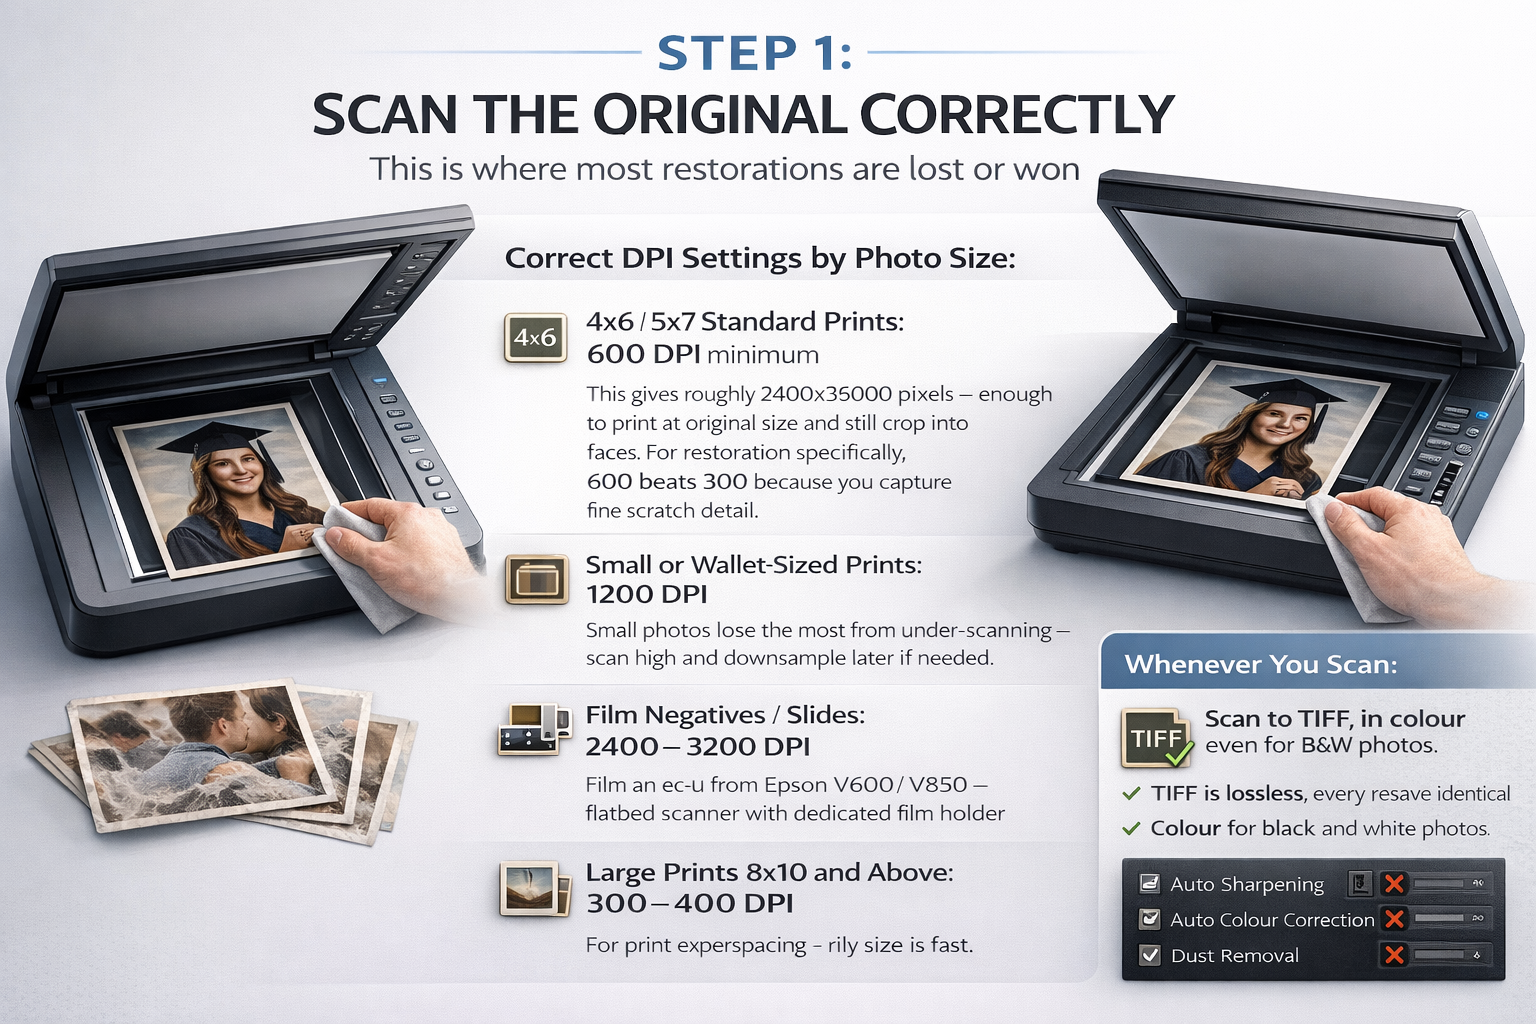
DPI settings by photo size:
- Standard 4×6 or 5×7 prints: 600 DPI minimum. This gives you roughly 2400×3600 pixels — enough to print at original size and still crop into faces. For restoration specifically, 600 beats 300 because you capture fine scratch detail the AI needs to distinguish damage from image.
- Small or wallet-sized prints: 1200 DPI. Small photos lose the most from under-scanning — scan high and downsample later if needed.
- Film negatives and slides: 2400–3200 DPI. These are small originals with high information density and need a flatbed scanner with a dedicated film holder (like the Epson Perfection V600 or V850). The workflow differs from print restoration — worth a separate session.
- Large prints (8×10 and above): 300–400 DPI is usually sufficient — enough surface area to capture detail without unmanageable file sizes.
Format: Scan to TIFF, not JPEG. TIFF is lossless — every resave stays identical. JPEG recompresses on every save, and after three or four rounds of editing the compression artifacts become part of the image. Keep a TIFF master; export JPEGs only for sharing.
Colour vs. grayscale: Always scan in colour, even for black-and-white photos. Colour scans capture yellowing and staining in full — more to work with during tone correction. Convert to grayscale later if you want; you can't add colour information back.
Scanner settings to turn off: Disable auto-sharpening, auto colour correction, and dust removal in your scanner software. These bake decisions into the raw scan that are better made manually. You want the rawest capture possible.
Before scanning, wipe the scanner glass with a lint-free cloth. Dust on the glass becomes part of every scan. This one step eliminates roughly 30% of the spots you'd otherwise spend time retouching.
Step 2: Set up Photoshop for non-destructive work
This step takes ninety seconds and has saved me from disaster more than once — I lost a full restoration session early on because I forgot to save as PSD before closing. The first Save As is muscle memory now.
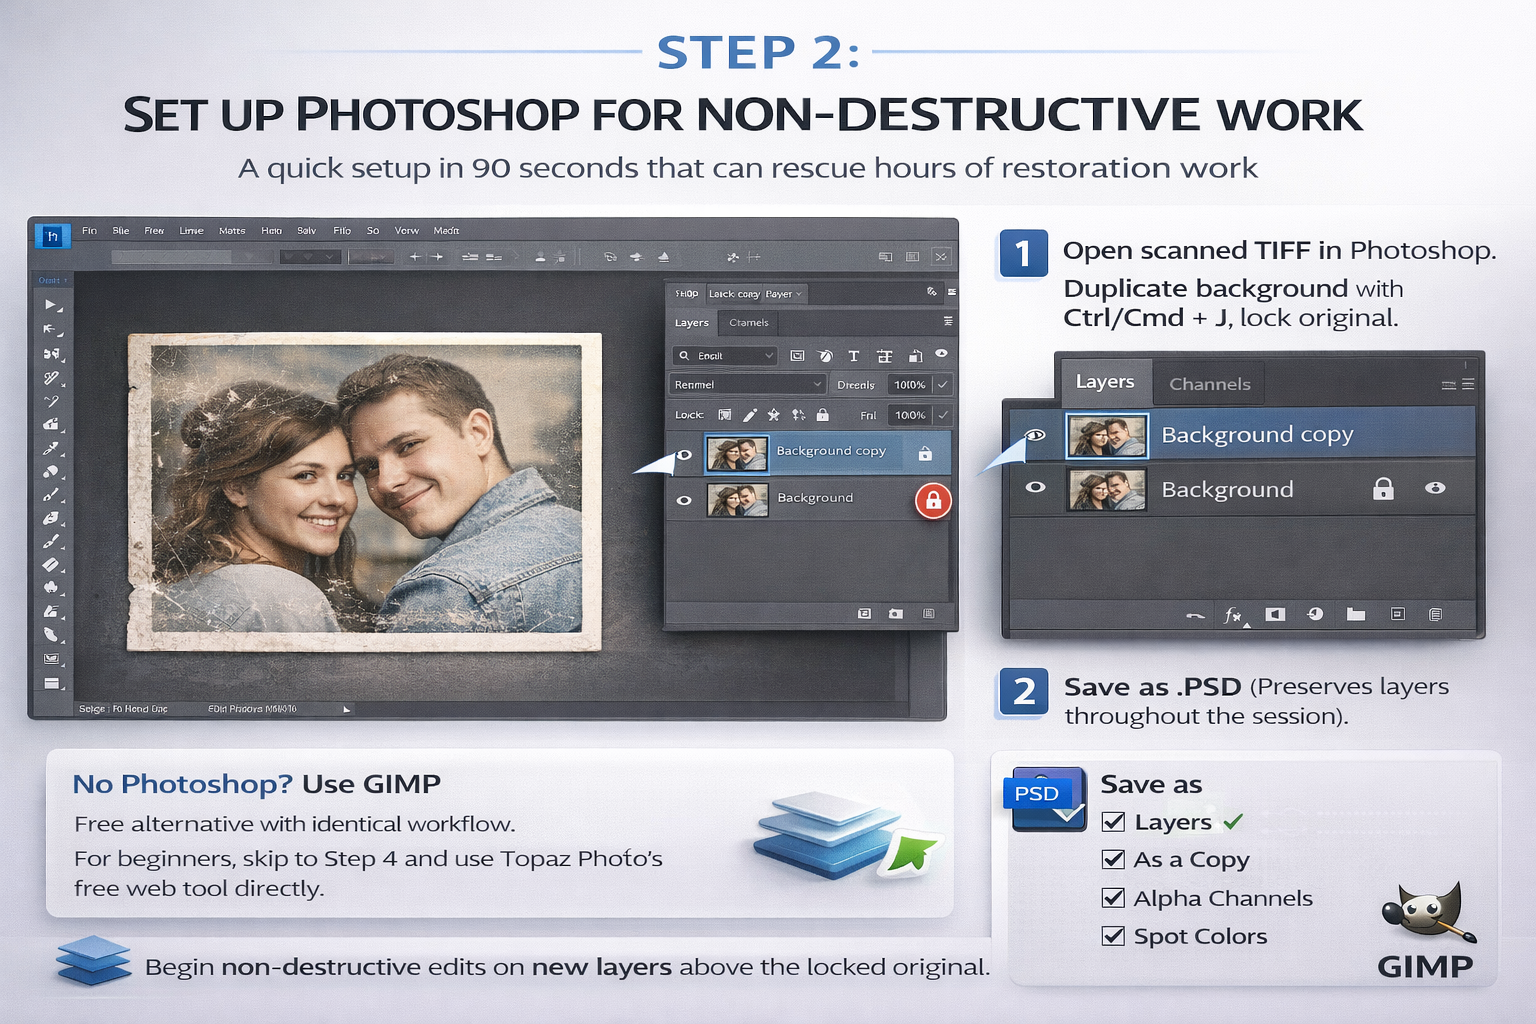
- Open your scanned TIFF in Photoshop.
- Duplicate the background layer immediately: Ctrl/Cmd + J. Lock the original. You never touch it again.
- All edits go on the duplicate or on new layers above it.
- Save as .PSD before doing anything else. Preserves layers throughout the session and gives you a file to return to months later.
If Photoshop isn't available, GIMP is a free alternative — the workflow is identical, the menu paths differ slightly. For beginners who don't want to learn either, skip to Step 4 and use Topaz Photo's free web tool directly.
Step 3: Basic corrections first — crop, straighten, levels
Before running any restoration, fix the obvious structural issues. Running AI restoration on a tilted, washed-out scan wastes the algorithm on problems trivial to fix manually.
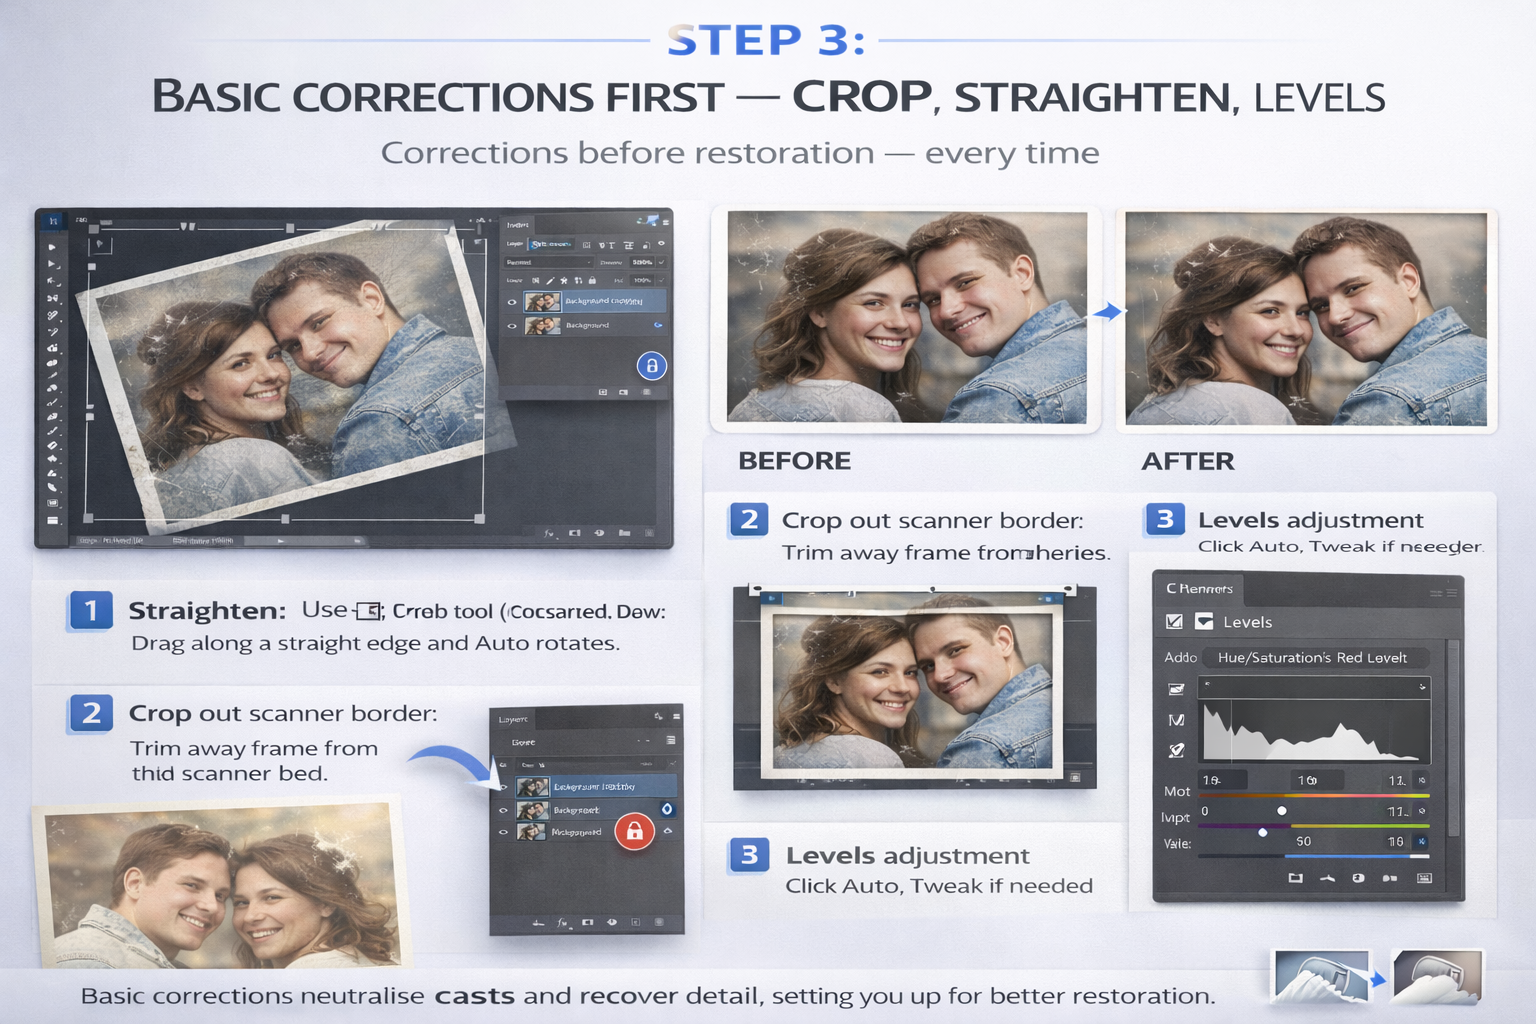
- Straighten: Use the Crop tool — drag along any edge that should be horizontal and Photoshop auto-rotates. Old scans almost always come in at a slight angle.
- Crop out scanner borders — the white frame from the scanner bed confuses auto-level algorithms.
- Levels adjustment: Add a Levels adjustment layer (Layer → New Adjustment Layer → Levels). Click Auto, then check at 100% zoom. This alone recovers significant contrast in faded photos. If Auto overcorrects, drag the white and black point sliders manually.
- For yellowed or tinted prints: Add a Hue/Saturation adjustment layer. Reduce Yellow and Red channels' saturation selectively — this neutralises the amber cast without desaturating the whole image. Pull back if faces start looking grey.
I've watched people spend an hour removing scratches on a washed-out scan, then find that the contrast correction afterwards shifted the whole tonal balance and half the healing work looked wrong. Corrections first, restoration second — every time.
Step 4: Run the AI restoration pass
This is the fast pass — one step that handles faded detail, general sharpness, and light scratches before you go in manually. Do this before retouching, not after: AI gives you a cleaner base to work from.
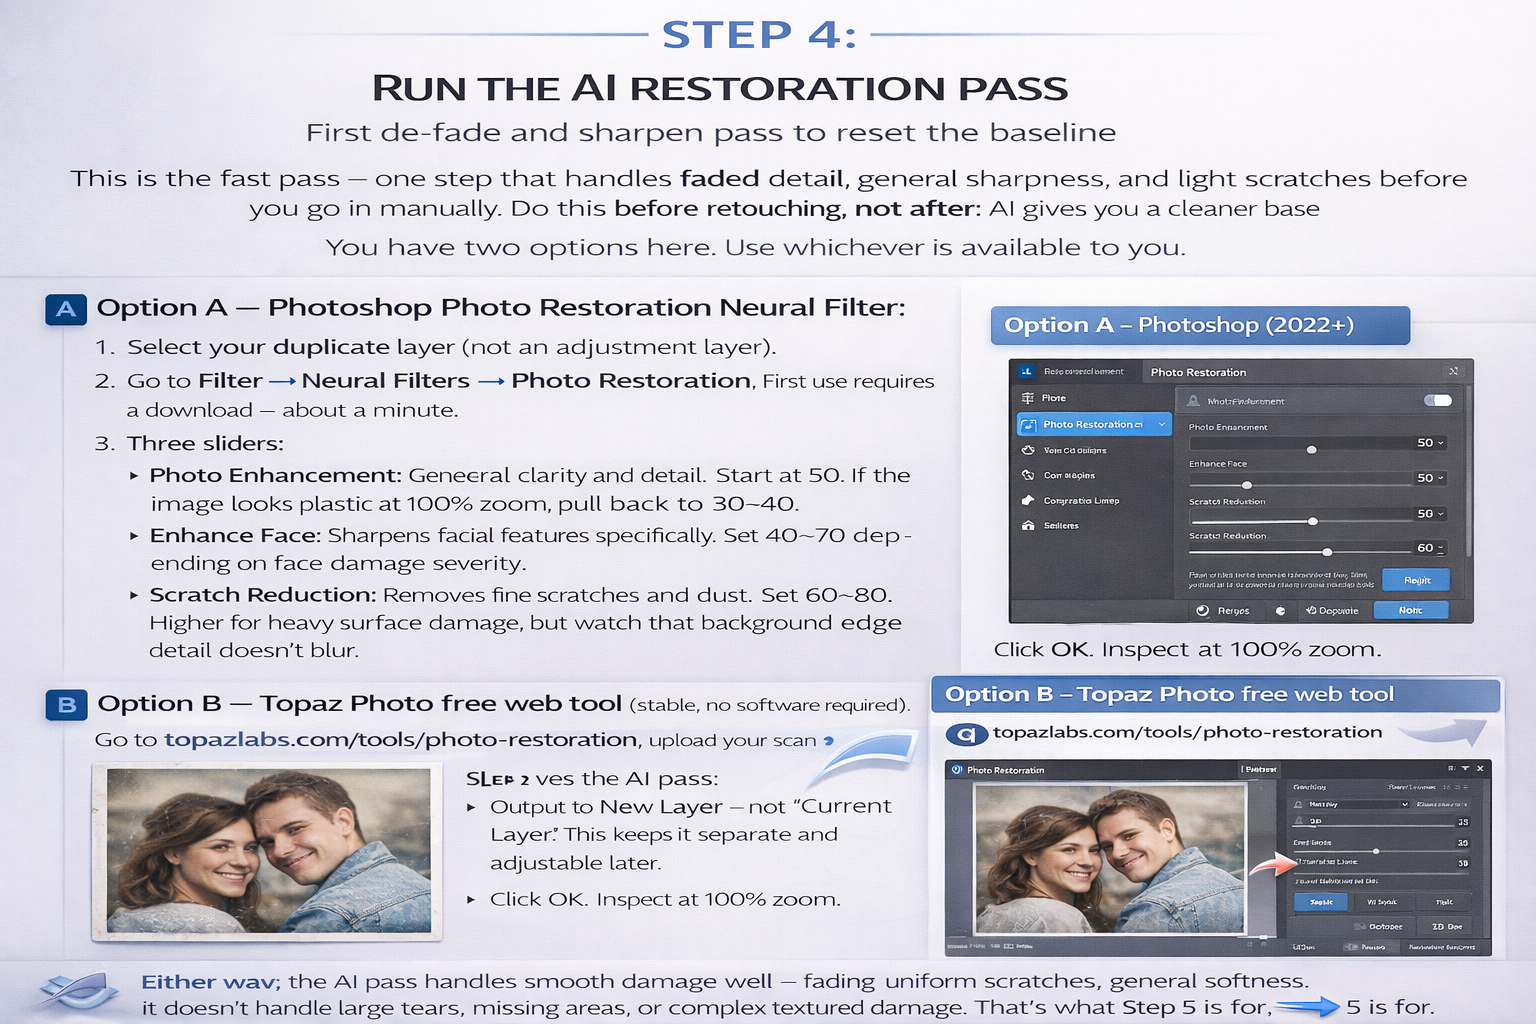
You have two options here. Use whichever is available to you.
Option A — Photoshop Photo Restoration Neural Filter:
- Select your duplicate layer (not an adjustment layer).
- Go to Filter → Neural Filters → Photo Restoration. First use requires a download — about a minute.
- Three sliders:
- Photo Enhancement: General clarity and detail. Start at 50. If the image looks plastic at 100% zoom, pull back to 30–40.
- Enhance Face: Sharpens facial features specifically. Set 40–70 depending on face damage severity.
- Scratch Reduction: Removes fine scratches and dust. Set 60–80. Higher for heavy surface damage, but watch that background edge detail doesn't blur.
- Output to New Layer — not "Current Layer". This keeps it separate and adjustable later.
- Click OK. Inspect at 100% zoom.
Known issue (Photoshop 26.x–27.x, 2025–2026): The Photo Restoration Neural Filter shows a "temporarily disabled" error for many users. If this happens, try rotating the image 90° before applying — this bypasses the bug in most cases. If it still fails, use Option B below. Adobe has acknowledged the issue; a fix was in Beta 27.3 but may not be in your stable version.
Option B — Topaz Photo free web tool (stable, no software required):
Go to topazlabs.com/tools/photo-restoration, upload your scan, and let Autopilot run. For mildly faded or lightly damaged photos this often produces results comparable to the Neural Filter, faster, and without Photoshop. It won't replace the full workflow for badly damaged prints, but as an AI pass before manual retouching it works well.
Either way: the AI pass handles smooth damage well — fading, uniform scratches, general softness. It doesn't handle large tears, missing areas, or complex textured damage. That's what Step 5 is for.
Step 5: Manual retouching — scratches, tears, missing areas
Create a new blank layer above the AI output. All manual retouching goes here — separate from the AI pass, adjustable independently.
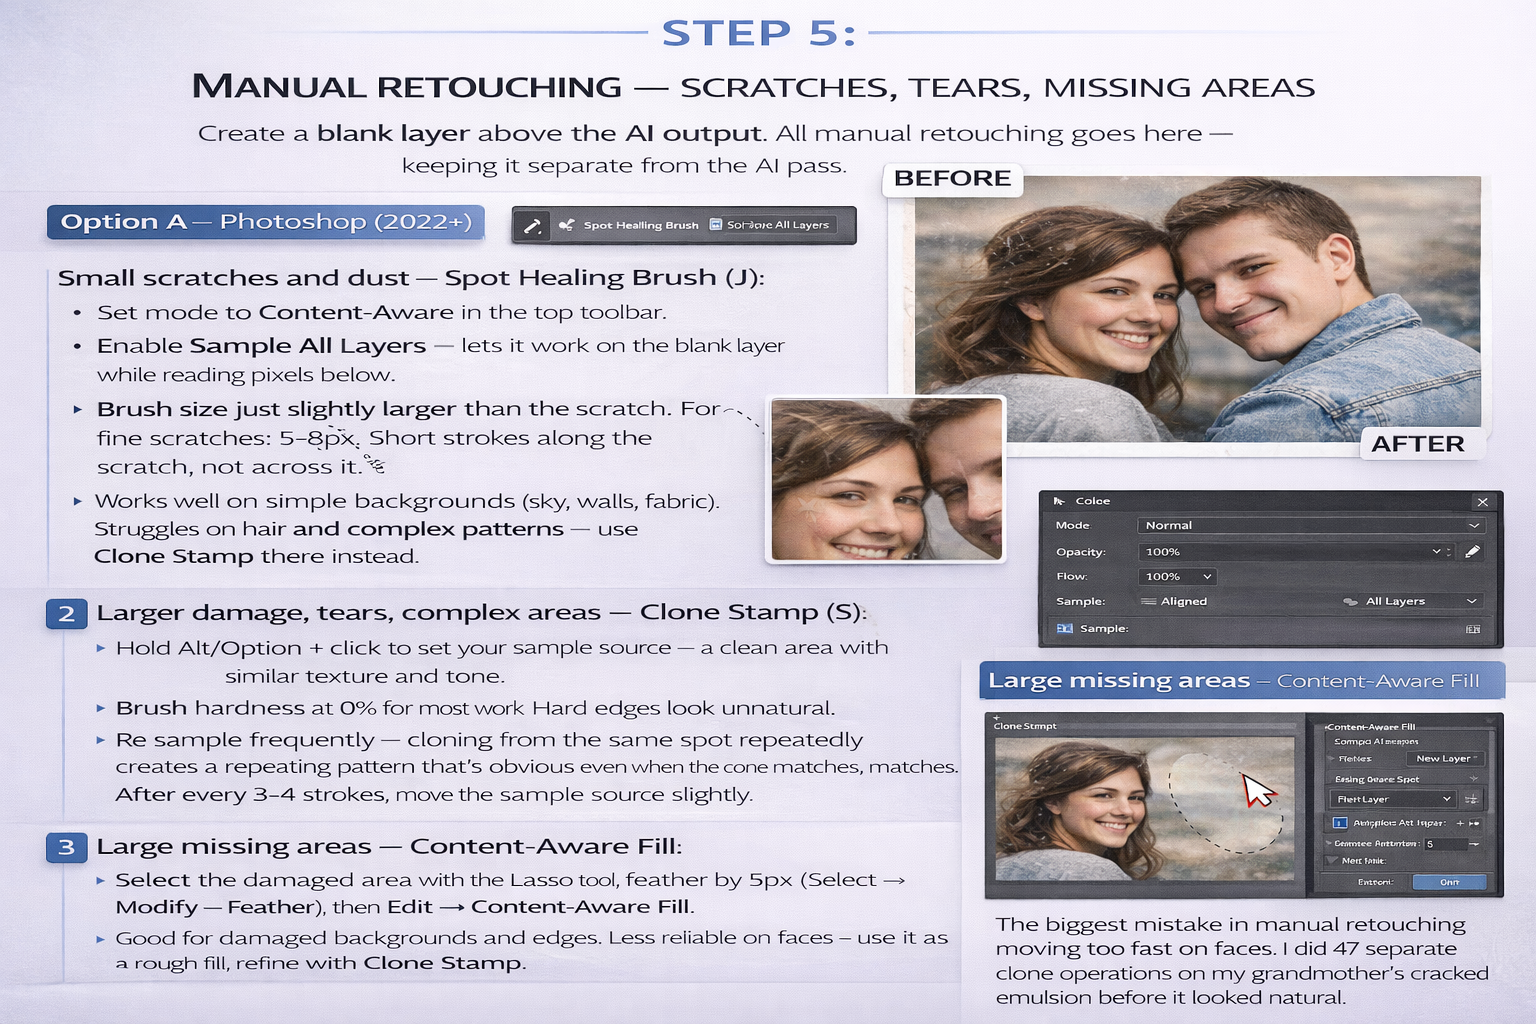
Small scratches and dust — Spot Healing Brush (J):
- Set mode to Content-Aware in the top toolbar.
- Enable Sample All Layers — lets it work on the blank layer while reading pixels below.
- Brush size just slightly larger than the scratch. For fine scratches: 5–8px. Short strokes along the scratch, not across it.
- Works well on simple backgrounds (sky, walls, fabric). Struggles on hair and complex patterns — use Clone Stamp there instead.
Larger damage, tears, complex areas — Clone Stamp (S):
- Hold Alt/Option + click to set your sample source — a clean area with similar texture and tone.
- Brush hardness at 0% for most work. Hard edges look unnatural.
- Re-sample frequently — cloning from the same spot repeatedly creates a repeating pattern that's obvious even when the tone matches. After every 3–4 strokes, move the sample source slightly.
- On faces: work at 200% zoom minimum. Sample from the same side of the face — skin texture has direction, and sampling from the wrong cheek looks patchy even if the colour is right.
Large missing areas — Content-Aware Fill:
Select the damaged area with the Lasso tool, feather by 5px (Select → Modify → Feather), then Edit → Content-Aware Fill. Good for damaged backgrounds and edges. Less reliable on faces — use it as a rough fill, refine with Clone Stamp.
The biggest mistake in manual retouching is moving too fast on faces. I did 47 separate clone operations on my grandmother's cracked emulsion before it looked natural. That's not unusual for a badly damaged portrait.
Step 6: Topaz Photo for face recovery
After the Photoshop work, if the photo still has soft faces or generally low resolution, Topaz Photo's face recovery model handles portrait detail — eyelashes, skin texture, teeth — at a level that the Photoshop Neural Filter averages out. For a full breakdown of its sharpening models and settings, see our guide to fixing blurry photos — the same models apply here.
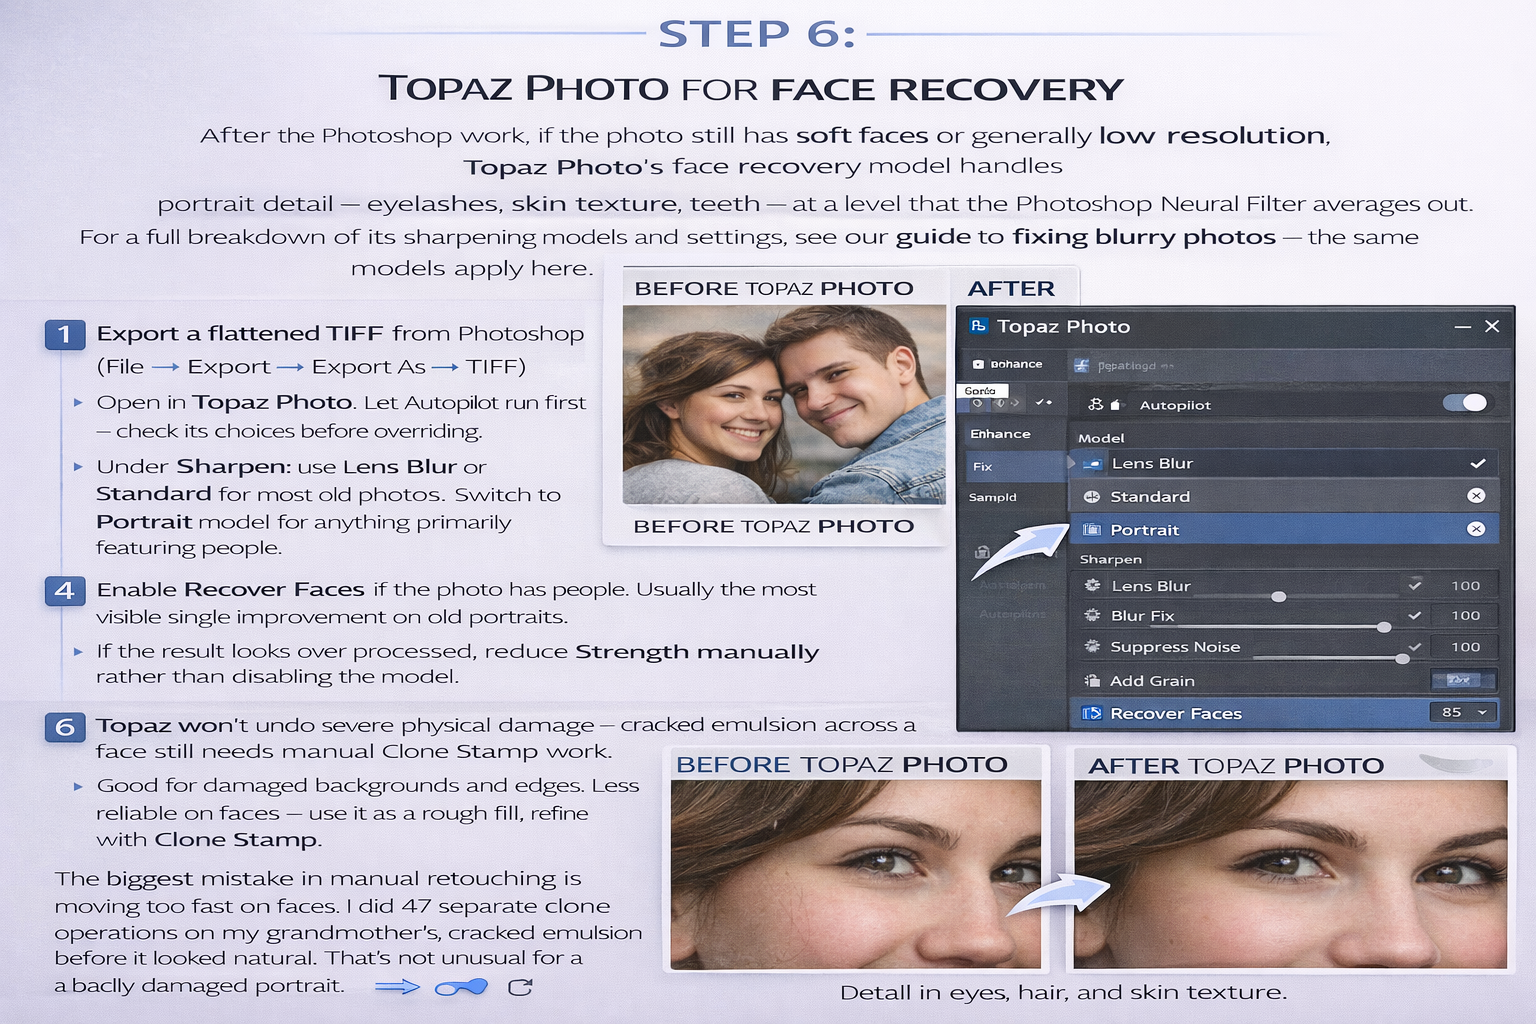
- Export a flattened TIFF from Photoshop (File → Export → Export As → TIFF).
- Open in Topaz Photo. Let Autopilot run first — check its choices before overriding.
- Under Sharpen: use Lens Blur or Standard for most old photos. Switch to Portrait model for anything primarily featuring people.
- Enable Recover Faces if the photo has people. Usually the most visible single improvement on old portraits.
- If the result looks over-processed, reduce Strength manually rather than disabling the model.
Topaz won't undo severe physical damage — cracked emulsion across a face still needs manual Clone Stamp work. What it does is recover the softness that happens when a photo has aged or been scanned from a faded print. The difference on eyes and hair at 100% zoom is the kind of thing that makes people actually gasp.
Step 7: Colorise a black-and-white photo (optional)
Photoshop's Colorize Neural Filter (Filter → Neural Filters → Colorize) gets sky, grass, and skin right most of the time. It consistently guesses wrong on specific clothing colours, eye colour, and anything it can't identify from context. The same "temporarily disabled" bug from Step 4 can affect this filter too — if it fails, Fotor's free colorisation tool online is a reasonable alternative.
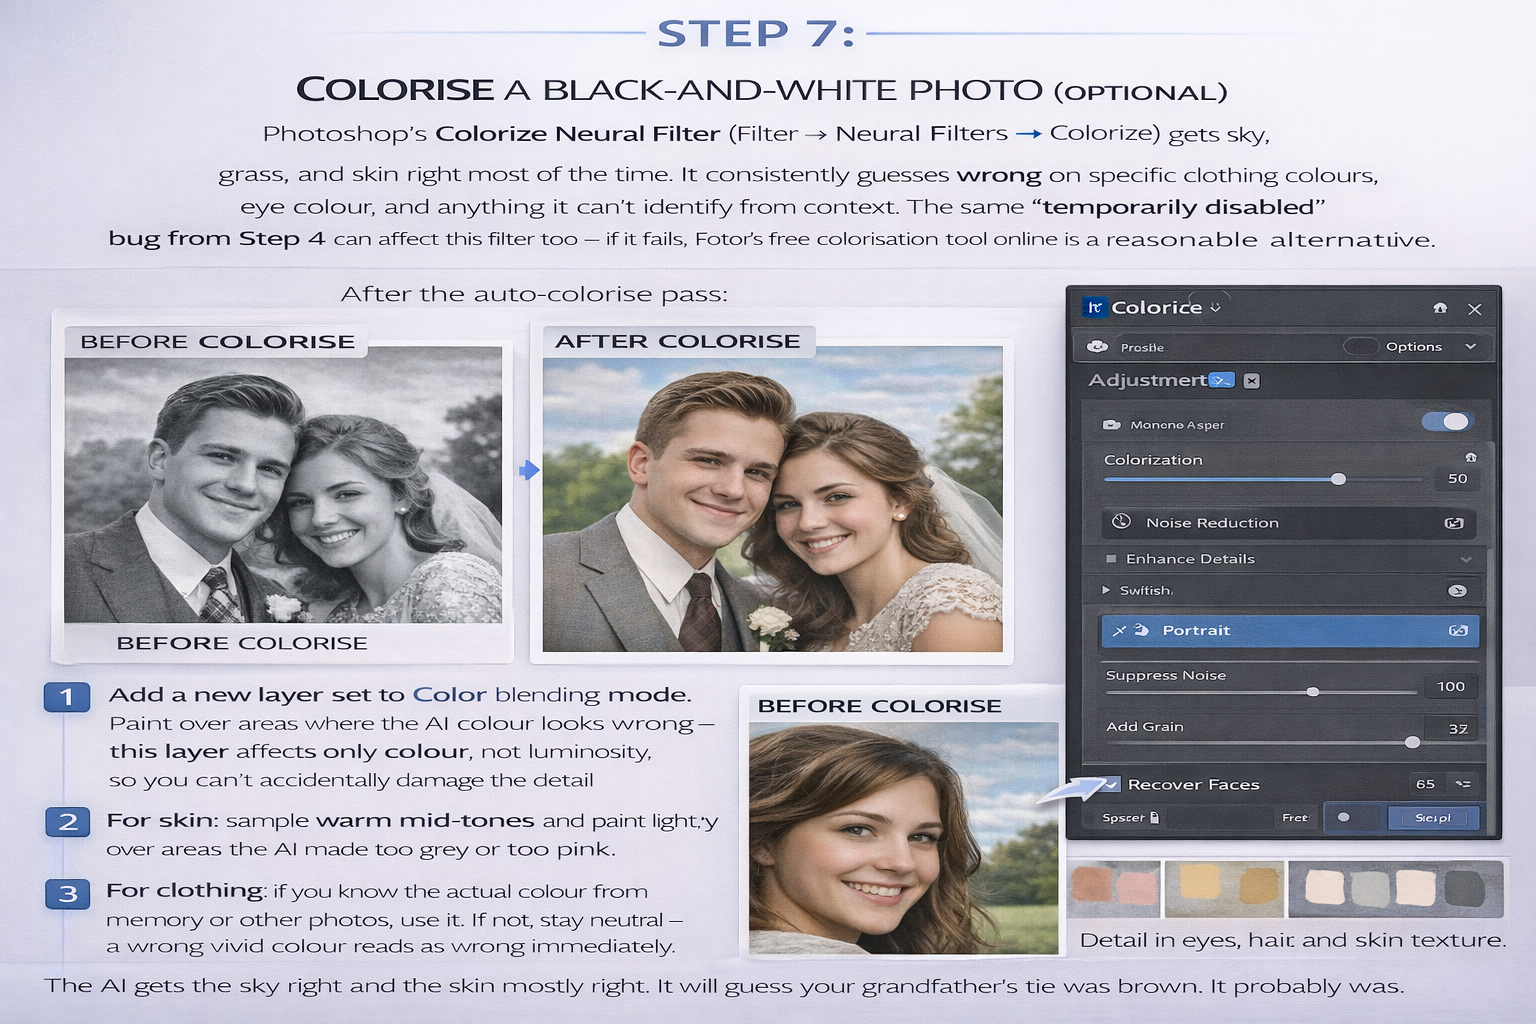
After the auto-colorise pass:
- Add a new layer set to Color blending mode. Paint over areas where the AI colour looks wrong — this layer affects only colour, not luminosity, so you can't accidentally damage the detail underneath.
- For skin: sample warm mid-tones and paint lightly over areas the AI made too grey or too pink.
- For clothing: if you know the actual colour from memory or other photos, use it. If not, stay neutral — a wrong vivid colour reads as wrong immediately.
The AI gets the sky right and the skin mostly right. It will guess your grandfather's tie was brown. It probably was.
Step 8: Export correctly
Keep the layered PSD. I keep every restoration PSD even years after finishing — twice I've gone back to re-export at higher resolution for reprinting, and starting from a flat JPEG would have meant starting the whole thing over.

- For printing: Export as TIFF at full resolution, or JPEG at quality 95–100 (Photoshop's "12" setting). Below quality 10, JPEG compression becomes visible in smooth gradients and skin tones.
- For digital sharing: JPEG at quality 80–85, longest edge 2400–3600px. File sizes stay under 2–3MB while retaining enough detail for full-screen viewing on any monitor.
- For reprinting at larger sizes: Run Topaz Gigapixel or Lightroom's Super Resolution before exporting. Both use AI upscaling rather than simple interpolation — the difference at 8×10 or larger is visible.
Quick comparison: which tool for which damage type
| Damage type | Best tool | Realistic result |
|---|---|---|
| Fading, loss of contrast | Levels / Curves adjustment layers | ✓✓ Excellent |
| General scratches, dust | AI pass → Spot Healing Brush | ✓✓ Excellent |
| Yellow / colour cast | Hue/Saturation adjustment layer | ✓✓ Excellent |
| Soft / blurry faces | Topaz Photo — Recover Faces | ✓ Very good |
| Tears, large damage | Clone Stamp + Content-Aware Fill | ~ Good with time and patience |
| Cracked emulsion on faces | Clone Stamp at 200% zoom | ~ Time-intensive but achievable |
| Large missing sections | Content-Aware Fill + manual cleanup | ✗ Partial — AI invents, not recovers |
Frequently asked questions
Can you restore a very damaged old photo?
Most old photos can be substantially improved — fading, yellowing, scratches, and moderate tears all respond well to this workflow. The real limit: large missing areas (burned edges, torn-away corners, missing faces) can't be recovered because the original information is gone. AI fills the gap with statistically plausible detail, not with what was actually there. For family photos where accuracy matters, that's worth knowing before you start.
What is the best free tool to restore old photos?
For a no-software, no-account option: Topaz Labs' free web tool handles faded and lightly damaged photos well in one upload. GIMP is the best free desktop alternative to Photoshop — it has the Healing Tool and Clone Tool with equivalent functionality. Fotor and Adobe Express both handle mild restoration free with account signup.
What DPI should I scan old photos for restoration?
600 DPI for standard 4×6 and 5×7 prints. 1200 DPI for wallet-sized or smaller prints. Film negatives and slides: 2400–3200 DPI with a dedicated film scanner or flatbed with film attachment. Always scan to TIFF — lossless means no quality degradation on resaves. You can always downsample a 600 DPI scan; you can't add resolution back after scanning too low.
How do I restore an old photo without Photoshop?
Fastest path: upload to Topaz Labs' free web tool for an AI restoration pass, then use Canva's photo editor for brightness, contrast, and colour adjustments. For manual scratch repair without Photoshop, GIMP is capable and free — the Healing Tool works identically to Photoshop's Spot Healing Brush for most practical restoration work.
How long does it take to restore an old photo?
A mildly faded photo with no physical damage: 15–30 minutes including scan time. A portrait with moderate scratches and colour cast: 1–2 hours. A badly damaged print with torn emulsion or large missing areas: 3–6 hours for a thorough manual restoration. The AI pass saves the most time on general cleanup — the rest is Clone Stamp work on faces and detailed damage, and that part doesn't get faster with better tools.