How to Remove Red Eye from Photos

Red eye is the easiest problem to remove from photos — two clicks in Photoshop or Lightroom and it's gone. The only time it gets complicated is with pets, because their flash reflection is green or yellow, not red, and automated tools don't detect it. I've also seen people spend ten minutes hunting for the iPhone red eye icon that simply isn't showing up — and there's a specific reason for that. I'll cover all of it.
Quick answer: in Photoshop, select the Red Eye Tool (nested under the Spot Healing Brush), click each pupil, done. In Lightroom, go to Develop module → Red Eye Correction tool → Red Eye → draw a circle over the pupil. On iPhone, open Photos → Edit → the eye icon (top left) → tap each red eye.
How to remove red eye in Photoshop
Photoshop's Red Eye Tool gives the most precise result and is the right choice when you need clean output for a large print or a close-up portrait where the eyes take up significant space in the frame.
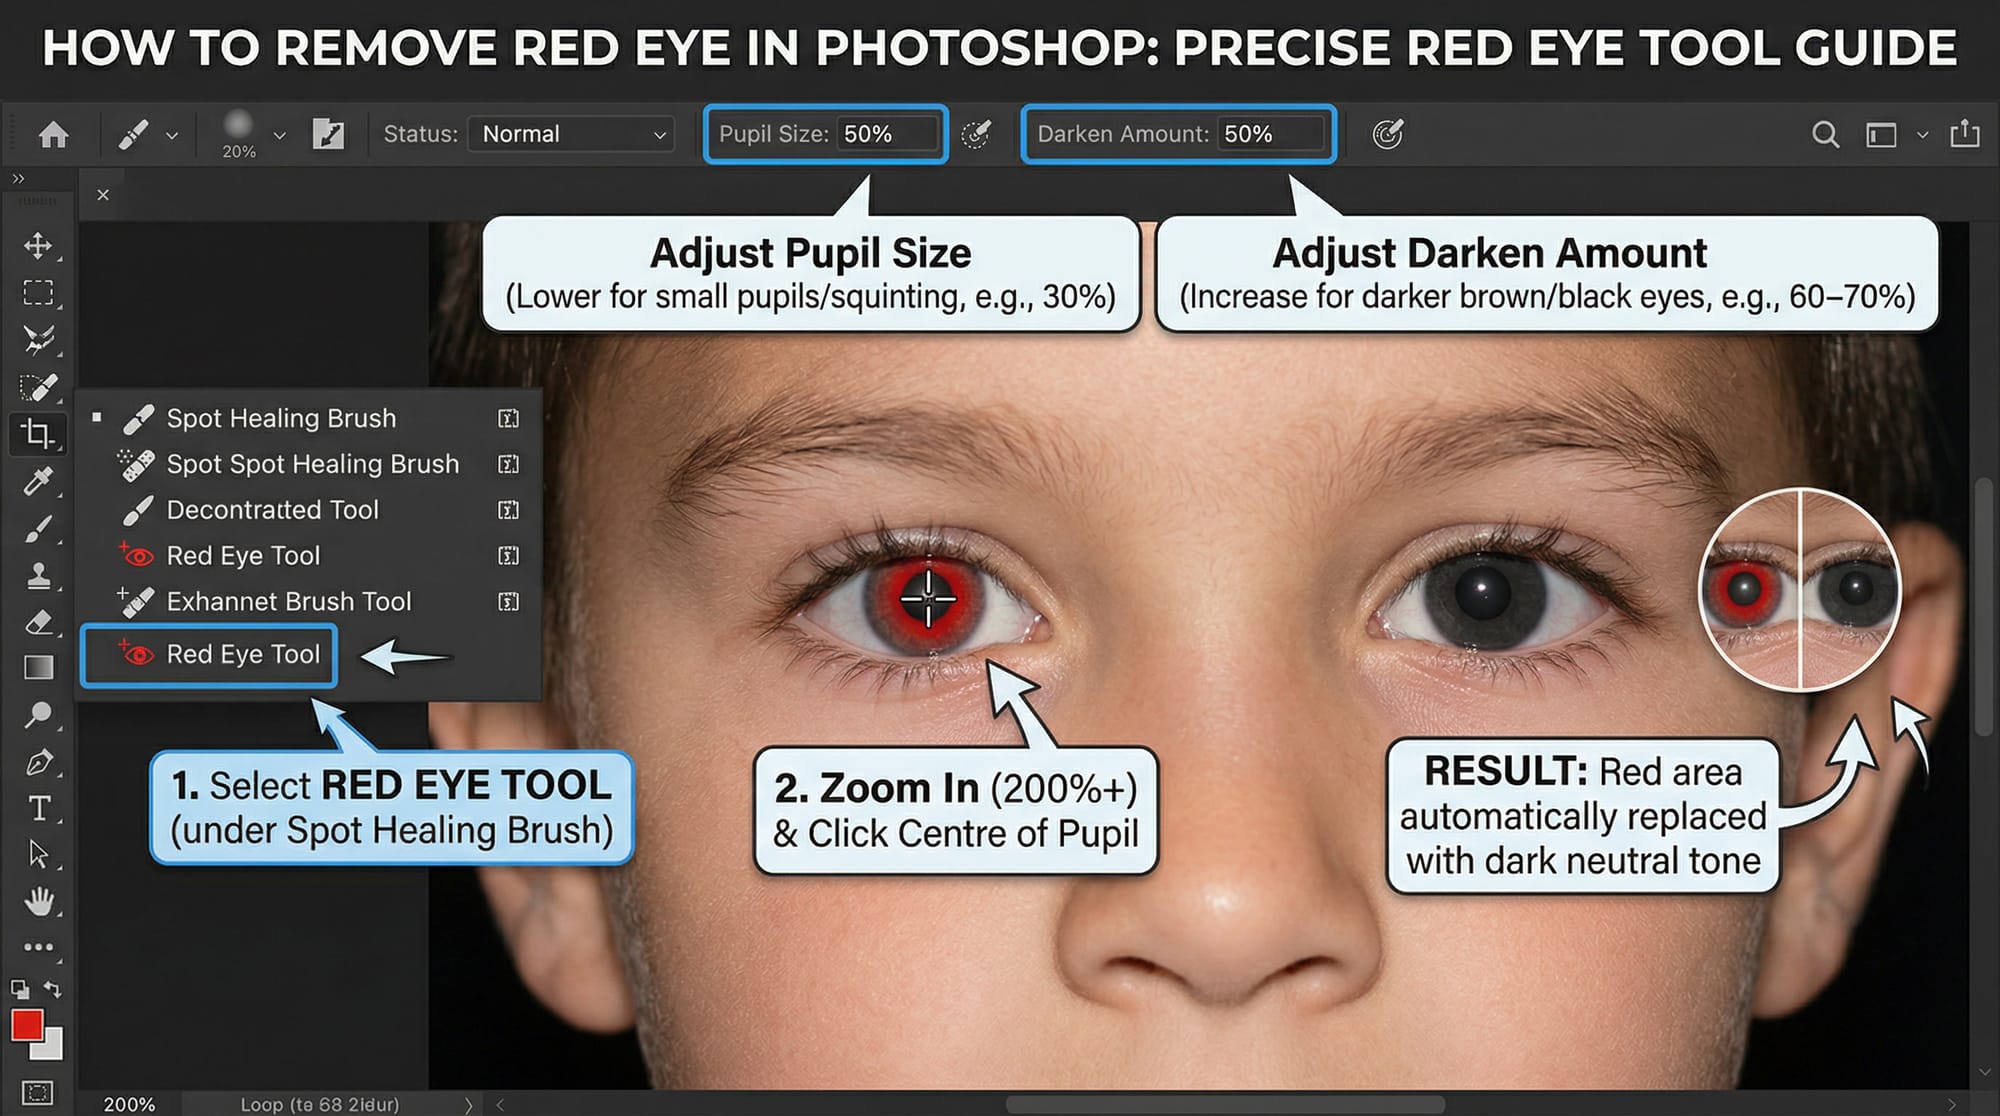
Open your photo. In the left toolbar, click and hold the Spot Healing Brush — a flyout menu appears. Select Red Eye Tool at the bottom of the list.
In the options bar at the top, you'll see two settings: Pupil Size and Darken Amount. The defaults are both 50%, which works for most photos. If the pupil looks small or the subject is squinting, lower Pupil Size to 30%. If the corrected eye looks grey rather than dark brown or black, increase Darken Amount to 60–70%.
Zoom in to at least 100% — preferably 200% on close portraits. Click directly on the centre of the red pupil. Photoshop selects the red area automatically and replaces it with a dark neutral tone. Repeat for the second eye.
If the result looks slightly off — uneven colour, a ring of red still visible at the edge — undo and try clicking closer to the dead centre of the pupil. The tool works outward from the click point, so starting position matters more than brush size.
For very old scans or compressed JPEGs where the red has bled into the iris, the Red Eye Tool alone won't be enough. After using it, zoom to 200% and check the edge of the pupil. If there's a reddish halo, grab the Brush Tool, set the colour to a dark grey sampled from the corrected area, and paint over the remaining red at 20–30% opacity. Two or three passes usually clears it.
How to remove red eye in Lightroom
Lightroom's Red Eye Correction tool works the same way as Photoshop's with one useful extra: it lets you reposition the correction circle after placing it. Useful when the subject isn't looking directly at the camera and the pupil is off-centre.
In the Develop module, look for the Red Eye Correction tool in the toolbar below the Histogram panel — it looks like an eye with an arrow. Click it.
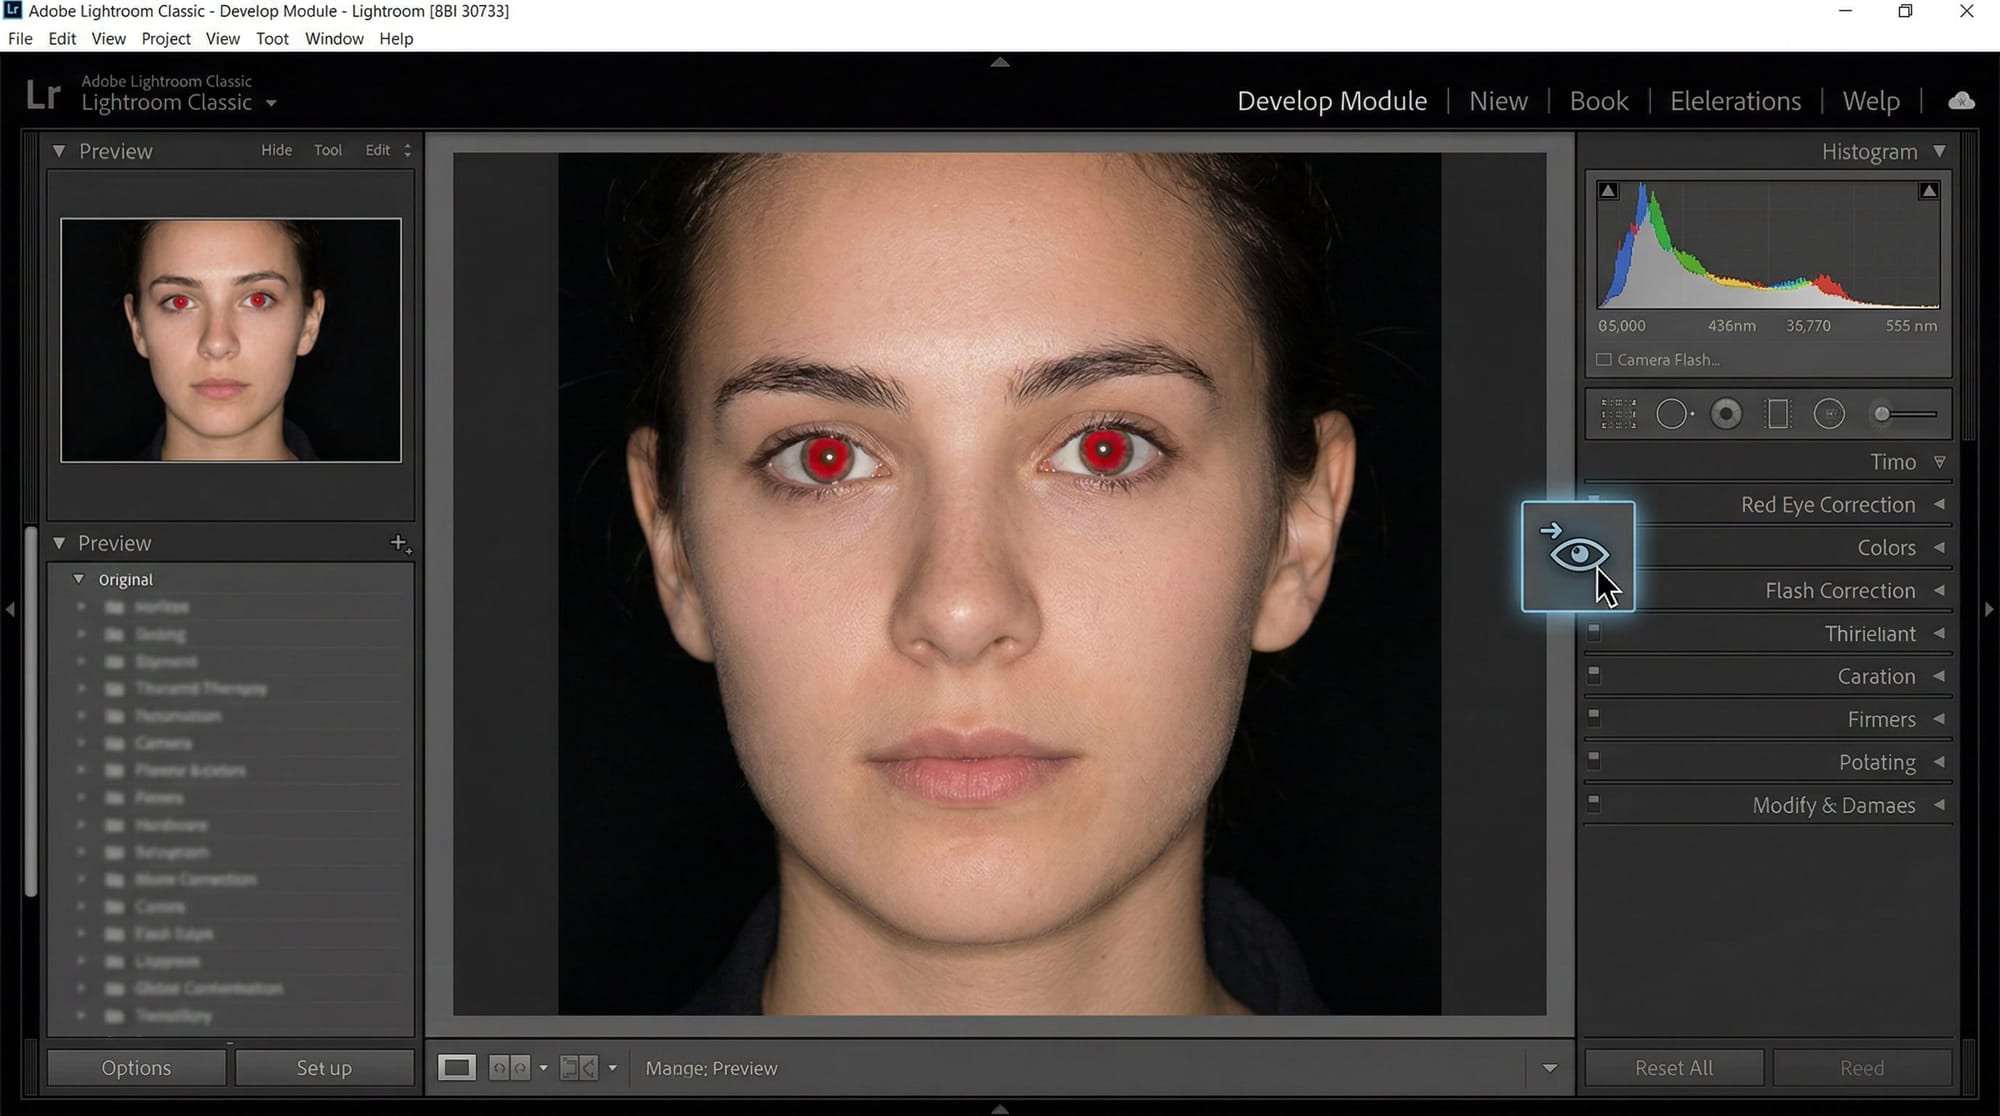
A panel appears with two options: Red Eye and Pet Eye. Choose Red Eye for people. Click and drag from the centre of the pupil outward until the circle covers the full red area. Release. Lightroom corrects it automatically.
If the circle landed in the wrong spot, drag it to reposition. Adjust Pupil Size and Darken sliders until the eye looks natural. Click Done when finished.
Lightroom Mobile does not have a Red Eye Correction tool. The desktop version does — the mobile app doesn't. If you're on your phone, use the iPhone Photos app or a dedicated tool instead.
How to remove red eye on iPhone
iPhone has a built-in red eye correction tool that many people don't know about. It's not in the main editing panel — it's a separate icon that only appears when the Photos app detects red eyes in the photo. If you open a photo and don't see the eye icon, it means the app didn't detect red eye automatically. Try tapping each eye area manually after activating the tool.
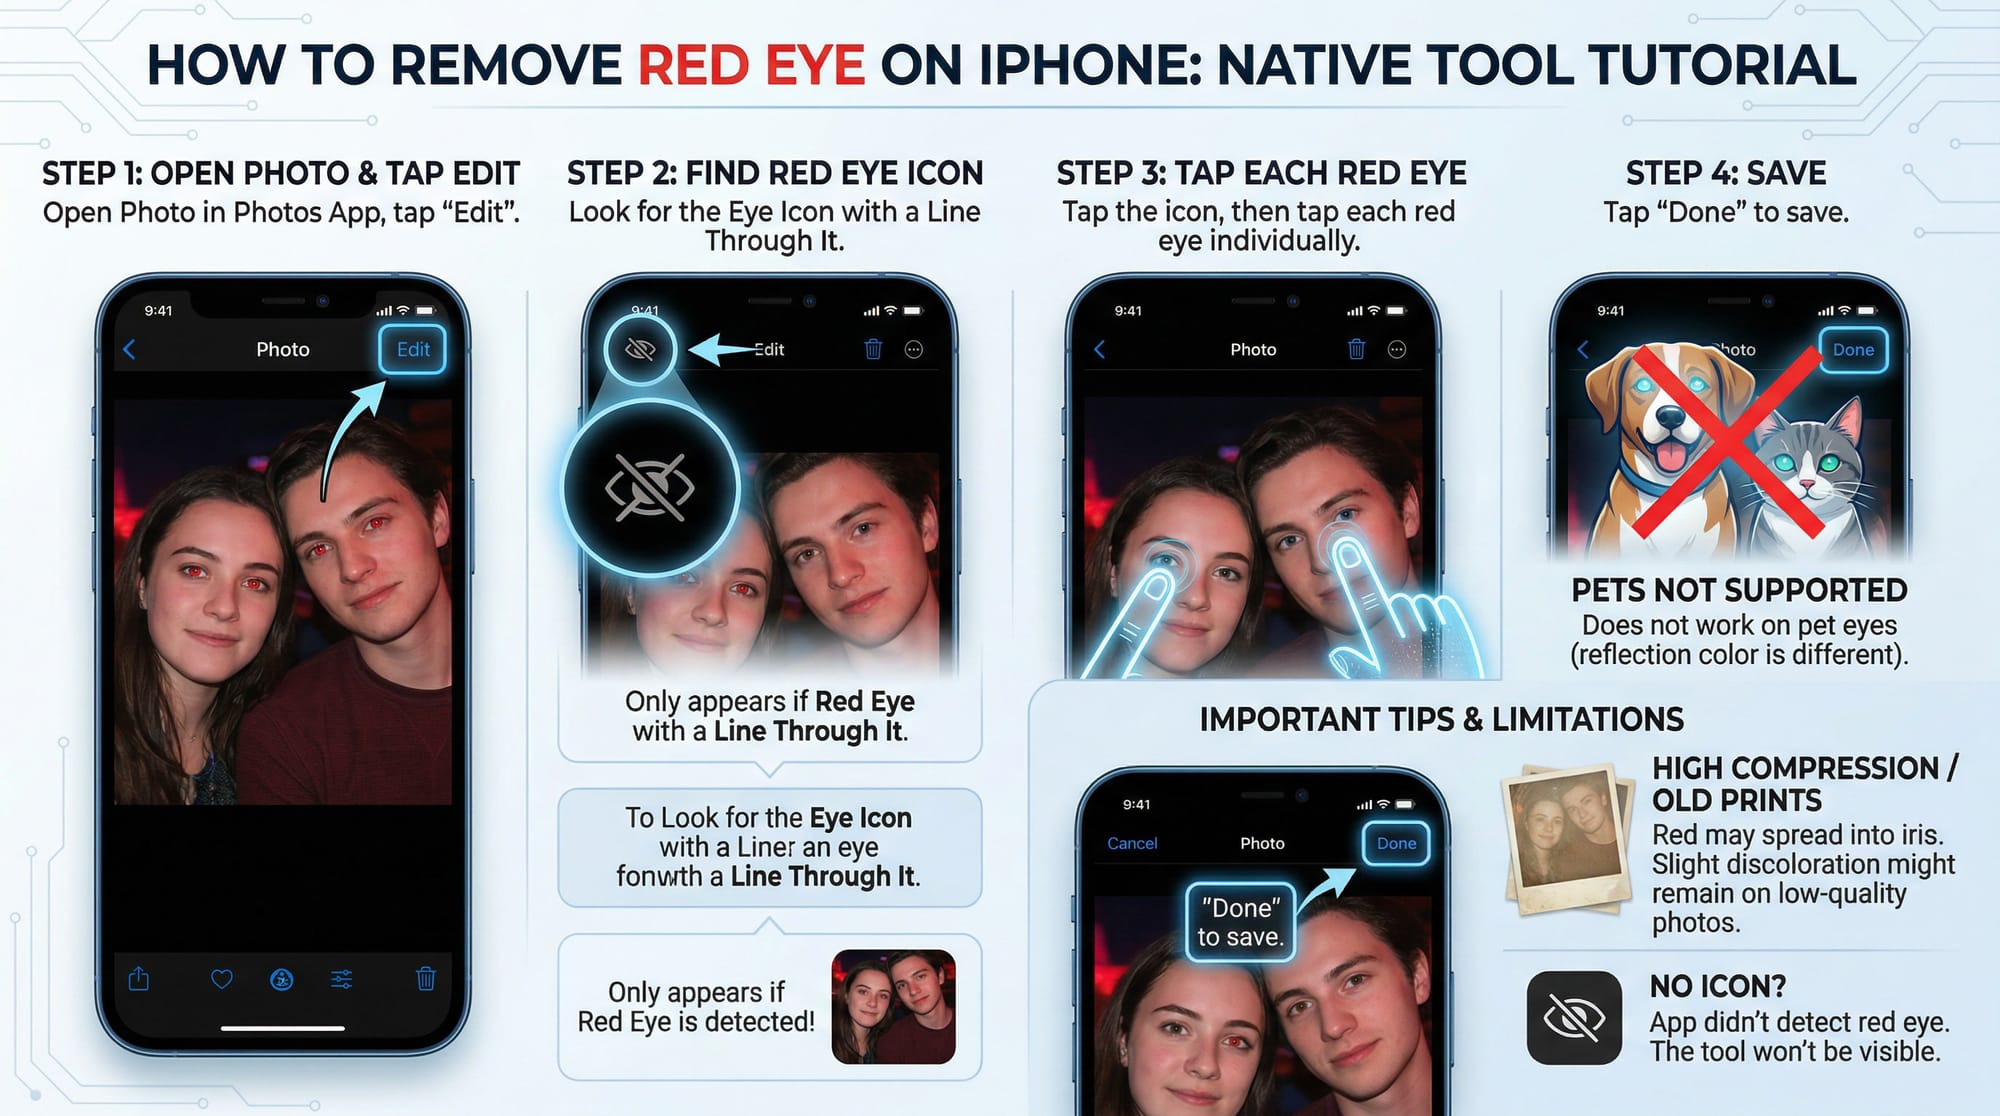
Open the photo in the Photos app. Tap Edit in the top right. Look for the eye icon with a line through it in the top left corner of the edit screen. Tap it. The app will prompt you to tap each red eye individually. Tap each one. Tap Done.
Works well on mild to moderate red eye from a direct flash. On heavily compressed photos or scanned old prints where the red has spread significantly into the iris, it may leave a slight discolouration — but it's still worth doing before sharing at screen size.
The iPhone red eye tool does not work on pet eyes. It detects red pixels, and animals' flash reflections are a different colour entirely.
On a Mac, the Photos app has the same red eye tool: open the photo → click Edit → the eye icon appears in the toolbar at the top of the screen. Click Auto to let it detect and fix automatically, or click the eye icon and click each red pupil manually if Auto misses any.
How to remove red eye on Android
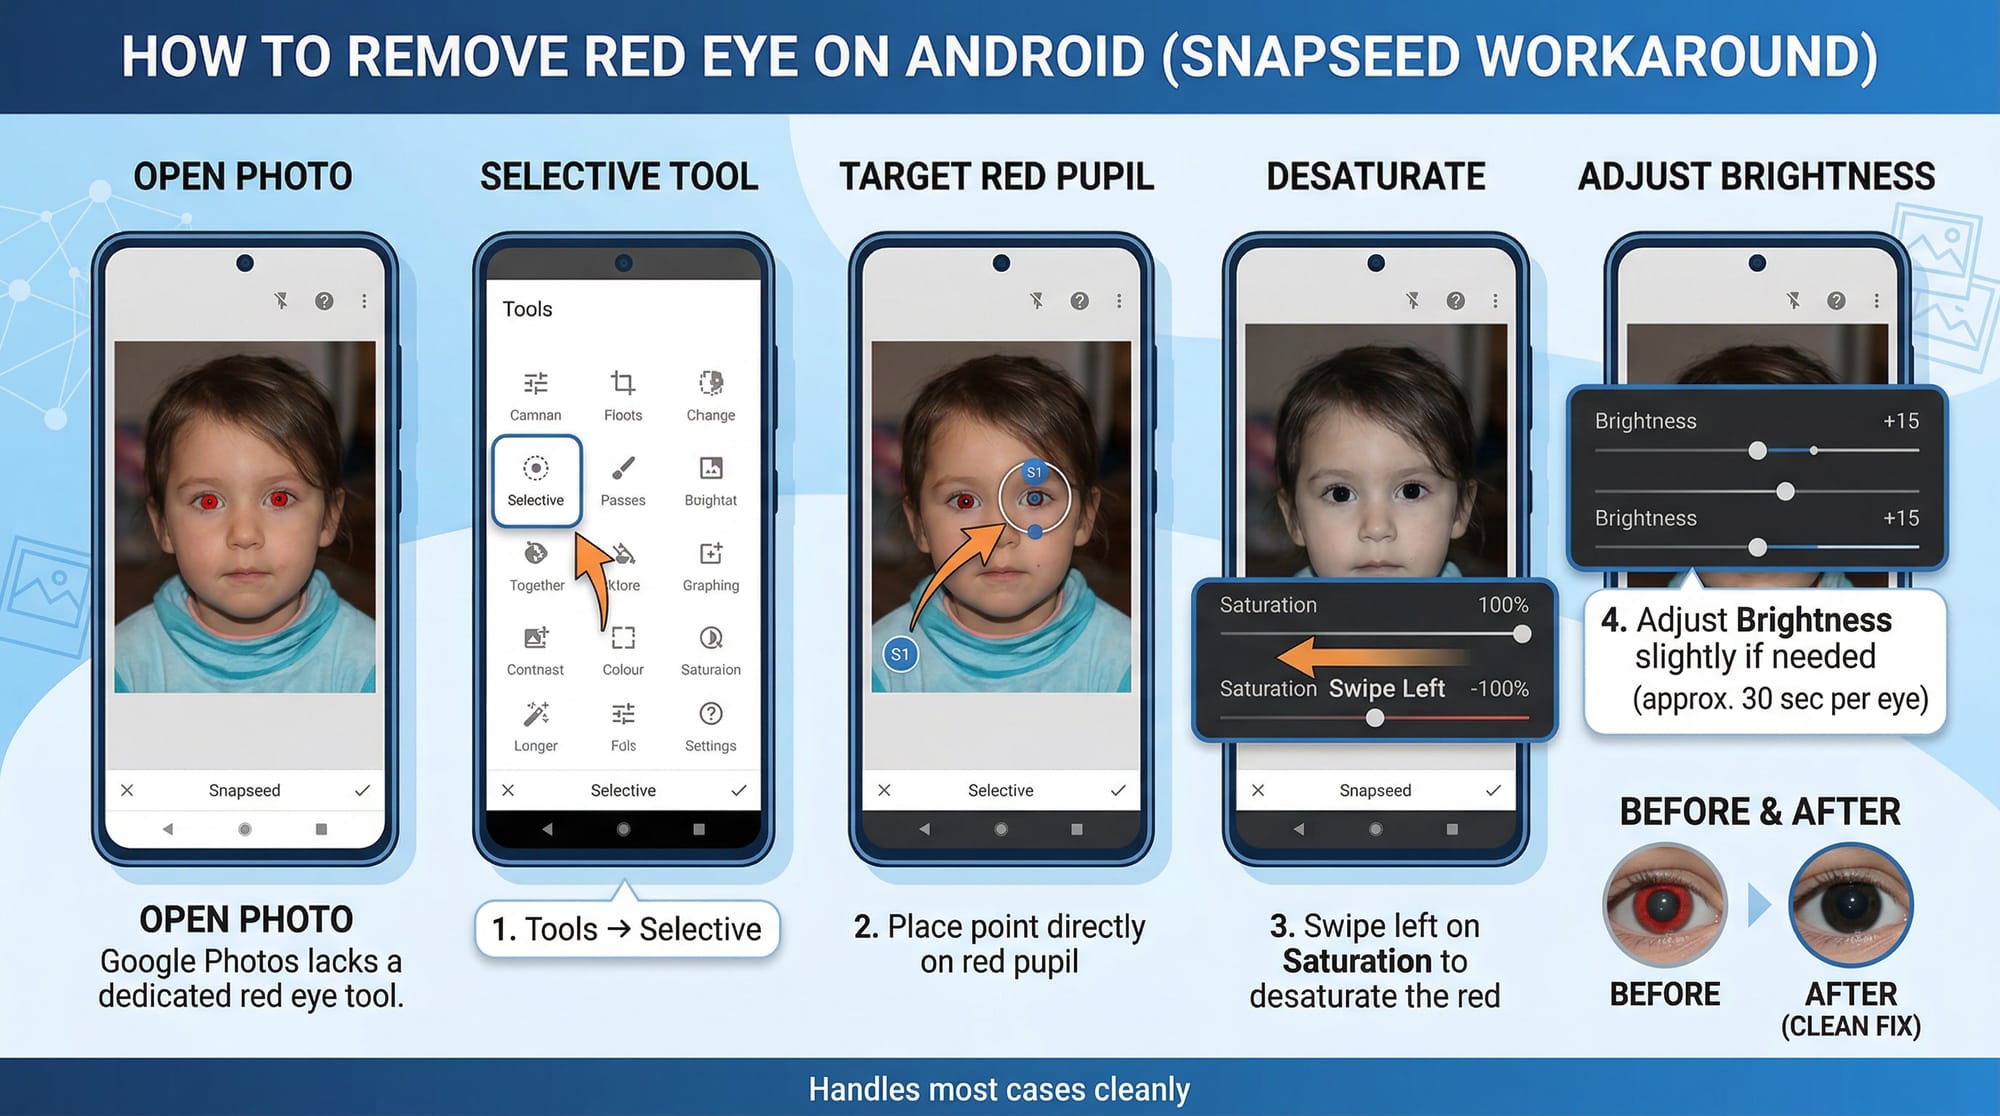
Google Photos doesn't have a dedicated red eye tool. The fastest workaround on Android: use Snapseed (free, Google). Open the photo → Tools → Selective → place a point directly on the red pupil → swipe left on Saturation to desaturate the red → adjust Brightness slightly if needed. About 30 seconds per eye and handles most cases cleanly.
Samsung Gallery's Remaster feature sometimes catches red eye automatically — worth trying first on Samsung devices before opening a separate app.
For a browser-based fix on any device: Fotor's free red eye remover handles it online without installing anything — upload, click each eye, download. No account required for basic use.
How to fix pet eye (green or yellow flash reflection)
Most people try the standard red eye tool on a dog or cat photo, nothing happens, and assume it's broken. It's not broken — automated red eye tools scan for red pixels. A dog or cat's flash reflection is green or yellow because of a reflective layer behind the retina called the tapetum lucidum, which bounces light back through the retina a second time to improve night vision. Most mammals have it. The standard tools simply aren't designed for it.
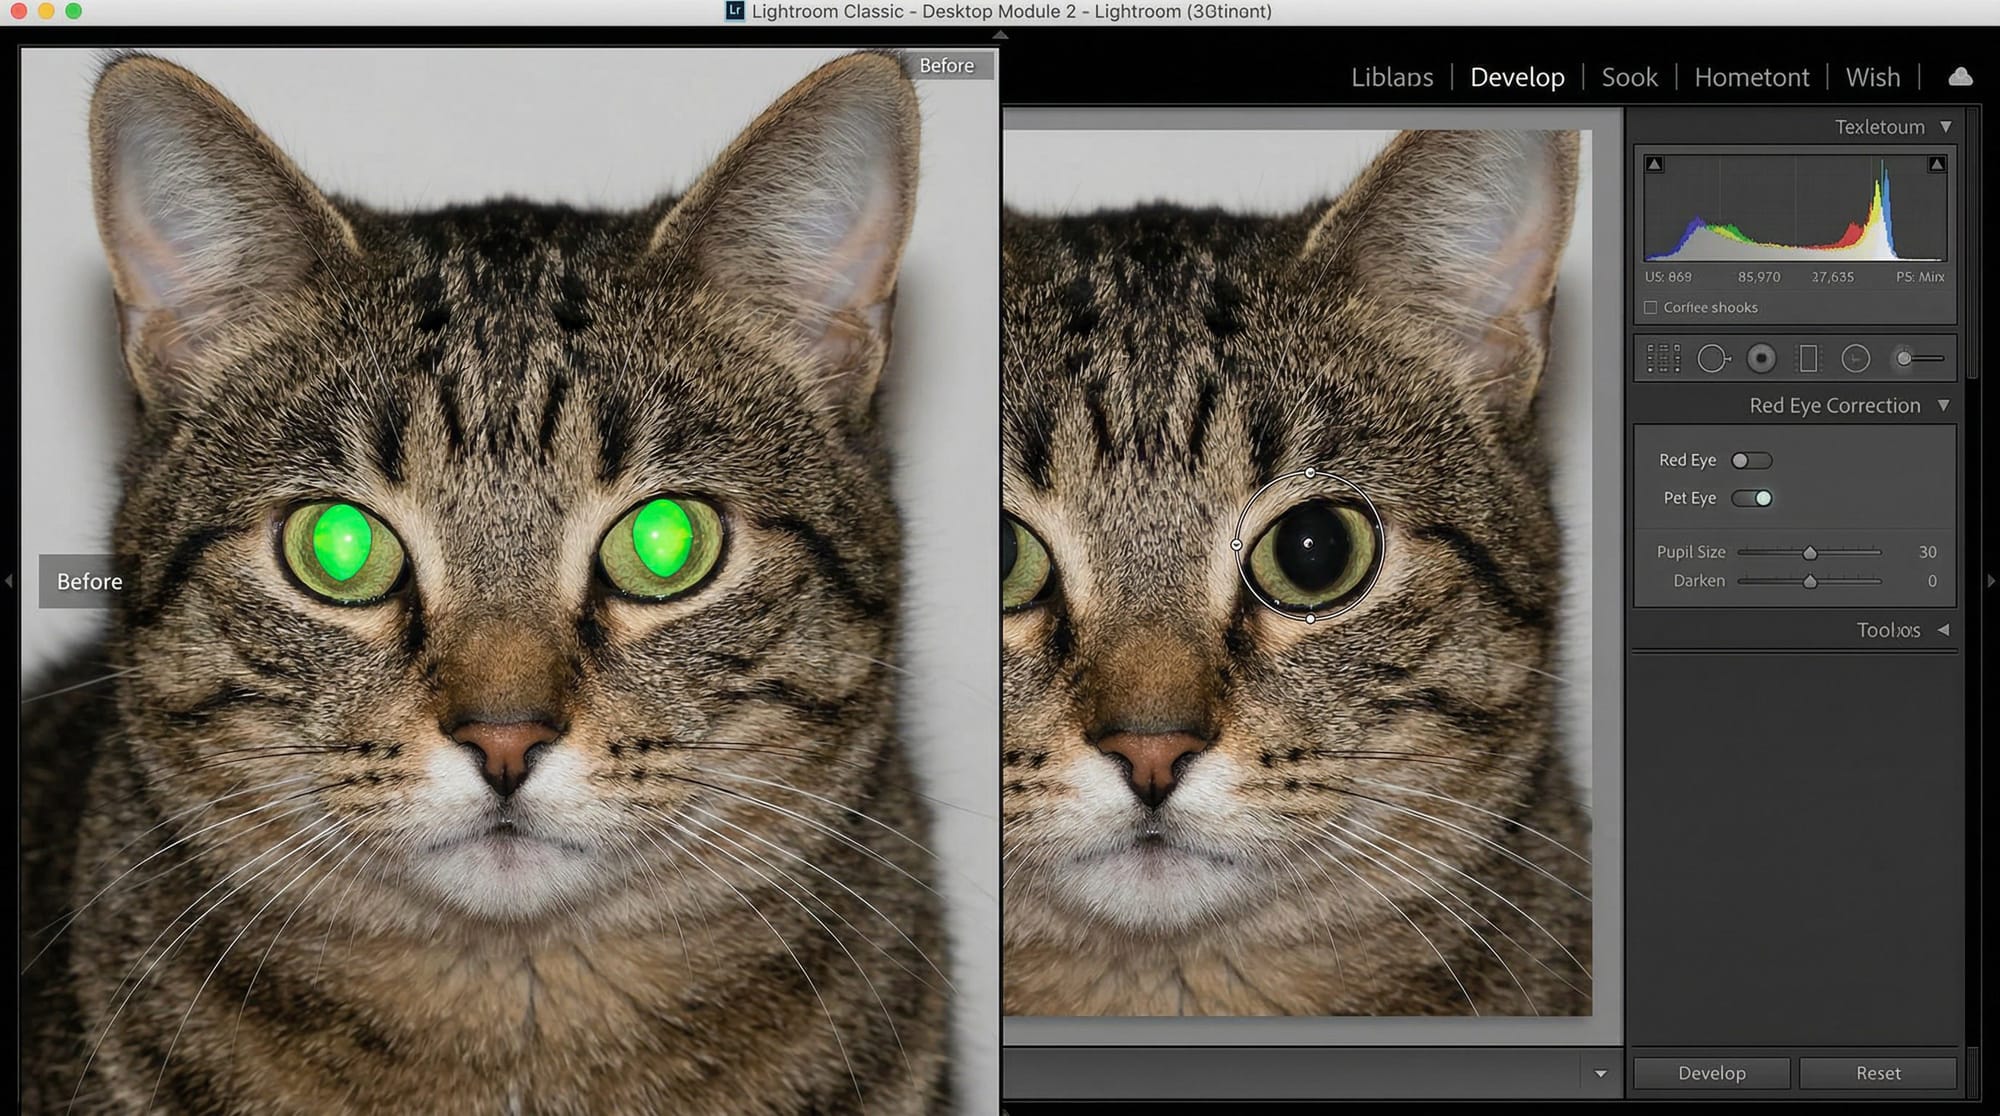
In Lightroom Classic: the Red Eye Correction tool has a Pet Eye option alongside Red Eye. Select it, draw the circle over the pet's eye, adjust the Pupil Size and Darken sliders. The Pet Eye mode detects green and yellow pixels instead of red. Works well on dogs and cats with a clearly defined pupil shape.
In Photoshop: Photoshop's Red Eye Tool doesn't have a Pet Eye mode. The manual approach: zoom to 200%, use the Lasso Tool to select just the bright green or yellow area of the pupil, then add a Hue/Saturation adjustment layer clipped to the selection. In the Hue/Saturation panel, target the Yellows and Greens channels, pull Saturation to -100 and reduce Lightness slightly. The green disappears and leaves a natural-looking dark pupil. Takes about two minutes and looks clean even on large prints.
The Photoshop method also works on photos where the pet is looking away from the camera at an angle, which defeats the circle-based Pet Eye tool in Lightroom.
Free online tools for red eye removal
If you don't have Photoshop or Lightroom and want a fast fix, three options are worth knowing.
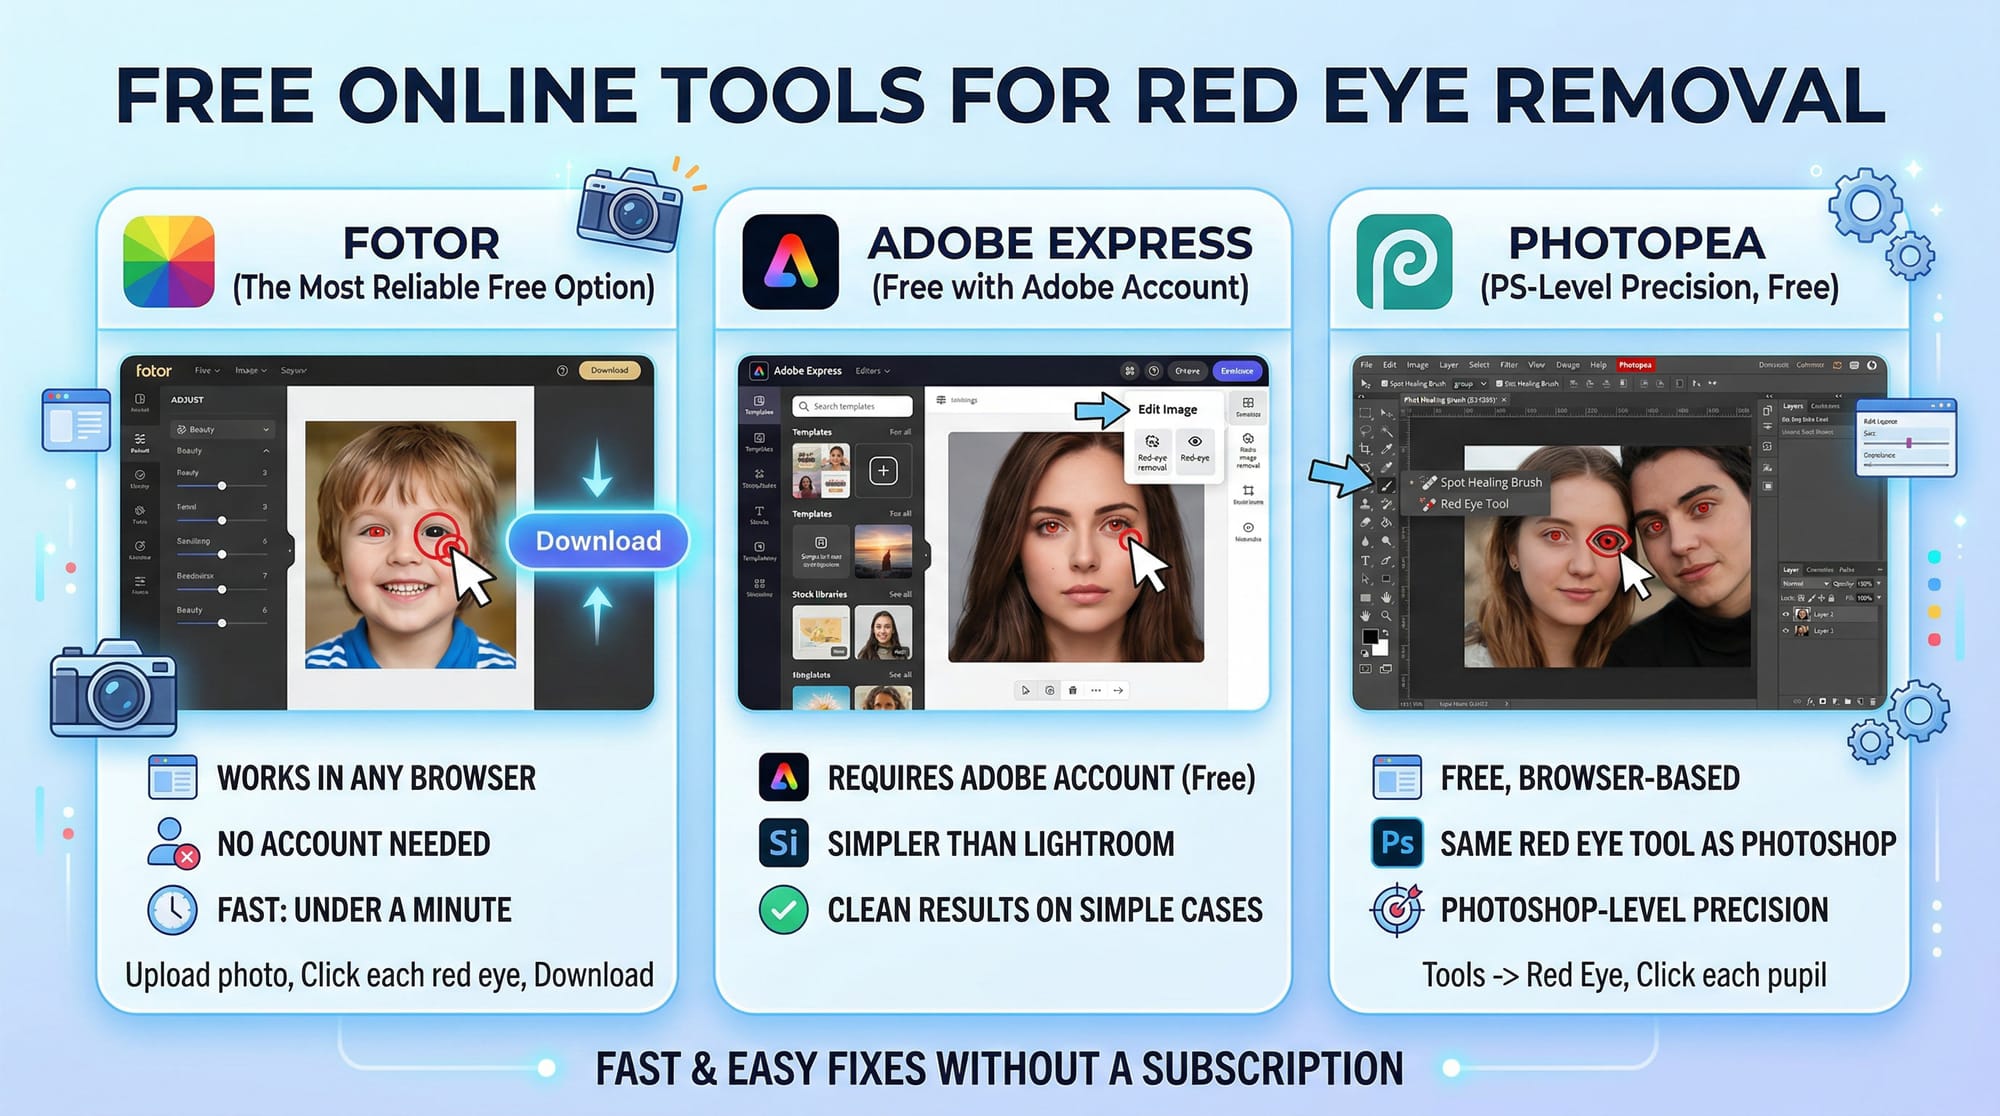
Fotor is the most reliable free option. Upload the photo, click each red eye, download. No account needed, works in any browser, handles most cases in under a minute.
Adobe Express (free with Adobe account) includes red eye removal under photo editing. Simpler interface than Lightroom and produces clean results on straightforward cases.
Photopea (free, browser-based) has the same Red Eye Tool as Photoshop. Go to Tools → Red Eye, click each pupil. Useful when you need Photoshop-level precision without the subscription.
When automatic tools fail
Two situations where one click isn't enough.
Severely compressed old JPEGs or scanned photos. Flash red in old or repeatedly-saved JPEGs bleeds beyond the pupil into the iris. Automatic tools correct the centre but leave a reddish halo. Apply the Red Eye Tool first, then zoom to 200% and paint over any halo with a dark grey brush at 20% opacity in two or three strokes. Low opacity blends more naturally than one high-opacity pass.
Subjects not looking directly at camera. When someone is looking slightly to the side, the red is off-centre in the pupil. In Lightroom, reposition the correction circle manually after placing it. In Photoshop, click at the actual centre of the red area rather than the apparent centre of the eye.
Frequently asked questions
Where is the Red Eye Tool in Photoshop?
It's nested under the Spot Healing Brush in the left toolbar. Click and hold the Spot Healing Brush icon to reveal the flyout menu, then select Red Eye Tool at the bottom. Set Pupil Size and Darken Amount in the options bar — 50% for both works for most photos. Zoom to at least 100% before clicking, then click directly on the centre of the red pupil.
Why doesn't the red eye tool work on my pet's eyes?
Your pet's flash reflection is green or yellow, not red. Automated red eye tools detect red pixels only. In Lightroom Classic, switch from Red Eye to Pet Eye mode — it targets green and yellow instead. In Photoshop, use the Lasso Tool to select the bright area, then desaturate it with a Hue/Saturation adjustment layer targeting the Yellows and Greens channels.
Why can't I find the red eye icon on my iPhone?
The red eye icon only appears in the Photos app when the app automatically detects red eyes in the photo. If there's no icon, the app didn't find red eye. Try tapping Edit and looking at the top left corner of the screen — if the icon is missing entirely, the app didn't detect any. You can still tap manually on each red pupil after activating the tool if the auto-detection missed it.
Does Google Photos have a red eye removal tool?
No. Google Photos does not include a red eye removal feature. For Android users, Snapseed (free, Google) is the fastest workaround — use the Selective tool, place a point on the red pupil, and drag Saturation left to desaturate the red. Fotor's free browser tool also works without installing anything.
Can I remove red eye on iPhone without an app?
Yes. Open the photo in the built-in Photos app, tap Edit, then tap the eye icon with a line through it in the top left corner. Tap each red eye individually. Works for photos where the app detects red eye — if the icon doesn't appear, the app didn't detect it automatically, but you can still tap the pupils after activating the tool. Works on people only, not pets.
How do I remove red eye from old scanned photos?
Use Photoshop's Red Eye Tool first, then zoom to 200% and check for a reddish halo at the edge of the pupil — common on old scans where compression has spread the red into the iris. If you see it, sample a dark grey from the corrected area, switch to the Brush Tool at 20% opacity, and paint over the halo in two or three strokes. Low opacity blends more naturally than one pass at high opacity.
What causes red eye in photos?
Flash light enters the eye, reflects off blood vessels in the retina at the back of the eye, and bounces back to the camera lens. It's worst in low light when pupils are wide open, and when the flash is physically close to the lens — which is why compact cameras and phones are worse for red eye than external flash units positioned away from the lens. People with lighter eyes (blue, green) get red eye more readily because there's less pigment to absorb the light before it reaches the retina.