How to Fix Grainy Photos (Reduce Noise)

Shot a low-light indoor event at ISO 3200 last winter — venue was dark, flash wasn't an option, and I needed a fast enough shutter to stop motion. Every frame had grain. Not unusable grain, but the kind that reads as texture-less mush at 100% zoom, especially in the shadows. I processed 180 photos that night, and fixing grainy photos quickly became a priority. Here's exactly what I did, and why.
Quick answer: for RAW files in Lightroom, use AI Denoise first (Detail panel → Denoise, set to 40–60). For JPEGs or when you want more control, use the manual sliders: Color noise first (leave at the default 25 or raise to 35–50), then Luminance (start at 20–30, not higher). Always zoom to 100% before judging the result.
First: understand what type of noise you're dealing with
Zoom to 100% before touching anything. Noise looks different depending on its cause, and the fix differs accordingly.
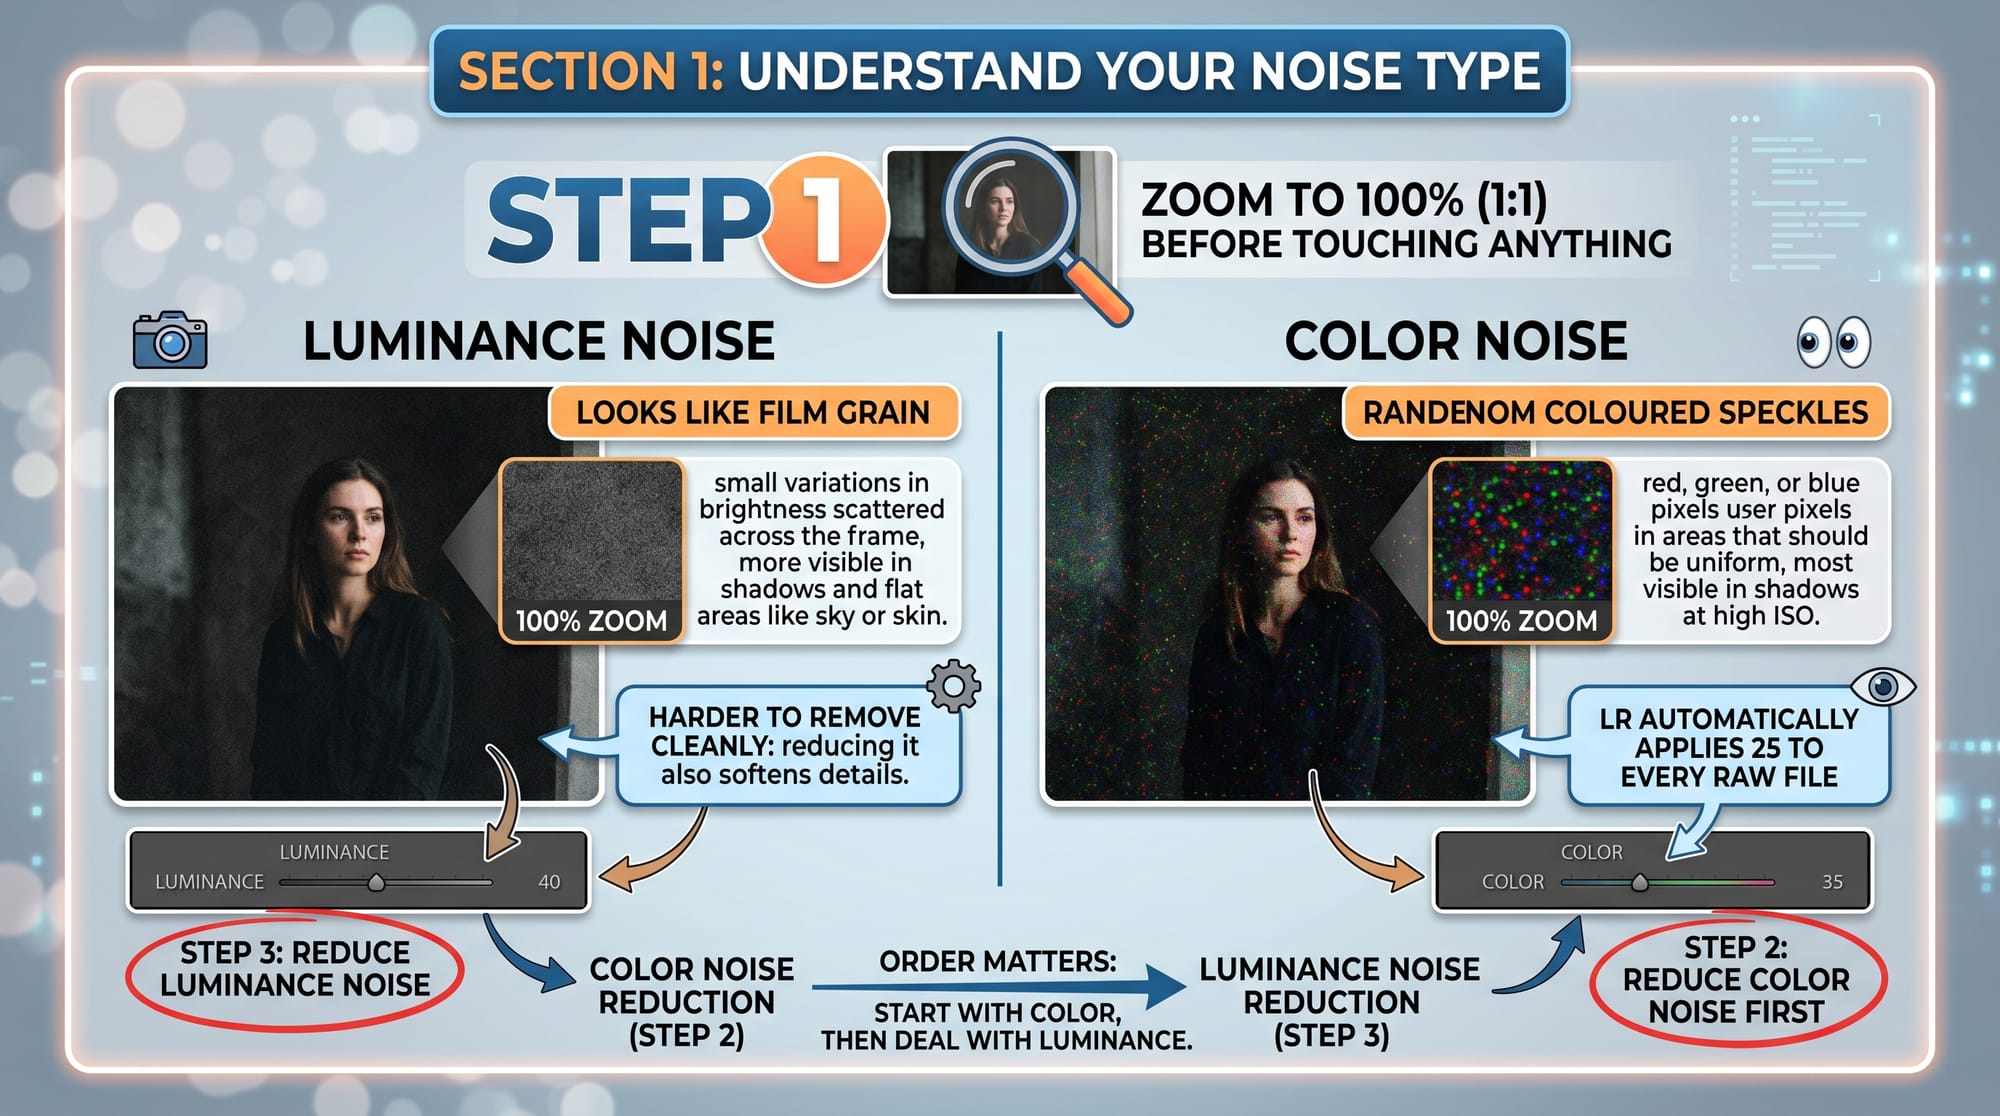
Luminance noise looks like film grain — small variations in brightness scattered across the frame, more visible in the shadows and flat areas like sky or skin. This is what most people mean when they say a photo looks "grainy." It's the harder type to remove cleanly because reducing it also softens detail.
Color noise shows up as random coloured speckles — red, green, or blue pixels in areas that should be a uniform tone. Most visible in shadows at high ISO. Lightroom automatically applies Color noise reduction of 25 to every RAW file on import, which handles most cases before you've even opened the Develop module. If you're still seeing coloured speckles, raise Color to 35–50.
Many noisy photos have both. Start with Color, then deal with Luminance. In that order.
How to fix grainy photos in Lightroom
Lightroom has two approaches: AI Denoise and the manual sliders. They're not interchangeable — they have different strengths and one important limitation.
AI Denoise (RAW files only, Lightroom Classic 12.3+):

In the Develop module of Adobe Lightroom, open the Detail panel. Click Denoise. A preview window shows the result before you commit. The default amount is 50 — a reasonable starting point for most shots. For high-ISO images (ISO 3200 and above), try 60–70. For moderate noise (ISO 800–1600), 30–50 often produces a more natural result.
Click Enhance. Lightroom processes the file — on a recent computer this takes 30 seconds to 2 minutes depending on resolution. From version 14.4 (June 2025), the result saves non-destructively in the catalog without creating a separate DNG file.
AI Denoise preserves texture far better than the manual Luminance slider. It distinguishes between noise and real detail in a way the old manual approach can't. I use it on every high-ISO RAW file now. The limitation: it only works on RAW files. JPEG, TIFF, and PSD files don't get the Denoise button.
Manual sliders (all file types including JPEG):

In the Detail panel, under Noise Reduction:
Color slider: Start here. Lightroom already sets this to 25 on RAW import, so raise it from 25 if you still see coloured speckles. Usually 35–50 clears them. Higher values risk bleeding colours into each other at edges — if you see that, use the Detail sub-slider to protect colour edges.
Luminance slider: This is set to 0 by default for a reason — moving it right blurs the photo to remove grain, and the blurring affects real detail as well as noise. There's no way around this trade-off with manual sliders. Start at 20–30 for moderate noise. ISO 3200 might need 40–50. Above 60, skin and fine textures start looking plastic.
After setting Luminance, adjust the two sub-sliders: Detail (default 50 — raise to 60–70 to recover some sharpness lost to noise reduction) and Contrast (default 0 — add 10–15 to restore contrast the blurring flattens). Small adjustments. These aren't dramatic controls.
Always judge the result at 100% zoom. The Develop module preview at fit view hides what noise reduction is doing to fine detail — zoom in on skin, hair, or background texture to see whether you've gone too far.
How to fix grainy photos in Photoshop
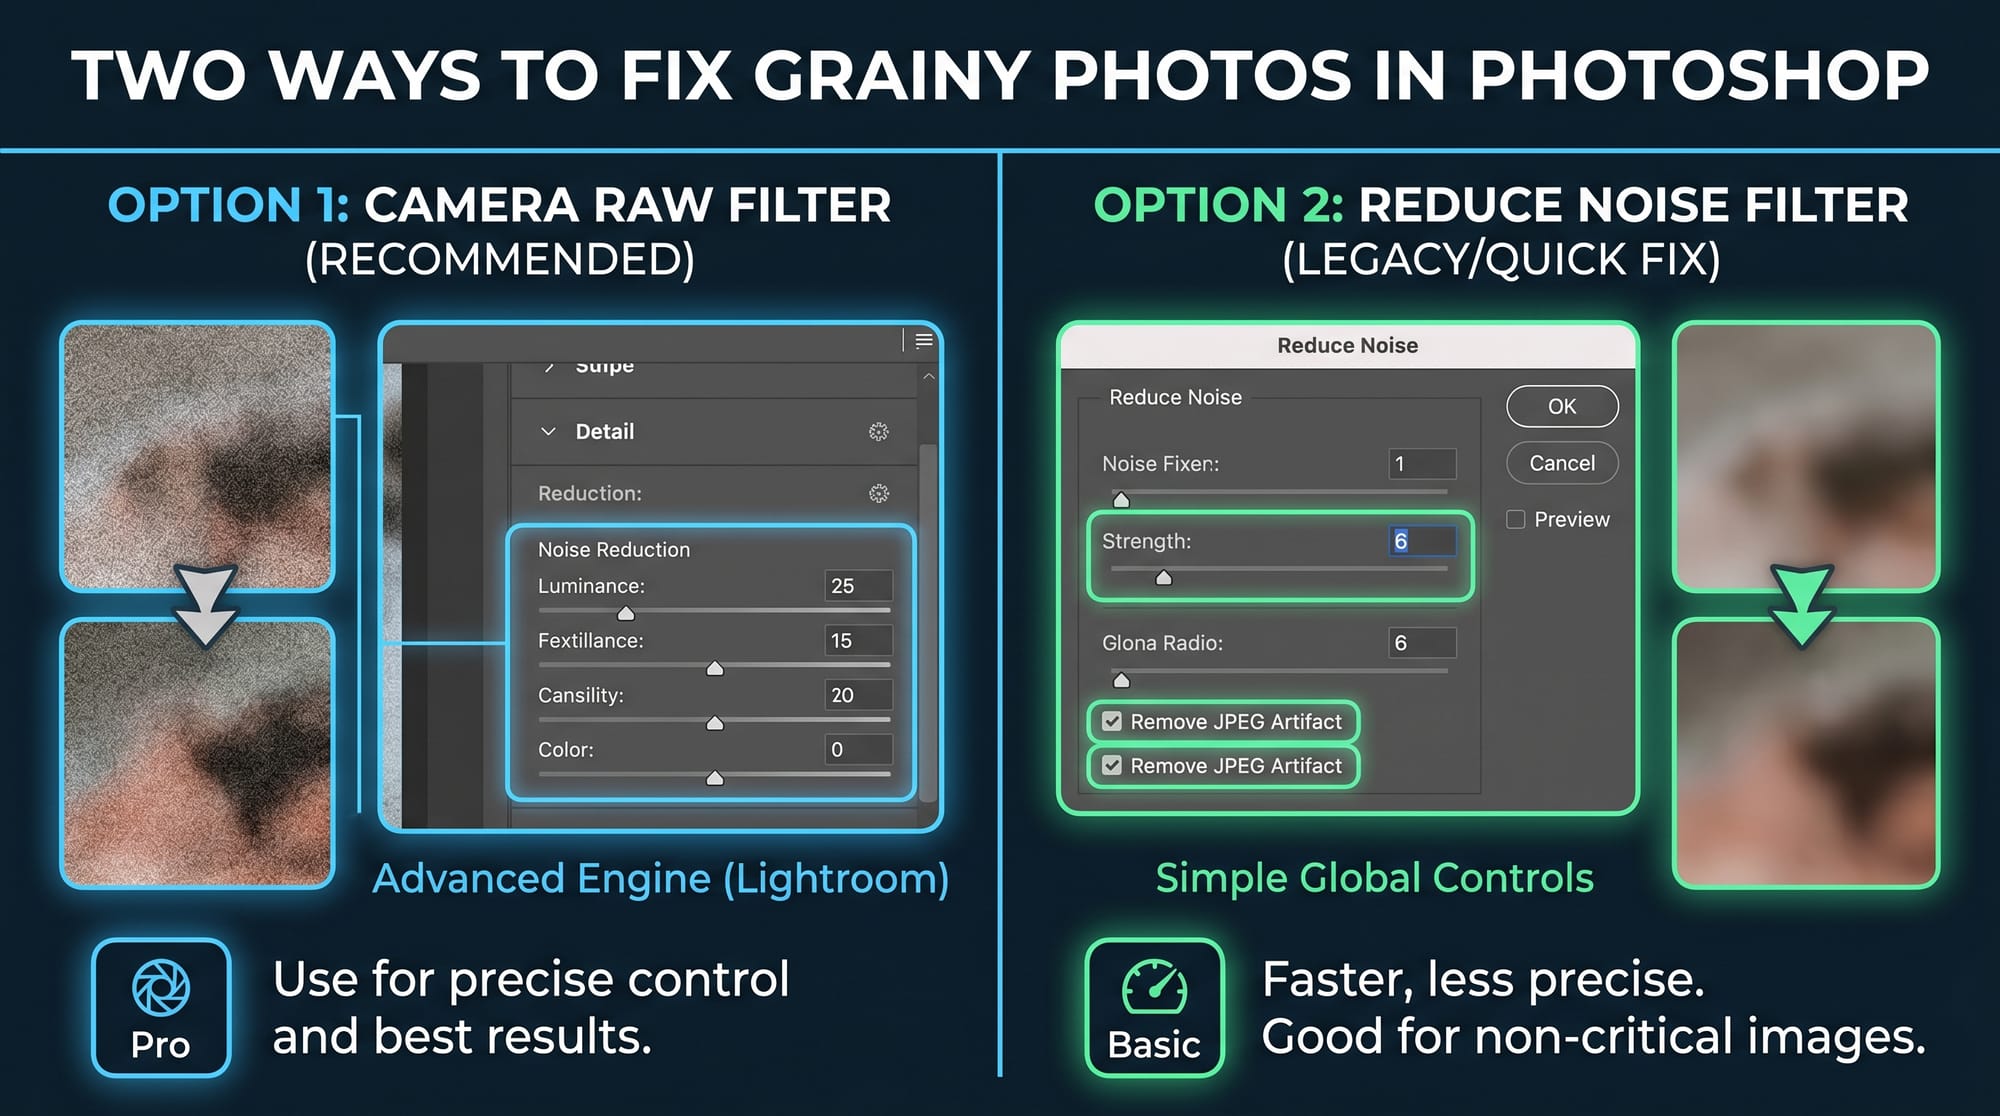
Photoshop gives two routes. The Camera Raw Filter is more capable than the Reduce Noise filter and uses the same engine as Lightroom — use that one.
Camera Raw Filter (recommended):
- Convert your layer to a Smart Object first: right-click the layer → Convert to Smart Object. This makes the filter non-destructive.
- Go to Filter → Camera Raw Filter.
- Open the Detail tab (the magnifying glass icon).
- Under Noise Reduction, raise Color to 35–50 to clear coloured speckles.
- Raise Luminance to 20–40 depending on severity. Watch the 100% preview as you drag.
- Adjust the Detail sub-slider up to 60–70 to recover sharpness.
- Click OK.
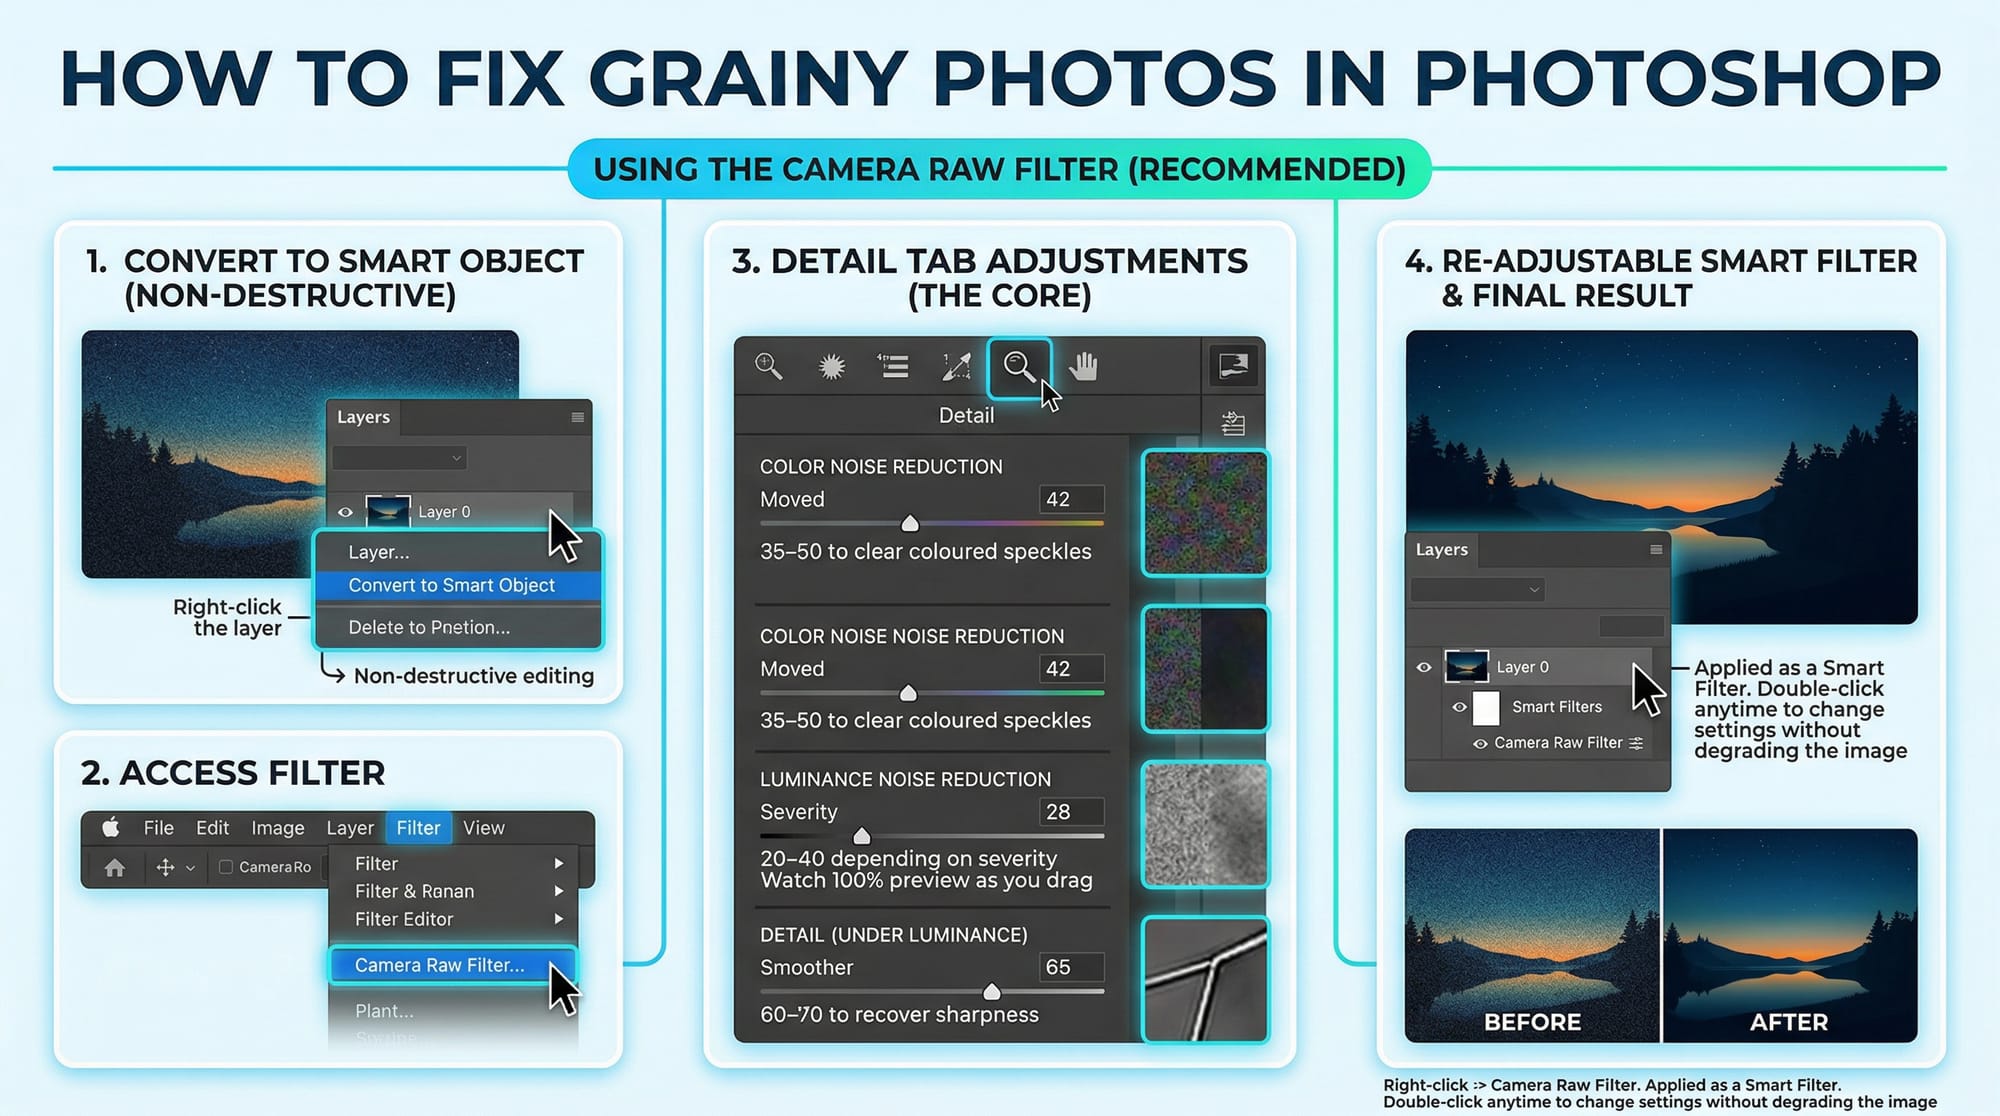
Because it's applied as a Smart Filter, you can double-click it later to adjust settings without degrading the image.
Reduce Noise filter (simpler, less control):
Filter → Noise → Reduce Noise. The Strength slider does global noise reduction. Start at 6–7 rather than the maximum. Check "Remove JPEG Artifact" if working with a compressed JPEG. This filter is faster but less precise — useful for quick fixes on non-critical images.
For portraits where you want noise reduction in the background but preserved skin detail: apply Camera Raw Filter globally first, add a layer mask, and paint black over the face and hair areas to restore the original sharpness there. Ten extra minutes but it makes a visible difference on close-up portraits. If the photo is also soft or blurry alongside the grain, deal with sharpening after noise reduction — the guide on fixing blurry photos covers which Lightroom and Topaz models to reach for.
How to fix grainy photos with Topaz Photo
For photos where Lightroom's Denoise isn't enough — severely noisy files, small sensor shots, or anything where you want the best result rather than the fastest — Topaz Photo's AI noise reduction consistently preserves fine detail better than either Lightroom's AI Denoise or Photoshop's Camera Raw filter on difficult files.
Open your image in Topaz Photo. Let Autopilot run first — it selects the model and strength automatically based on the image content. On most noisy shots it gets it right.
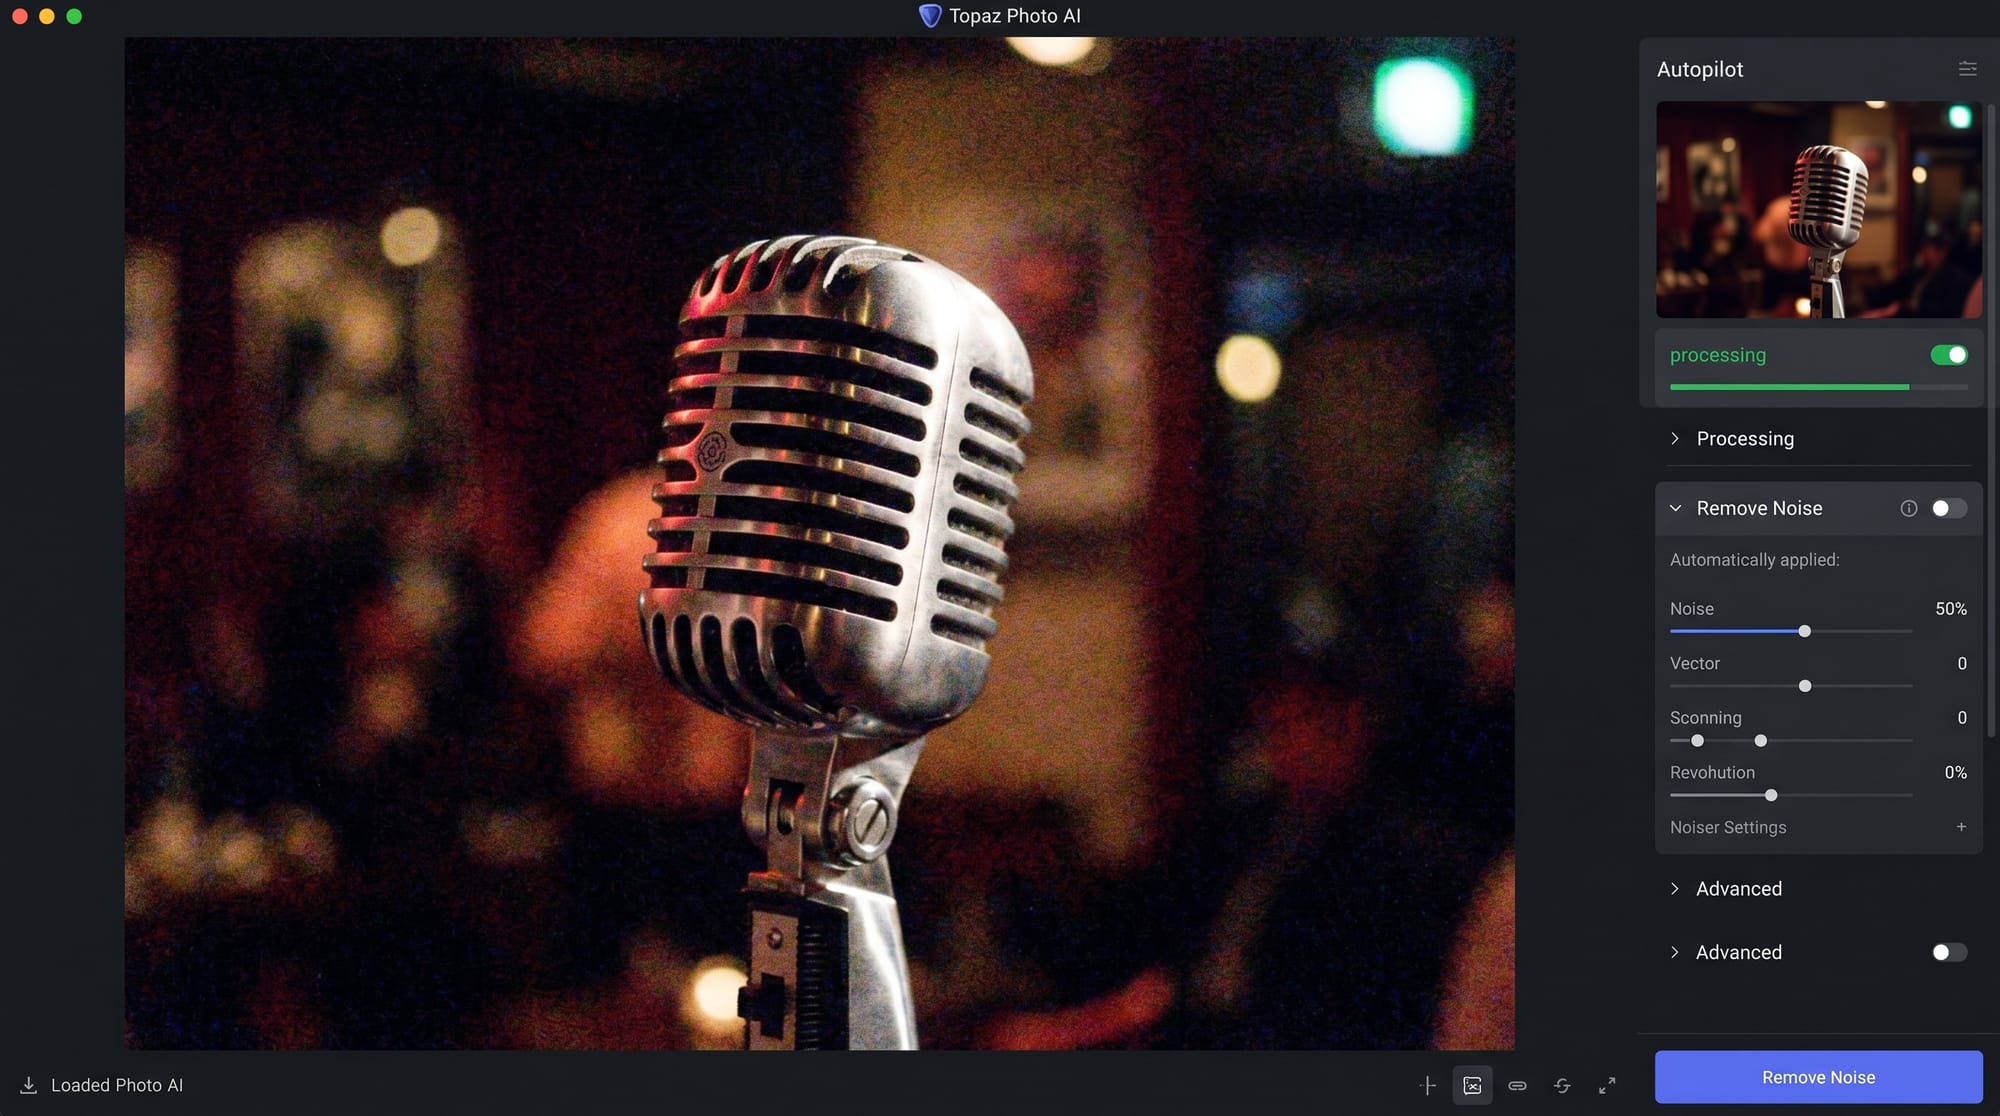
If you want manual control: in the Denoise section, Autopilot sets the Strength slider automatically (shown with a green dot). Override it manually if the result looks over- or under-processed. Reduce Strength if skin looks painted or hair loses strand definition. Processed sky behind a face at ISO 3200 should look smooth — but eyelashes should still have individual definition, not a painted look.
Topaz Photo is subscription-only from $17/month (Personal plan). There's a free trial at topazlabs.com that lets you test it on your own files before subscribing.
How to fix grainy photos on iPhone
The built-in Photos app doesn't have a dedicated noise reduction tool. The practical workaround for mild grain: open the photo in Photos → Edit → reduce Brilliance slightly (this lowers shadow contrast where noise is most visible) → add a small amount of Definition, which increases mid-tone contrast and can partially mask grain. These are adjustments, not fixes — they make the photo look better without removing noise.
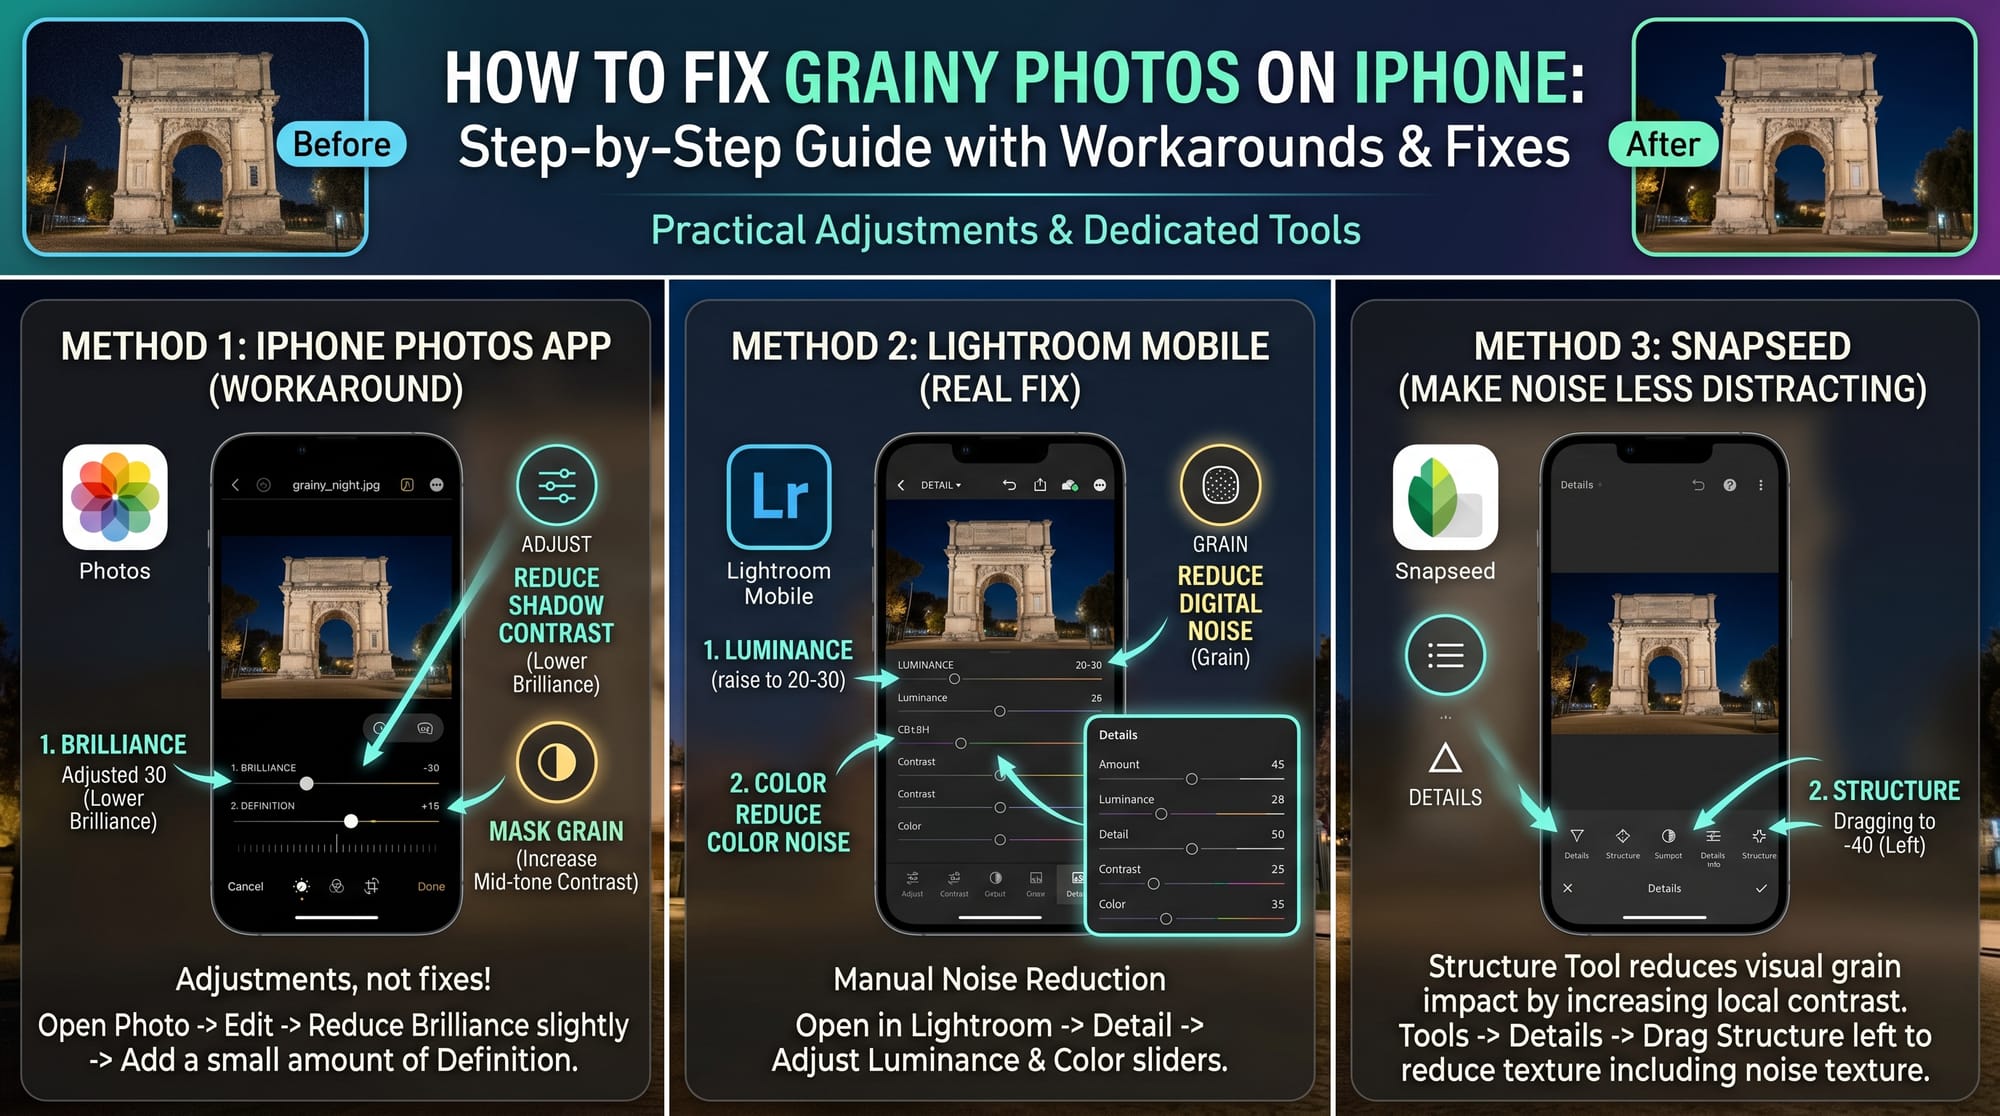
For a real fix on mobile: Lightroom Mobile (free) has the same manual Luminance and Color sliders as desktop Lightroom in the Detail panel. It doesn't have AI Denoise, but the manual sliders handle moderate noise well. Open the photo in Lightroom Mobile → Detail → raise Color to 35, raise Luminance to 20–30.
Snapseed (free, Google) has a Structure tool that can reduce the visual impact of grain by increasing local contrast — it doesn't remove noise but makes it less distracting. Tools → Details → drag Structure left to reduce harsh texture including noise texture.
When noise can't be fully removed
Extreme high-ISO noise — ISO 12800 and above on a small sensor, or ISO 6400+ on a phone — contains so little real image data that aggressive noise reduction produces plastic-looking results. You remove the noise but lose the image along with it. At that point the question isn't how to fix the photo, it's whether the shot is usable at all.
The other case: noise introduced by heavy shadow recovery. If you shot at a low ISO but underexposed badly and then brightened the shadows significantly in post, the resulting noise is harder to clean than native high-ISO noise — the shadow data is thin and noise reduction makes it thinner. Running AI Denoise before shadow recovery rather than after gives better results on badly recovered files. For the right order of operations when fixing underexposed shots, see the guide on how to fix a dark or underexposed photo.
Frequently asked questions
Why are my photos grainy?
Almost always high ISO. When there isn't enough light, cameras raise ISO sensitivity to compensate — but higher ISO amplifies the camera's electronic signal along with the light signal, and that amplification produces noise. ISO 800 is fine on most modern cameras. ISO 3200+ will show visible grain, especially in shadow areas. Small sensors (phones, compact cameras) produce more noise at the same ISO than large sensors because each pixel captures less light. Shooting RAW instead of JPEG helps because RAW preserves more shadow data, giving you more to work with when reducing noise in post.
What's the difference between AI Denoise and the manual Luminance slider in Lightroom?
AI Denoise (Lightroom Classic 12.3+) uses machine learning to separate noise from genuine image detail — it removes grain while preserving texture. The Luminance slider blurs the whole image to reduce noise, which removes grain but also softens real detail. For most images, AI Denoise produces a better result. The limitation: Denoise only works on RAW files. The Luminance slider works on everything including JPEG and TIFF.
Why is my photo still grainy after noise reduction in Lightroom?
Three common reasons: you're working with a JPEG rather than RAW (less noise data to work with); you applied noise reduction but haven't zoomed to 100% to check it (fit-view preview looks cleaner than it is); or the noise is severe enough that the manual sliders alone can't handle it. For JPEG files, try the Photoshop Camera Raw Filter. For RAW files with heavy noise, Topaz Photo's noise reduction generally outperforms Lightroom on difficult files.
How much should I raise the Luminance slider in Lightroom?
Start at 20–30 for moderate noise (ISO 800–1600). Move to 40–50 for heavy noise (ISO 3200–6400). Above 60 usually produces a plastic, smeared look on skin and fine textures. After raising Luminance, bring the Detail sub-slider up to 60–70 to recover some sharpness. Judge everything at 100% zoom — fit-view preview makes noise reduction look better than it is.
Does noise reduction work on JPEG photos?
Yes, but with less room than RAW. Lightroom's AI Denoise doesn't support JPEGs — use the manual Luminance and Color sliders instead, or the Photoshop Camera Raw Filter. For better results, shoot in RAW when you know noise will be a problem — it gives you roughly 1–2 extra stops of clean shadow recovery compared to JPEG.
Why does noise reduction make my photo look plastic?
Strength is too high. Reduce the Luminance slider, or in Topaz reduce the Strength setting. A photo with a small amount of visible grain almost always looks more natural than one that's been over-denoised. The goal is to reduce noise to where it's not distracting, not to eliminate it entirely.